
Truck Car Seat Installation Guide: Steps for a Secure Fit
This post contains affiliate links. As an Amazon Associate, we earn from qualifying purchases.
Install a car seat in a truck by choosing between the LATCH system or the vehicle’s seat belt, never both. For LATCH, find the lower anchor bars between the seat cushions, clip the connectors, and tighten the strap. For seat belt installs, thread the belt through the correct belt path, lock the retractor or use a locking clip, and cinch it tight. The seat must not move more than 1 inch side-to-side or front-to-back.
That 1-inch rule is the only thing that matters once you’ve picked your method. Everything else, the manual, the labels, the YouTube tutorials, is just getting you to that point. A seat that passes the wiggle test is safe. One that doesn’t is not.
What follows: how to find the anchors in a truck cab (they’re not always behind the seat), when LATCH stops being an option and you must switch to the belt, and the single biggest mistake that leaves a seat loose even when you think it’s tight.
Key Takeaways
- Never use LATCH and a seat belt together. Pick one securement method.
- LATCH has weight limits. The Chicco Fit360, for example, caps LATCH at 30 lbs rear-facing and 35 lbs forward-facing.
- In trucks, vans, and SUVs, tether anchors can be on the seat back, floor, or ceiling, never assume they’re on the rear shelf.
- A properly installed car seat should not move more than 1 inch (2.5 cm) in any direction at the belt path.
- If your truck’s seat belt doesn’t lock when pulled all the way out, you need a locking clip.
LATCH vs. Seat Belt: Which to Use in Your Truck
The first choice isn’t about ease. It’s about which system your truck and car seat still allow you to use. The LATCH system. Lower Anchors and Tethers for Children, is standard in vehicles made after 2002. It uses two metal bars hidden in the seat crack. The seat belt is the original method, and it’s always there.
Common mistake: Using both LATCH and the seat belt at the same time. The NHTSA states you must pick one. Using both puts conflicting forces on the car seat’s structure and can cause it to fail in a crash.
LATCH is simpler for most first-time installs because it eliminates seat belt locking mechanics. But it has a hard ceiling. Every car seat has a LATCH weight limit printed on a sticker on its side. If you can’t find the sticker, the NHTSA provides a formula: subtract the weight of the car seat itself from 65 pounds. That’s the maximum child weight for LATCH. Once your child exceeds that, you must switch to a seat belt install.
The seat belt method is universal and has no weight limit tied to the child. Its limit is the belt’s own strength. The challenge is ensuring the belt stays locked. Many modern trucks have seat belts with a Switchable Automatic Locking Retractor (ALR). You pull the belt all the way out until it clicks, then it retracts and stays locked. If your belt doesn’t do that, you’ll need a locking clip, a small, heavy-duty metal H-shaped piece that comes with your car seat.
Finding Your Truck’s Anchor Points
You can’t install what you can’t find. In a sedan, lower anchors are between the seat back and cushion. Tether anchors are on the rear shelf. A truck cab scrambles that layout.
Lower anchors look like two small, horizontal metal bars. Run your fingers along the seat crack where the back meets the bottom cushion. You might feel plastic covers over them. They’re spaced about 11 inches apart. Every forward-facing or convertible car seat has two LATCH connectors on a strap to clip onto these.
Tether anchors are different. The NHTSA notes that in larger vehicles like vans, pickup trucks, and SUVs, these anchors may be on the back of a vehicle seat, on the floor, the ceiling, or other locations. I’ve seen them bolted to the truck bed wall behind the rear seat, or on the back of the cab itself. They look like a small metal loop or a plastic-covered hook. Your truck’s manual has a diagram. Find it before you start.
Where this goes sideways: Confusing a tether anchor for a luggage tie-down. Tie-downs are for cargo, not car seats. They aren’t rated for crash forces. If you’re unsure, check the NHTSA car seat safety guidelines for your specific vehicle make and model.
| Anchor Type | What It Looks Like | Where to Find It in a Truck |
|---|---|---|
| Lower Anchors (LATCH) | Two horizontal metal bars, ~11 inches apart. | Buried in the crack (“seat bight”) between the seat back and bottom cushion. |
| Tether Anchor | A metal loop, D-ring, or hook, often under a plastic cover. | Can be on the back of the rear seat, the truck floor, the ceiling, or the rear cab wall. |
| Seat Belt Path | The slot or opening on the car seat frame. | Marked on the car seat with a red (forward-facing) or blue (rear-facing) label. |
Step-by-Step: Installing with LATCH
This is the method most people try first. It feels straightforward until you hit the weight limit or realize your truck’s anchors are buried under thick seat foam.
- Locate the lower anchors. Push the vehicle seat cushion down and dig your fingers into the crease. Find both bars. Clear any obstructions.
- Attach the connectors. Press the car seat’s LATCH connector hooks onto the metal bars until you hear or feel a solid click. A soft click isn’t enough. Tug on the strap; the connector shouldn’t pop off.
- Tighten the strap. Push down into the car seat with your full body weight, use your knee if you have to, while you pull the tightening strap. You want all the slack out. The seat shouldn’t lift when you pull up on the front edge.
- Attach the tether (if forward-facing). Find your truck’s tether anchor point. Connect the car seat’s tether strap hook, then tighten it. This strap limits forward head movement in a crash.
I won’t recommend a LATCH install for a child over 35 pounds. The connectors and your truck’s anchor bars are only rated to a combined weight of 65 pounds (child + seat). Exceed that, and you’re trusting plastic and thin metal with forces they weren’t designed for. Switch to the seat belt.
Skip the tether on a rear-facing seat. Most rear-facing car seats in the United States do not use a tether for installation. The seat’s recline angle and the crash forces handle the motion. Adding a tether can void the seat’s warranty and change how it performs. Check your specific seat’s manual, if it doesn’t explicitly say to use the tether rear-facing, don’t.
Step-by-Step: Installing with a Seat Belt
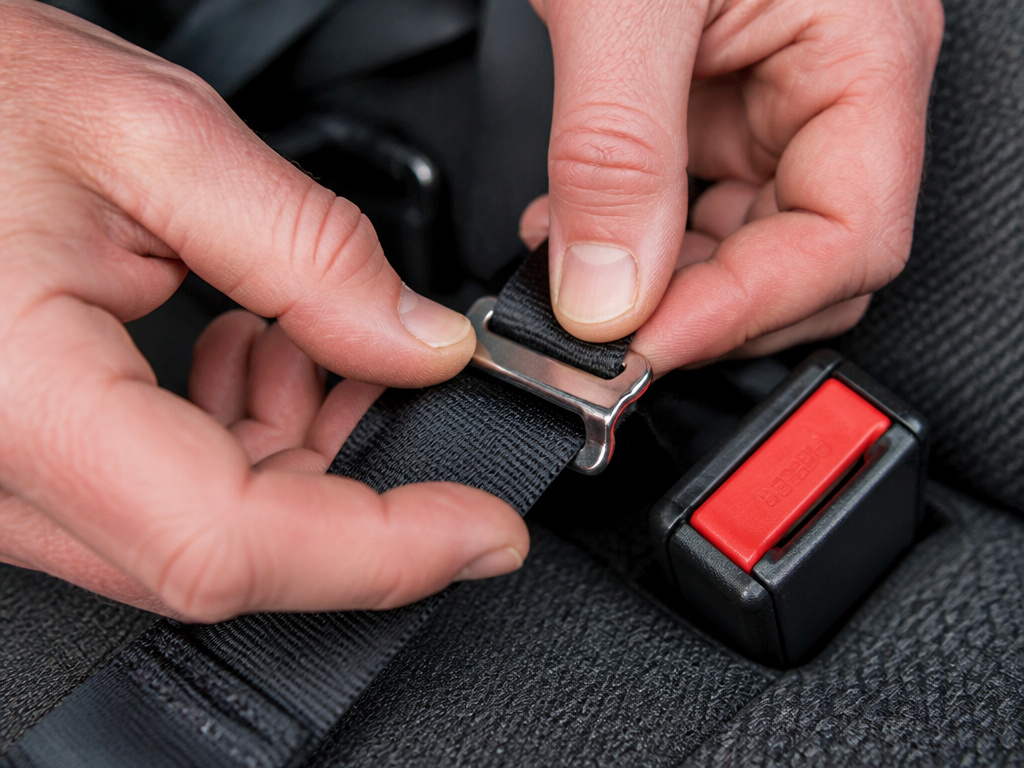 When LATCH isn’t an option, your child is too heavy, your truck is too old, or you’re using the center seat, the seat belt is your only path. This is where more installs fail.
- Thread the belt through the correct path. Every convertible seat has two belt paths: one for rear-facing (usually blue) and one for forward-facing (usually red). Thread the lap portion of the belt through this path. Don’t twist the belt.
- Lock the seat belt. Buckle it. Now, determine your belt type. If it’s an ALR belt (common in passenger seats of trucks like the RAM 3500), pull the shoulder strap all the way out until it ratchets, then let it retract. It should now be locked. If the belt slides freely even when fully extended, you need a locking clip.
- Apply a locking clip (if needed). Place the clip within an inch of the latch plate on the lap portion of the belt. This pinches the two belt webbing strands together, preventing slip.
- Cinch it tight. Push down hard on the car seat with your knee in the seat’s foot area while pulling up on the seat belt tail. You’re removing every millimeter of slack.
The locking clip is the part people fumble. It goes on the lap belt, right next to the buckle. If you put it on the shoulder belt, the seat will still slide. If you don’t use one when your belt requires it, the seat will be dangerously loose within two minutes of driving.
The 1-Inch Movement Test
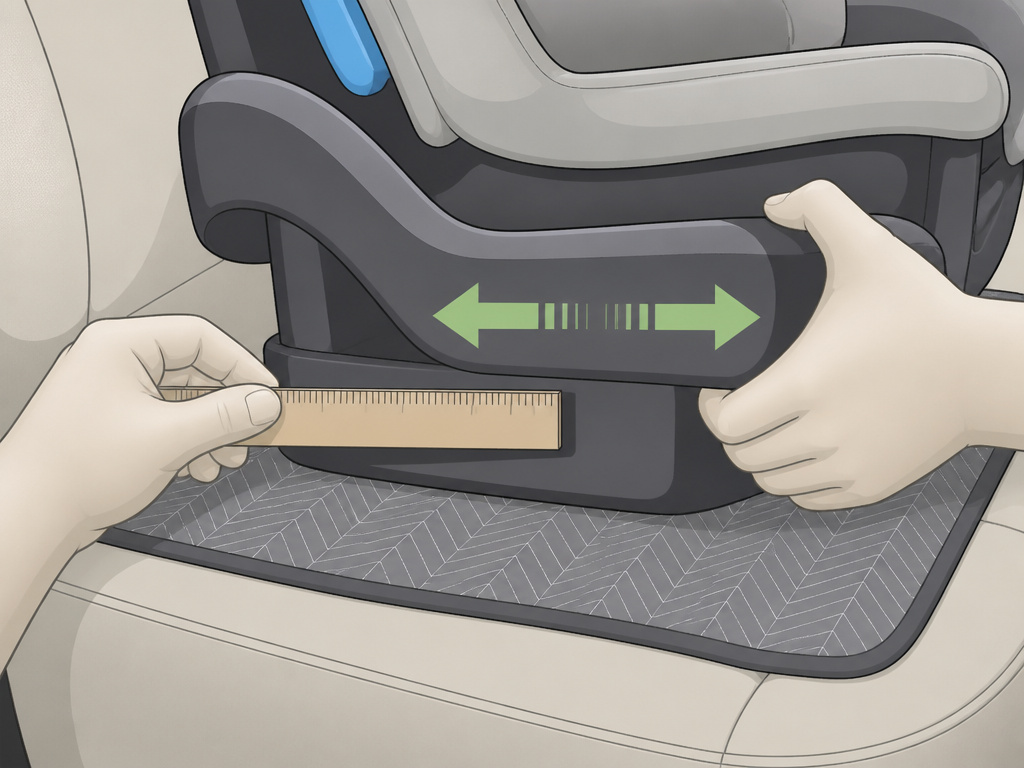 Forget feel. This is the only metric that matters. Once the seat is installed, grab it at the belt path, where the seat belt or LATCH strap passes through the car seat frame. Push and pull side-to-side, then front-to-back.
A properly installed car seat should not move more than 1 inch (2.5 cm) side-to-side or front-to-back at the belt path.
If it moves more, the install is not secure. Re-tighten. Push down harder. Check for twists in the belt or LATCH strap. Re-thread the belt if you have to. The test is performed at the belt path, not the top of the seat. The top of a rear-facing seat will have some natural flex; that’s fine. The base must be rock solid.
What most people get wrong: Testing at the top of the seat. You’re checking for movement where the forces are transferred to the vehicle, not where the seat shell naturally bends.
When LATCH Isn’t an Option in Your Truck
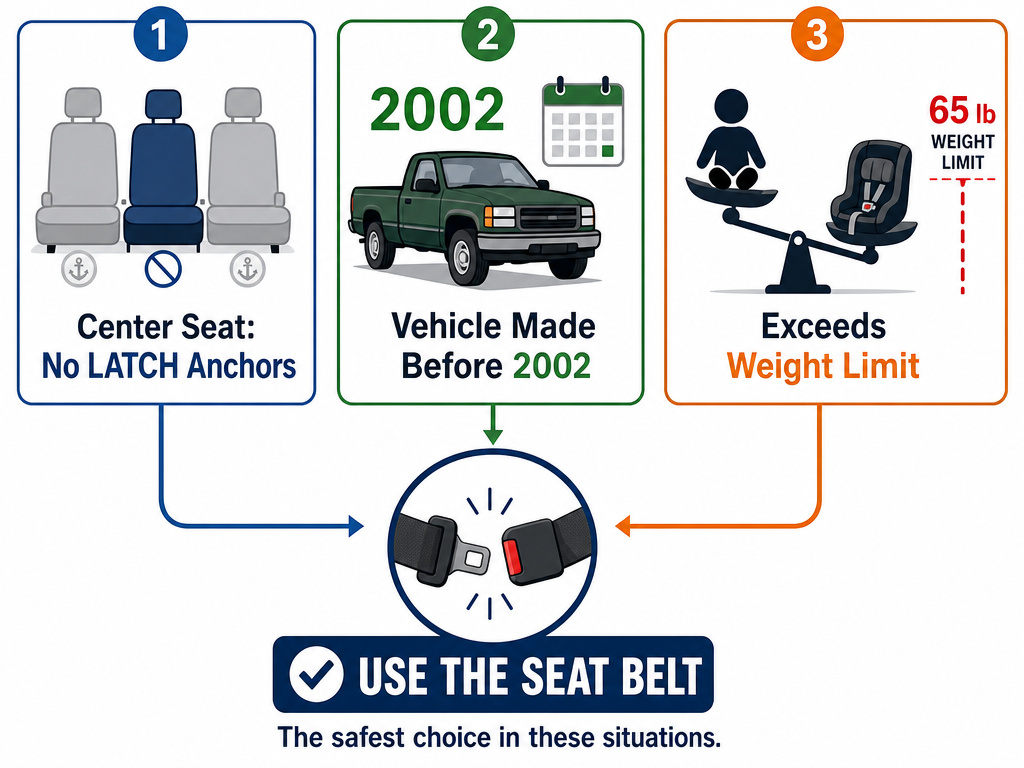 LATCH seems like the default. It’s not. Three common truck scenarios force you to the seat belt.
The center seat. Most trucks only have LATCH anchors for the two outboard seats. If you want the car seat in the center for safety, you must use the seat belt. There’s no workaround.
An older truck. Vehicles manufactured before September 1, 2002, are not required to have lower anchors. If your classic truck doesn’t have them, the belt is your only option.
The weight limit. This is the silent one. You install with LATCH when your child is 10 pounds. You keep using it. One day, your child plus the seat weight crosses the 65-pound total limit, and you’ve been driving with an unapproved setup for months. The Chicco Fit360 manual is explicit: DO NOT use lower anchors rear-facing for a child over 30 lbs, or forward-facing for a child over 35 lbs. Other seats have similar caps. The moment your child hits that number, you reinstall with the seat belt.
| Scenario | Why LATCH Won’t Work | Your Move |
|---|---|---|
| Center Seat Installation | LATCH anchors are only installed for the two outboard seating positions. | Use the seat belt. It’s often the only securement method approved for the center. |
| Child Exceeds LATCH Weight Limit | Combined weight of child + car seat exceeds 65 lbs (or the seat’s stated limit). | Switch to a seat belt install immediately. This is a hard stop. |
| Vehicle Made Before 2002 | Lower anchors were not federally mandated. Your truck may not have them. | Use the seat belt. A locking clip will likely be necessary. |
Forward-Facing vs. Rear-Facing: The Tether Rule
The tether strap is non-negotiable for forward-facing seats. It’s the strap that comes from the top back of the seat. In a crash, it stops the seat, and your child’s head, from pitching forward several inches. That distance is the difference between a restrained child and a serious neck injury.
For rear-facing seats, the rule flips. Most rear-facing seats in the U.S. Do not use a tether. The seat’s own shell and recline angle manage the crash forces. Adding a tether can actually change the seat’s angle of recline or put stress on parts not designed for it. Unless your car seat manual explicitly says to tether it rear-facing, leave the strap stowed.
Finding the tether anchor in a truck is its own hunt. As the NHTSA notes, in trucks and SUVs they can be on the back of the seat, on the floor, or even on the ceiling. Your owner’s manual is the map. Never hook a tether to a cargo tie-down, a trailer hitch, or any part of the frame not explicitly labeled as a tether anchor.
Common Installation Mistakes and How to Fix Them
You can follow every step and still get it wrong. These are the errors I see every week at car seat checks.
Twisted straps. A single twist in a LATCH strap or seat belt reduces its effective strength by up to 40%. Lay the strap flat from anchor to connector.
The recline angle is wrong. A rear-facing seat needs to be reclined enough so a baby’s head doesn’t flop forward. Most seats have a built-in level or angle indicator. Use it. For a newborn, the angle is often 45 degrees. For an older infant, it can be more upright.
The harness is too loose. After you buckle your child in, perform the pinch test at the shoulder. If you can pinch a horizontal fold in the harness strap, it’s too loose. Tighten until you can’t pinch any material.
You used both LATCH and seat belt. This bears repeating because the logic feels sound, more anchors, more secure. It’s wrong. The systems are designed to work independently. Using both can stress the car seat shell in ways it wasn’t tested for. Pick one.
Easy to miss: The locking clip orientation. The rounded side faces the buckle, the flat side faces away. Installing it backwards can cause it to slip under crash forces.
If you’re unsure, get a professional check. Certified Child Passenger Safety Technicians (CPSTs) will inspect your install for free at most fire stations, police stations, or hospitals. They spot the mistakes you didn’t know you were making.
Frequently Asked Questions
Can you install a car seat in the front seat of a truck?
Only if your truck has a passenger airbag that can be permanently turned off. Most don’t. The force of a deploying airbag can kill a child in a rear-facing seat. The back seat is always safer. If your truck is a single cab with no back seat, you must disable the airbag, consult your truck’s manual and a CPST.
Is the middle seat the safest place for a car seat in a truck?
Statistically, yes. It’s the farthest point from any potential side impact. However, many trucks only have lap-only belts in the center, which are not safe for forward-facing car seats that require a shoulder belt for the tether. You also can’t use LATCH there. You must use the seat belt and ensure it locks.
How do you install a car seat in a truck without LATCH?
You use the seat belt. The process is the same as in any vehicle: thread the belt through the correct belt path on the car seat, lock the belt (using the ALR feature or a locking clip), and cinch it tight. The lack of LATCH doesn’t make it less safe; it just requires you to master the seat belt lock.
What if my truck’s seat belt doesn’t lock?
You need a locking clip. It’s a small, H-shaped metal clip that comes with your car seat. You slide it onto the lap portion of the seat belt, within an inch of the buckle. It pinches the two strands of webbing together to prevent slippage. Don’t try to install without it, the seat will shift.
Can you use LATCH and a seat belt together for extra safety?
No. Never use both systems simultaneously. The NHTSA and every car seat manufacturer prohibit it. The systems can interact during a crash, putting unexpected stress on the car seat frame and potentially causing it to fail. Choose one method and install it correctly.
Before You Go
Installing a car seat in a truck comes down to three decisions: LATCH or seat belt, finding your specific anchor points, and passing the 1-inch test. LATCH is easier until your child hits the weight limit printed on the seat. The seat belt is always an option, but you must lock it, either through your truck’s retractor or with a locking clip. The tether is mandatory for forward-facing, a no-go for most rear-facing. And no matter which method you pick, if the seat moves more than an inch at the belt path, it’s not safe. Go back, tighten, and test again. Your child’s safety doesn’t accept “close enough.”
