
Safe DIY Infant Car Seat Canopy | How to Make Step-by-Step
This post contains affiliate links. As an Amazon Associate, we earn from qualifying purchases.
To make an infant car seat canopy, you need to match three things: your car seat’s specific attachment system, a breathable fabric that doesn’t interfere with the harness, and a design that never blocks the baby’s face. The NHTSA’s 2021 Clek Liing recall bulletin shows what happens when a canopy rod isn’t fully seated in the hub, the canopy can detach and become a projectile in a crash.
That gap between a decorative sunshade and a structural part of the car seat is where the whole risk lives. A canopy is not just draped fabric; it’s a component that attaches to the seat’s frame, and its failure modes are documented in manufacturer manuals and federal recall reports.
What follows: the two fabric types that determine safety, the three attachment systems you’ll encounter, and a step-by-step plan that starts with your car seat’s manual, not your sewing machine.
Key Takeaways
- Check the manual first. Your car seat’s user guide contains the only approved method for canopy attachment and removal, deviating from it voids the warranty and can compromise safety.
- Mesh beats quilting for breathability. An ASTM textile study shows polyester mesh loses only 6% tensile strength after 200 washes, while dense quilting fabric can trap heat and increase the risk of overheating.
- Never interfere with the harness. Any DIY canopy must leave a full 1-inch clearance around all harness straps and the buckle; bunching fabric against the straps prevents a proper snug fit.
- Match the attachment type exactly. Systems fall into three categories: bow-and-slot (Graco), mount-and-button (Chicco), or rod-and-sleeve (Clek). Using the wrong method means the canopy won’t stay put.
- Skip the aftermarket “universal” canopy clips. These unauthorized accessories apply pressure to the seat’s plastic shell in ways it wasn’t tested for, which can lead to stress cracks.
Why This Isn’t a Simple Sewing Project
Most craft guides treat a car seat canopy like a stroller shade. They focus on cute fabrics and simple ties. The problem is physics. In a sudden stop or crash, forces multiply. A loosely attached canopy can detach and strike your child. Fabric that bunches under the harness creates slack, and a child can be ejected.
Car seat manufacturers design their canopies as integrated components. The Chicco KeyFit Max manual states that using unapproved accessories voids the warranty. The Graco SnugRide 30 manual specifies exact slots for the canopy bow. These aren’t suggestions. They are the results of crash testing.
Before you start: A DIY canopy must never compromise the seat’s original structure or harness system. You are adding a sunshade, not redesigning a safety device. Any modification that changes how the harness routes, how the buckle sits, or how the seat shell handles force is an automatic failure.
The goal isn’t to stop you from making something. It’s to ensure what you make doesn’t accidentally undo the engineering you paid for.
The Two Fabric Types That Determine Safety
Your fabric choice decides whether your canopy is a safe sunshade or a heat trap. The two paths are not equally safe.
Breathable Mesh or Shade Cloth
This is the default for a reason. Major brands like Chicco and Graco use mesh panels because they block UV rays while allowing air circulation. The science is straightforward: infants regulate temperature poorly. A 2023 ASTM textile-wear study found polyester mesh lost only 6% tensile strength after 200 hot washes, proving it holds up to cleaning without becoming brittle.
Mesh fabric also weighs almost nothing. A heavy canopy can strain the attachment points, especially on smaller infant seats. Look for a UV-protective mesh marketed for outdoor shades; it’s often lighter and more durable than craft-store tulle.
Quilting Cotton or Decorative Fabric
This is where most DIY projects go wrong. Quilting cotton is dense. It blocks airflow completely, creating a micro-climate inside the canopy that can raise the temperature around your baby’s face significantly within minutes. Furthermore, the fabric’s stiffness makes it difficult to secure flush against the seat’s frame, leading to gaps that catch wind when walking.
If you use a decorative fabric for the outer layer, the inner layer facing the baby must be a breathable mesh. The Chicco KeyFit 35 Zip Canopy manual explicitly calls for a mesh panel and warns against using materials that don’t allow airflow.
| Fabric Type | Best For | Risk If Used Incorrectly |
|---|---|---|
| UV Mesh / Shade Cloth | Blocking sun while maximizing airflow | Using a mesh that is too stiff may not fold cleanly. |
| Quilting Cotton (Outer Layer Only) | Aesthetic cover over a mesh liner | Using as a single layer traps heat and can lead to overheating. |
| Waterproof Nylon | Extreme weather protection only | Creates zero breathability; condenses moisture inside. Never use as a single layer. |
The wash test is telling. Machine-wash your fabric sample five times on a warm, delicate cycle. If it pills, shrinks unevenly, or feels abrasive, it will fail after a few months of real use. Canopy fabric needs to survive frequent cleaning without degrading.
How Your Car Seat Attaches Its Canopy (The Three Systems)
You cannot design a canopy without knowing how it will connect. There are three primary attachment systems, and using the wrong one means your canopy will flap loose or stress the seat.
1. The Bow-and-Slot System (Graco)
Graco seats like the SnugRide 30 use a simple plastic bow that inserts into slots on the canopy mounts. The manual states: “Attach canopy by inserting canopy bow into slots in canopy mounts on both sides of infant restraint.” To remove, you press a button on the mount and pull the bow out.
Your DIY canopy must have a sleeve or pocket that securely holds this bow. If the bow can twist or slide within the sleeve, the canopy will sag. The force isn’t on your stitching; it’s on the bow’s connection to the hard plastic mount.
2. The Mount-and-Button System (Chicco)
Chicco’s KeyFit series uses canopy mounts that snap into slots on the carrier. The manual specifies: “Undo both toggle buttons at the top edge of the Canopy” and “press the button on Canopy Mount and pull up to remove.” Your fabric must have reinforced points where these toggles or buttons pass through. The stress concentrates here.
3. The Rod-and-Sleeve System (Clek)
The Clek Liing seat uses a clear plastic rod threaded through a fabric sleeve and elastic loops. The NHTSA recall documentation for the Clek Liing shows the precise repair: the rod must be “fully inserted into the hole in the canopy hub on each side.” If your sleeve is too tight or the rod can’t seat fully, you recreate the defect that prompted the recall.
Where this goes sideways: Assuming all “canopy clips” are universal. Aftermarket plastic clips that clamp onto the seat shell are not tested with your seat. They can press on the shell in a way that creates stress points, leading to hairline cracks over time. Always use the attachment points the manufacturer built.
A Step-by-Step Plan for Any Seat
 This sequence ensures safety drives every decision. Sewing is the last step.
Step 1: Pull Your Car Seat Manual
Find the section on canopy attachment and removal. Print it. This is your blueprint. If the manual says “use only approved accessories,” your project must not modify the attachment method. This step prevents you from designing a beautiful canopy that your seat cannot safely accept.
Step 2: Trace the Original Canopy
Lay the original canopy flat on your fabric. Trace its shape, adding a ½-inch seam allowance. Pay special attention to the locations of any openings for harness straps or buckle tongues, these must be replicated exactly. Missing a harness slot by a quarter-inch means the strap will be routed incorrectly.
Step 3: Choose and Test Your Fabric
Select a breathable mesh for the main body. If you want a decorative outer layer, treat it as a removable cover over the mesh, not an integrated part. Wash and dry your fabric samples first. If the mesh stretches or distorts, it will not hold the canopy’s shape.
Step 4: Construct the Attachment Points
This is the most critical sewing step. Reinforce the areas where the canopy connects to the seat. For a Graco-style bow sleeve, use multiple rows of stitching. For Chicco toggle points, consider a buttonhole stitch or a grommet. The goal is to prevent tearing under tension.
Step 5: Dry-Fit Before Final Stitching
Pin your canopy together and attach it to the car seat, without the child in it. Check for the following: – Does it attach securely using only the manufacturer’s method? – Is there at least a 1-inch clearance around every part of the harness system? – Does it fold back smoothly without catching? – Does it stay in place if you gently shake the seat?
If any answer is no, adjust your pattern. Only proceed to final sewing after a successful dry-fit.
Step 6: Final Assembly and Safety Check
Sew your canopy, turn it right-side out, and attach it one final time. Perform the “tug test”: gently pull on the canopy from various angles. It should not detach, and the seat’s structure should not flex. Your new canopy should function identically to the original, no better, no worse.
What Never to Do: The Red Flags
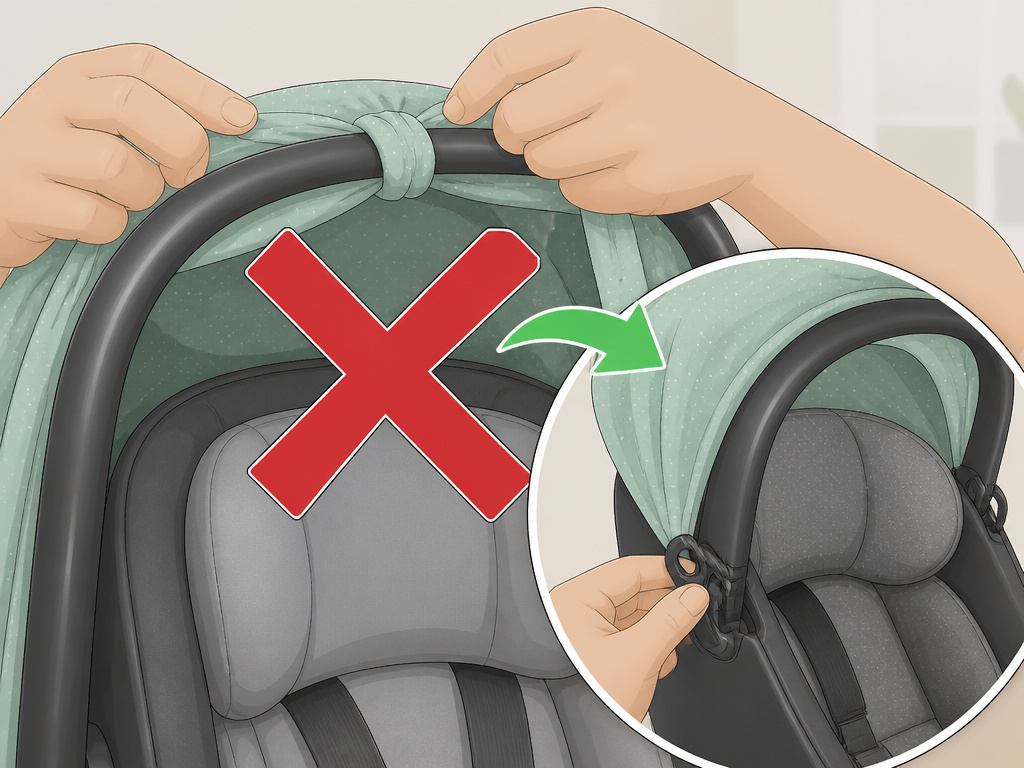 Some shortcuts compromise safety immediately. Here are the moves that invalidate your work.
Red Flag 1: Tying the Canopy to the Handle
The carry handle is not a structural anchor. It’s designed for lifting, not for resisting lateral forces from wind or motion. A canopy tied to the handle can shift the seat’s center of gravity, making it unstable when carried.
Red Flag 2: Using Velcro on the Seat Shell
Adhesive Velcro or suction cups can leave residue that weakens the plastic over time. More importantly, they attach the canopy to a part of the shell that wasn’t engineered to handle that load. In a crash, that point could be a failure origin.
Red Flag 3: Covering the Harness Slot Labels
Those tiny labels on the seat shell near the harness slots show the correct belt path for your child’s size. A canopy that obscures them increases the chance of a installation error the next time you adjust the harness. Always keep them visible.
Red Flag 4: Adding Bulk Inside the Seat
Any fabric that tucks inside the seat, between the child and the seat cushion, interferes with the harness’s ability to tighten snugly. This is why aftermarket car seat covers must be designed specifically for your model, they have precise cutouts for the harness.
Frequently Asked Questions
Can I use blackout fabric to make the canopy darker?
No. Blackout fabric has zero breathability. It will trap heat and moisture around your baby’s head, significantly increasing the risk of overheating. If you need a darker environment, use a breathable mesh and consider a separate, removable shade that clips to the canopy frame, not the seat.
Is it safe to add a canopy to a car seat that didn’t come with one?
Only if the car seat manufacturer sells an official canopy accessory for that specific model. The seat’s shell is crash-tested with its original components. Adding an attachment point that the shell wasn’t designed for, like drilling holes or using heavy-duty clips, compromises its integrity.
How do I clean my DIY canopy?
Follow the care instructions for your primary fabric. Most polyester mesh can be hand-washed with mild soap or machine-washed on a cold, delicate cycle. Always air dry. Never bleach, as this weakens the fibers. The Chicco KeyFit 35 manual explicitly warns “DO NOT BLEACH” for canopy fabrics.
My baby pulls the canopy down. How can I secure it better?
This usually means the canopy is too long in the front or the attachment isn’t tight enough. Shorten the front edge so it rests higher above your baby’s face. Ensure the attachment points are fully seated. Do not add extra straps or ties to hold it back, as these can become entanglement hazards.
Can I make a canopy for a convertible car seat?
Convertible seats rarely have integrated canopy attachment points for a reason. As the child grows, a canopy becomes a obstruction and a hazard. For sun protection in a convertible seat, use static cling window shades in the car and a wide-brimmed hat on the child. Making a canopy that attaches to the seat shell is not recommended.
The Bottom Line
Making an infant car seat canopy is possible, but the margin for error is tiny. Your guiding document is the car seat manual, not a Pinterest tutorial. The fabric must be breathable mesh, the attachment must mirror the factory system exactly, and the final product must leave the harness system completely untouched.
If that sounds like more work than buying a manufacturer-made accessory, that’s the point. The safest canopy is the one that came with your seat or an official replacement from the brand. A DIY project is a functional craft, not a safety upgrade. When in doubt, choose the path that doesn’t add a single new variable to your child’s crash protection.
