
How to Fit Infant Car Seat: Seat Belt & LATCH System Guide
This post contains affiliate links. As an Amazon Associate, we earn from qualifying purchases.
To fit an infant car seat, you must choose the correct installation method. ISOFIX (LATCH) or vehicle seat belt, and execute it with a tight, secure fit that passes the one-inch movement test at the belt path. The harness straps must be at or just below the infant’s shoulders, and the chest clip positioned at armpit level. The seat is outgrown when the child’s head is within one inch of the seat shell or they exceed the manufacturer’s height or weight limit, typically 13 kg or 75-85 cm.
That tight, secure fit is the whole game. A seat that shifts more than an inch at the belt path is not safe, and the difference between a snug install and a dangerous one often comes down to a single, overlooked step in either the car seat manual or your vehicle’s owner’s manual.
What follows: a head-to-head on ISOFIX versus seat belt, the exact steps to lock each system down, and the three physical checks that catch 90% of installation errors before you ever put your child in the seat.
Key Takeaways
- ISOFIX (LATCH) is simpler and harder to install incorrectly, but has a combined weight limit of 65 lbs for child + seat. Once you exceed that, you must switch to the vehicle seat belt.
- The harness straps must be at or just below the infant’s shoulders for rear-facing seats. Straps above the shoulders allow the child to ramp up and out of the seat in a crash.
- Perform the one-inch movement test at the belt path, not the top of the seat. Push and pull where the seat belt or lower anchors thread through the base; movement over one inch means a re-install.
- Bulky winter coats and snowsuits are forbidden. The harness cannot be tightened sufficiently over puffy material, creating dangerous slack in a collision.
- If the car seat manual and your vehicle manual conflict, contact the car seat manufacturer. Their guidance overrides the vehicle manual for their specific product.
The ISOFIX vs Seat Belt Installation Showdown
The choice isn’t about which is safer, both are equally safe when installed correctly. It’s about which is simpler and more foolproof for your specific vehicle and stage.
ISOFIX, called LATCH in the U.S., uses rigid connectors that click into metal anchors built into your vehicle’s seat bight. It’s a standardized system designed to reduce user error. The seat belt method uses your vehicle’s existing seat belt, routed through guides on the car seat base, and relies on you locking the belt correctly.
Common mistake: Assuming ISOFIX is always the better choice. For many parents, it is, until the child-plus-seat weight hits 65 lbs. After that, the seat belt is your only compliant option.
The federal NHTSA car seat safety guide states that every car seat must be installed using either the lower anchors OR the seat belt, never both at the same time. Using both doesn’t make it safer; it creates an unapproved load path that the seat wasn’t crash-tested for.
| Installation Method | Best For | The Critical Limitation |
|---|---|---|
| ISOFIX / LATCH | First-time installs, frequent seat removal. | Combined child + seat weight limit of 65 lbs. Exceed it, and you must switch to seat belt. |
| Vehicle Seat Belt | Long-term installs, older/heavier infants, vehicles without lower anchors. | Relies on correct belt locking (switchable retractor or locking clip). More prone to user error. |
| ISOFIX with Load Leg | Maximizing stability, reducing head excursion. | Requires a flat, vehicle-approved floor pan. Cannot be used on elevated or sloped surfaces. |
For a seat like the Joie i-Gemm 3, which has a 13 kg child weight limit, you’ll likely use ISOFIX for its entire usable life. The seat itself weighs around 9-10 kg, putting the combined weight under the 65 lb (29.5 kg) threshold. But if you have a heavier infant or a heavier seat, the math changes fast.
How to Install with ISOFIX and a Load Leg
This is the gold standard for modern infant seats like the Joie i-Gemm series or Cybex Cloud G Pro when used with their bases. The load leg is a third point of contact that braces against the vehicle floor, dramatically reducing forward rotation in a frontal crash.
- Locate the vehicle anchors. Peel back the seat crease to find the U-shaped metal bars. Don’t guess.
- Attach the ISOFIX guides (if provided). These plastic sleeves protect your vehicle’s upholstery and guide the connectors. Not all seats have them.
- Push the connectors straight onto the anchors until you hear and see a click. A solid click is mandatory. Both connectors must show a full green indicator. No green, no go.
- Extend the load leg to the vehicle floor. Press down on the base while you extend the leg until its indicator turns green. It must have full, flat contact with the floor pan, not a footwell hump or a set of cables.
- Apply your full body weight into the base. Kneel in it and use your torso to press it deep into the vehicle seat cushion. This removes slack from the ISOFIX webbing.
- Perform the one-inch test at the belt path. Grab the base where the ISOFIX connectors are housed and try to move it side-to-side and front-to-back. It should not move more than one inch in any direction.
The load leg has 24 positions on seats like the Joie i-Gemm 3. If the indicator shows red, the leg is in a wrong or intermediate position. You must adjust it until it locks and shows green.
Skipping the body-weight press is where most ISOFIX installs fail. The connectors can be latched but the whole base can still be loose on the seat cushion. That slack translates into dangerous forward movement in a crash.
How to Install with the Vehicle Seat Belt
When ISOFIX isn’t an option, the seat belt is your workhorse. Its success hinges on one thing: locking the belt so it cannot loosen.
First, identify your seat belt type. Pull it all the way out and let it retract slowly. If it ratchets and stays locked, you have a switchable retractor, the easiest kind. If it retracts smoothly, you have an emergency locking retractor (ELR) and will need to use the seat’s built-in lock-off or a separate locking clip.
For Switchable Retractor Belts:
- Route the belt through the base’s belt path as shown in your manual. This is non-negotiable.
- Buckle it.
- Pull the shoulder belt all the way out to activate the locking mechanism.
- Allow it to retract while applying downward pressure on the base. Listen for the ratcheting sound.
- Tighten by pressing your knee into the base and pulling the slack from the lap portion of the belt.
For ELR Belts (using the seat’s lock-off):
- Route and buckle the belt.
- Tighten it as much as possible by hand.
- Close the seat’s lock-off arm over the belt (usually on the side of the base). This clamps the belt in place.
- Check that the belt is now locked and cannot be pulled further.
The lock-off is a small plastic arm that most parents miss or don’t close fully. If your seat has one, it is the primary locking device. The Cybex Cloud G Pro manual is explicit: if instructions conflict with your vehicle manual, call Cybex. Their lock-off design is specific to their seat’s engineering.
Harness Fit: The Single Most Common Mistake
 A perfectly installed base is worthless if the harness is wrong. This is where you secure the child, and the rules are precise.
Strap Height: For a rear-facing infant seat, the harness straps must be at or just below the infant’s shoulders. This prevents the child from ramping upward and being ejected in a crash. As the child grows, you’ll move the straps to the next set of slots. Most seats have at least three height positions.
Chest Clip: This is a pre-crash positioner, not a restraint. It must be at armpit level. Too low on the belly, and it directs crash forces into soft tissue. Too high on the neck, and it’s a choking hazard.
Tightness: Perform the pinch test. After buckling and tightening the harness, try to pinch the strap vertically at the child’s shoulder. If you can pinch any excess webbing, it’s too loose. The harness should be snug enough that you cannot pinch a horizontal fold.
Where this goes sideways: Dressing the infant in a bulky winter coat. The harness feels tight over the coat, but in a crash, the coat compresses instantly, creating inches of deadly slack. Always place blankets over the tightened harness, not under it.
This is why adjusting the infant car seat harness is a daily task. That perfect snugness today will be too loose tomorrow after the straps settle and the child grows.
The Two-Step Installation Check
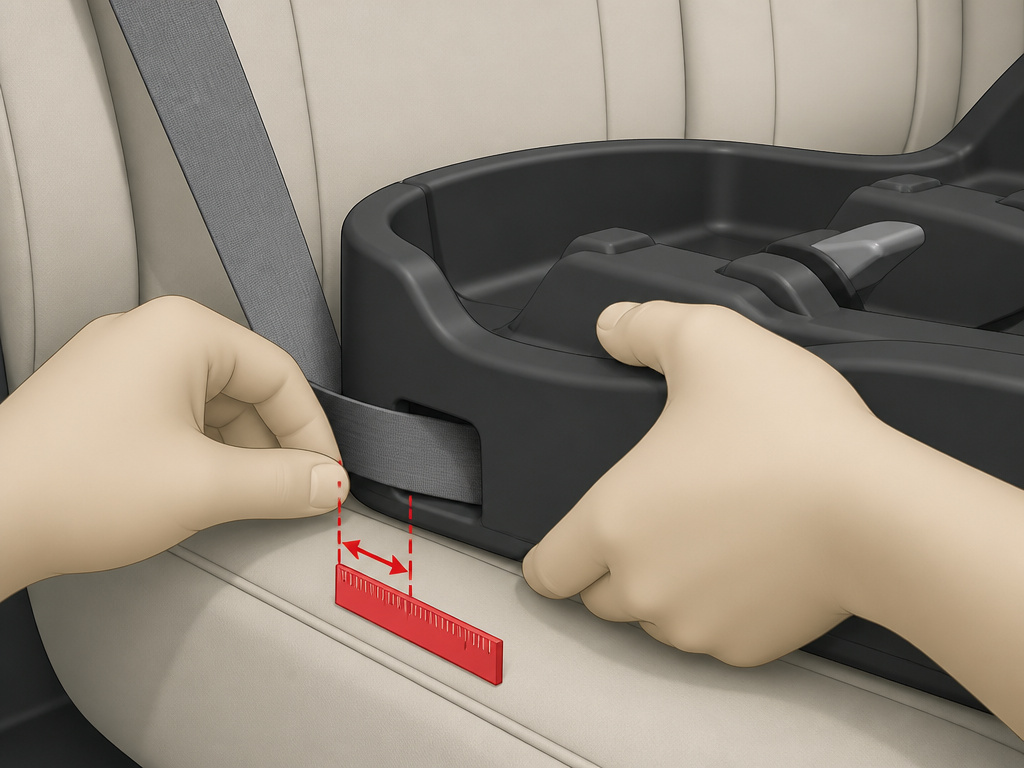 Before you drive anywhere, run these two physical tests. They take 30 seconds and catch nearly every major error.
1. The One-Inch Movement Test at the Belt Path.
Grab the car seat or base where the seat belt or lower anchors pass through it, this is the belt path. Try to move it side-to-side and front-to-back. If it moves more than one inch in any direction, it’s not tight enough. Do not test by wiggling the top of the carrier; that will always have some flex.
2. The Harness Pinch Test.
With the child in the seat, buckle and tighten the harness. At the child’s shoulder, try to pinch the strap vertically between your thumb and forefinger. If you can pinch any excess material, the harness is too loose. You should not be able to pinch a horizontal fold of webbing.
Fail either test, and you need to start over. A loose seat or a loose harness will not protect your child.
When Does the Seat No Longer Fit?
 Infant seats have strict, non-negotiable outgrown markers. Hitting any one of them means it’s time for a convertible car seat.
- The child exceeds the maximum weight limit. This is usually 13 kg (approx. 29 lbs). Check your seat’s label.
- The child exceeds the maximum height limit. This is either a stated height (e.g., 75 cm for a Joie i-Snug 2, 85 cm for an i-Gemm 3) OR when the top of the child’s head is within one inch of the top of the seat shell.
- The shoulders are above the top harness slot. Even if the head still has room, if you can’t position the straps at or below the shoulders, the seat is outgrown.
Many infants outgrow their seat by height long before they hit the weight limit. That’s why checking the one-inch headroom rule at every use is critical. A child outgrowing a seat at 9 months, like in the Reddit post about the Chicco KeyFit 30, is completely normal for a long baby.
Frequently Asked Questions
Can I install an infant seat in the front passenger seat?
You can, but you must only do so if the vehicle has no active frontal airbag for that seat, or if the airbag can be permanently deactivated. Most modern vehicles do not allow this. The rear seat is always safer.
My car seat manual says one thing, my car manual says another. Which do I follow?
The Cybex Cloud G Pro manual provides the template: contact the car seat manufacturer. Their instructions for their specific product take precedence. Never guess when manuals conflict.
How tight should the harness really be?
Tighter than feels natural. If you hesitate and think “that might be too tight,” it’s probably just right. A snug harness should not allow any pinched webbing at the shoulder.
Can I use aftermarket inserts or head supports?
Only if they are sold by the car seat manufacturer specifically for your model. Aftermarket car seat inserts can interfere with the harness routing and have not been crash-tested with your seat, voiding its certification and making it unsafe.
Do I need to replace the seat after a minor fender bender?
Most manufacturer manuals and the NHTSA say yes. A minor crash can stress plastic in ways you can’t see. Check your specific seat’s manual; some have very strict replacement policies.
Before You Go
Fitting an infant car seat boils down to three things: a base secured with less than one inch of movement, a harness snug enough to pass the pinch test at the shoulders, and a daily habit of checking both. Choose ISOFIX for its simplicity if your vehicle and weight limits allow, but master the seat belt install for the long haul. The safest seat is the one that fits your child, fits your car, and, most importantly, you use correctly every single time.
