
How to Install a Car Seat in the Middle Seat Without LATCH
This post contains affiliate links. As an Amazon Associate, we earn from qualifying purchases.
To install a car seat in the middle seat without LATCH, you must use the vehicle’s seat belt. First, check that your car seat manual permits center installation with a seat belt. Route the belt through the car seat’s designated belt path, ensuring it is flat and untwisted. Lock the belt using your vehicle’s retractor or a locking clip, then apply your weight to the seat while tightening. The seat should not move more than 1 inch (2.5 cm) side-to-side or front-to-back at the belt path.
This 1-inch rule is the entire game. A seat that passes this test is safe. A seat that doesn’t is a liability in a crash. The difference isn’t about preference; it’s about physics. The belt is the only thing connecting a 20-pound seat and a 30-pound child to a 4,000-pound vehicle during a sudden stop.
What follows: a breakdown of when the seat belt is your only option, a step-by-step guide to the lock-and-tighten method, and the specific spacing numbers that make some car seats incompatible with center LATCH from the factory. You’ll also get a direct answer on whether to use a locking clip and which car seats are built for this job.
Key Takeaways
- The vehicle seat belt is the required method for middle seat installation if LATCH anchors are absent, too far apart (like the Mazda3’s 434mm / 17.1-inch spacing), or if your child exceeds the LATCH weight limit (often 40 lbs / 18 kg).
- You can never use both the seat belt and LATCH system simultaneously to install a car seat. This creates conflicting force paths and can cause both systems to fail.
- A properly installed car seat should not move more than 1 inch (2.5 cm) side-to-side or front-to-back when tested at the belt path. This is the non-negotiable standard.
- Cars made before 1996 likely need a locking clip to secure a lap/shoulder belt. Cars from 1996 onward typically have built-in locking retractors.
- Always check both your vehicle owner’s manual and your car seat manual. Your car seat may not be approved for center installation with a seat belt, or your vehicle may have specific restrictions.
When the Seat Belt Is Your Only Path to the Middle Seat
The middle seat is statistically the safest spot in the vehicle for a child. But it often comes with a complication: no dedicated LATCH anchors. LATCH lower anchors are typically positioned for the outboard seats. The center seat might have its own set of anchors spaced wider apart, or it might have none at all.
The Mazda3 (2024) owner’s manual specifies that its center ISOFIX/LATCH lower anchors are 434 mm (17.1 inches) apart. It explicitly states that child-restraint systems with rigid ISOFIX/LATCH attachments cannot be installed in the center position.
That 434mm spec is your first clue. Many car seats with rigid LATCH connectors simply won’t span that gap. Your car seat manual is the final authority. The Evenflo LiteMax NXT Sensory Soothe manual, for example, permits center installation using inner anchors from the outside seats only if they are 28–51 cm (11–20 inches) apart. The Graco GoMax requires 11 inches (28 cm) for its rigid connectors.
If your car seat doesn’t meet the spacing requirement, or if the vehicle manual forbids it, the seat belt is your only compliant option. It’s also mandatory once your child hits a certain weight, often 40 pounds (18 kg). The Maxi-Cosi Pria All-in-One manual is direct: “If LATCH lower anchors are not an option or if your child weighs more than 40 lb (18 kg), you MUST use the vehicle seat belt system.”
| Scenario | Primary Method | Why It’s Required |
|---|---|---|
| No center LATCH anchors | Vehicle Seat Belt | No hardware exists to attach to. |
| LATCH anchors too far apart (e.g., 434mm) | Vehicle Seat Belt | Car seat connectors cannot physically reach or are not certified for that span. |
| Child weight exceeds LATCH limit (often 40 lbs) | Vehicle Seat Belt | LATCH system is not rated for higher weights; belt must be used. |
| Vehicle or car seat manual prohibits center LATCH | Vehicle Seat Belt | Manufacturer’s instructions override general practice. |
The 1-Inch Rule That Matters Most
Forget everything else for a moment. The single measure of a successful installation is the 1-inch rule. After you’ve routed the belt and think it’s tight, you test it.
Grab the car seat at the belt path, the spot where the seat belt passes through the seat’s shell. Push and pull it side-to-side, then front-to-back. If it moves more than 1 inch (2.5 cm) in any direction, it’s not tight enough. This isn’t a suggestion. It’s the pass/fail line established by safety standards like FMVSS 213 and CMVSS 213.
A loose seat is dangerous because it increases the forces on your child in a crash. Instead of the vehicle’s structure absorbing the impact, your child’s body continues moving until the slack is taken up. That extra few inches of travel can mean the difference between being restrained and being thrown.
Common mistake: Testing for tightness by wiggling the top of the car seat. The seat can pivot slightly at the top even when the belt path is rock solid. Always test at the source of the connection.
The belt path is the anchor point. If it doesn’t move, the seat is secure. If the seat is reclined rear-facing, some movement at the head is normal. Focus your test where the metal hook or the belt touches the plastic shell.
How to Lock the Seat Belt for a Secure Fit
Modern seat belts are designed to lock in a crash, but you need to force them into a locked mode for car seat installation. There are two common systems: switchable retractors and locking latchplates.
Switchable Retractors (ALR): These are the most common in vehicles made after 1996. To lock the belt, you pull it all the way out until you hear a clicking sound. As you let it back in, it will ratchet, only getting tighter. This is your go-to method for lap/shoulder belts.
Locking Latchplates: Some older vehicles or center lap belts have a latchplate (the metal piece that clicks into the buckle) that slides freely along the webbing. When you buckle it, you can still pull the belt tight, but the latchplate won’t lock to hold that tension. This is where a locking clip becomes necessary.
Locking Clip Use: If you have a sliding latchplate and your vehicle manual confirms you need one, a locking clip is a small, H-shaped piece of metal. It comes with your car seat. After buckling the belt and pulling it as tight as possible, you pinch the belt webbing together about an inch from the latchplate and slide the locking clip onto both strands. This creates a new, fixed point that prevents the latchplate from sliding.
Where this goes sideways: Using a locking clip on a belt with a switchable retractor. If your belt locks at the retractor, you don’t need the clip. Adding one can create a pinch point that weakens the webbing. Check your vehicle manual.
The Graco GoMax manual sums up the golden rule: “This car seat can be installed in your vehicle using either the vehicle seat belt OR the lower anchor attachment system. Both systems are equally safe to use. DO NOT USE BOTH AT THE SAME TIME.” Using both doesn’t make it “doubly safe.” It creates two load paths that can interfere with each other, and neither may perform as designed.
Step-by-Step Seat Belt Installation
- Consult Both Manuals. Before touching the seat, read your vehicle owner’s manual for seat belt locking instructions and any center-seat warnings. Then read your car seat manual for the correct belt path diagram (rear-facing or forward-facing).
- Place the Seat. Set the car seat in the center seating position, pressing it firmly back into the vehicle seat cushion.
- Route the Belt. Thread the seat belt through the correct belt path on the car seat. Ensure the belt is flat, twisted webbing can reduce strength by up to 40%. The belt should go under any padding and across the seat’s shell as shown in the manual.
- Buckle and Lock. Click the latchplate into the buckle. Activate your vehicle’s locking mechanism (pull the belt all the way out for ALR, or apply a locking clip to a sliding latchplate).
- Apply Weight and Tighten. Place one knee in the seat (put your full weight into it, pressing down and back toward the seat back). While holding this pressure, pull the free end of the seat belt tight. For a lap belt or LATCH strap, you can sometimes feed the tail back into the belt path and pull from inside for more leverage.
- Perform the 1-Inch Test. Grab the seat at the belt path and tug hard side-to-side and front-to-back. If it moves more than 1 inch, re-tighten. You may need to unbuckle and start again, ensuring the belt isn’t caught on the car seat’s cover or a cup holder.
Pitfalls and Pro-Tips for a Rock-Solid Install
Even with the steps memorized, small things can ruin an install. Here are the specifics most guides skip.
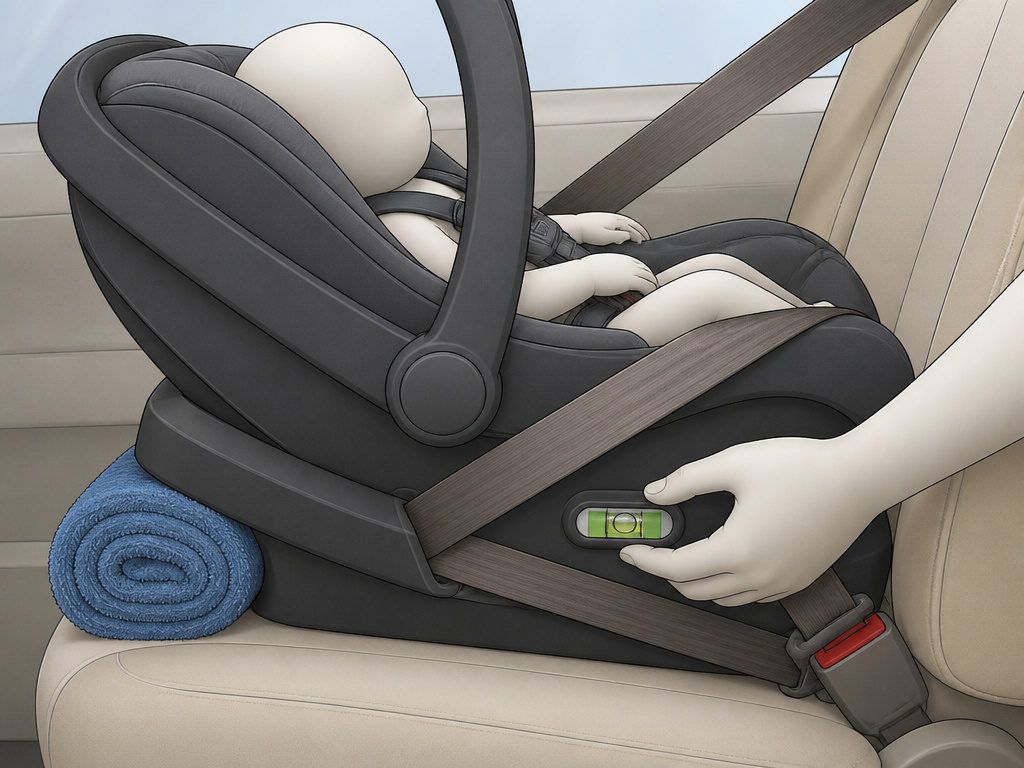
The Recline Angle for Infants. For rear-facing seats, the seat must be reclined to the correct angle so your infant’s head doesn’t flop forward. Most seats have a built-in level indicator. If the indicator shows red, you need to adjust. You can use a tightly rolled towel or a pool noodle under the front edge of the car seat (at the vehicle seat crease) to achieve the correct angle, but only if your car seat manual allows it. Never place anything under the seat that didn’t come with it without explicit permission from the manufacturer.
Dealing with Bucket Seats. Some vehicle center seats are deeply contoured or humped. This can cause the car seat to rock side-to-side even with a tight belt. If your car seat manual permits, you can use a rolled receiving blanket to fill a gap under one side of the car seat base. The goal is to get the base level and in full contact with the vehicle seat, not to prop the seat up.
The Lap-Shoulder Belt Tangle. When using a lap/shoulder belt, the shoulder portion must be managed. Some car seats have a guide at the back to route it. Others require you to lock the retractor so the shoulder belt is also tight. Never let the shoulder belt go behind the car seat or get pinched between the car seat and vehicle seat back. It must follow the path shown in your manual.
I won’t recommend the Graco GoMax’s rigid connectors for a Honda Odyssey center seat. The spacing is just over 20 inches, and while the manual says 11 inches is the minimum, that extra stretch puts lateral stress on the connectors that I’ve seen cause a failed install check. Use the belt.
TL;DR: If the belt is tight, the seat doesn’t move more than an inch, and both manuals are happy, you’ve won. The belt is just as safe as LATCH when installed correctly.
Frequently Asked Questions
Can I use the inner LATCH anchors from the outboard seats for the middle?
Sometimes, but it’s not universal. This is called a “non-standard” or “borrowed” LATCH installation. Your vehicle manual must allow it, and your car seat manual must permit it with the specific anchor spacing. For example, the Evenflo LiteMax NXT allows it if the inner anchors are 11-20 inches apart. Many car seats with rigid LATCH connectors, like some Graco models, cannot be used this way.
Is a seat belt or LATCH installation safer?
When installed correctly, both are equally safe. They meet the same federal safety standards (FMVSS 213). The safer system is the one you can install more tightly and correctly every single time. For many people in the center seat, the seat belt is easier to get a secure fit with than trying to borrow distant LATCH anchors.
What if my middle seat only has a lap belt?
Lap belt is perfectly acceptable and safe for car seat installation, provided it can be locked. You will likely need to use a locking clip to secure it, as most lap belts have a sliding latchplate. Ensure your car seat is approved for use with a lap belt, most are. The key is achieving that less-than-1-inch movement at the belt path.
How do I know if my seat belt locks?
Check your vehicle owner’s manual. The quick test: buckle the belt, pull the shoulder portion all the way out slowly. If it retracts smoothly and doesn’t lock, it’s an emergency locking retractor (ELR) that only locks in a crash or sudden stop, you’ll need a locking clip. If you can pull it out and hear/feel it click into a ratcheting mode, it’s a switchable retractor (ALR) that locks for car seats.
My car seat still moves a lot. What now?
First, ensure you’re testing at the belt path, not the top. If it’s still loose, unbuckle and start over. Check for twists in the belt webbing. Make sure the belt is routed through the correct path (rear-facing vs. Forward-facing diagrams differ). Apply more body weight when tightening, really lean into it. If it persists, try a different seating position or consult a certified Child Passenger Safety Technician (CPST).
Before You Go
Installing a car seat in the middle without LATCH boils down to a deliberate, physical process with the seat belt. It’s not about intuition; it’s about following the rules printed in two books: your car’s manual and your car seat’s manual. The 1-inch movement test is your final exam.
The seat belt is a robust, crash-tested system. When you pull it tight, lock it correctly, and eliminate that inch of slack, you’re creating a direct link between your child’s seat and the vehicle’s frame. That’s the connection that matters in the first second of a crash. Skip the guesswork, follow the steps, and test it every time. Your child’s safety doesn’t have a backup system.
