
How to Install a Car Seat | LATCH vs Seat Belt
This post contains affiliate links. As an Amazon Associate, we earn from qualifying purchases.
To install a car seat correctly, you must choose one secure attachment method: the vehicle’s LATCH system (Lower Anchors and Tethers for Children) or the vehicle’s seat belt. Never use both simultaneously. The LATCH system uses lower anchor connectors in the seat crease and a top tether for forward-facing seats, while the seat belt method routes the belt through the car seat’s designated belt path and locks it. Both are equally safe when installed tightly, passing the 1-inch movement test at the belt path.
The difference between those two methods isn’t academic. It dictates which parts of your car you’ll use, how you’ll check for tightness, and when you’ll need to switch techniques as your child grows. A loose install is dangerous, but a double-secured one, using LATCH and a seat belt together, introduces conflicting forces that can fail in a crash.
What follows is a breakdown of the two systems, the hidden weight limit that forces a switch, and the step-by-step checks that separate a safe install from a risky one.
Key Takeaways
- Never use both the LATCH system and a seat belt to install the same car seat. This creates stress points that can break.
- The 1-inch rule is universal: a properly installed seat should not move more than 1 inch side-to-side or front-to-back when tugged at the belt path.
- LATCH has a weight limit, often hidden. The NHTSA formula is 65 pounds minus the weight of the car seat itself.
- Always use the top tether strap when the seat is forward-facing, regardless of whether you used LATCH or seat belt for the lower connection.
- If your car seat doesn’t fit tightly with one method, try the other. The seat belt is often the better choice for older, heavier children or for center seat installations.
LATCH vs Seat Belt: The Core Choice
Your car, if it’s a 2003 model or newer, has a LATCH system built into the rear seats. You’ll find the lower anchors in the crease between the seat back and cushion, marked by small symbols. The top tether anchors are on the rear shelf, seat back, or floor, depending on your vehicle. The seat belt is, well, the seat belt.
Common mistake: Using both systems for a single install. Every manual from Chicco, Graco, and Joie states this clearly: “DO NOT USE BOTH AT THE SAME TIME.” The forces in a crash travel through the rigid structure of the car seat. Two competing restraint systems can twist the seat or overload one attachment point, leading to failure.
The LATCH system is often easier to get tight, especially with newer seats that have rigid, click-in connectors. It’s a straightforward, standardized connection. The seat belt installation method is your universal fallback. It works in any seating position, in any car, and for any child weight. It’s the only option for installing without LATCH in older vehicles or for a car seat in the center seat when the vehicle doesn’t have dedicated center LATCH anchors.
| Installation Method | Best For | Limitations |
|---|---|---|
| LATCH System | Newer vehicles, easier initial tightness, standardized anchors. | Has a combined child + seat weight limit (check your seat’s label). Not always available in the center seat. |
| Vehicle Seat Belt | Any vehicle, any seating position, no upper weight limit. | Can be harder to get tight; locking mechanisms vary (switchable retractor vs. Locking latchplate). |
The Hidden LATCH Weight Limit You Must Calculate
This is the part that catches most parents years into using a seat. LATCH isn’t meant for indefinite use. The lower anchors have a maximum weight capacity set by both the vehicle and the car seat manufacturer.
The NHTSA car seat safety guidelines provide the master rule: if your car seat doesn’t have a specific label, the maximum allowable child weight for lower anchor use is 65 pounds minus the weight of the car seat.
Lower anchor weight limit = 65 lbs – weight of car seat
Let’s say your all-in-one convertible seat weighs 22 pounds. The math is 65 – 22 = 43. You must stop using the lower anchors and switch to a seat belt installation once your child hits 43 pounds, even if the seat harness is rated for 65 pounds. The anchors themselves, not the seat’s harness, are the limiting factor.
Where this goes sideways: Continuing to use LATCH past the weight limit. The metal anchors or the seat’s connector straps can be overstressed in a crash. The switch isn’t optional.
When to Switch from LATCH to Seat Belt
You’ll make the switch in one of two scenarios. First, when your child’s weight hits the calculated limit above. Second, if you’re installing in a seating position where LATCH isn’t approved or is impractical, like many middle seat positions. The process is simple: unhook the lower anchor connectors, route the vehicle seat belt through the correct belt path (always marked in blue for rear-facing, red for forward-facing), and lock it.
The Step-by-Step Install Check (Both Methods)
The goal is the same for LATCH and seat belt: absolute stillness. The process differs at the start, but converges on the same final test.
For a LATCH Install
- Locate your vehicle’s lower anchors and top tether anchor (for forward-facing).
- Connect the seat’s lower anchor straps or rigid bars to the vehicle anchors. A click or color-change indicator (green = good) confirms a secure connection.
- Press down firmly into the vehicle seat cushion and tighten the strap. Remove all slack.
- For forward-facing, attach and tighten the tether strap according to your seat’s manual.
For a Seat Belt Install
- Place the seat in the vehicle. Ensure the base is at least 80% on the vehicle seat cushion.
- Route the seat belt through the car seat’s correct belt path. For a rear-facing car seat, this is usually near the child’s feet.
- Buckle the seat belt. You must now lock it. Most modern cars have a switchable retractor: pull the belt all the way out until it clicks, then let it retract. Older cars use a locking latchplate (a small metal piece on the buckle side that flips to lock).
- Tighten by pressing down on the seat and pulling the belt tail. Remove all slack.
The 1-Inch Rule (And Why It’s Non-Negotiable)
Now, the universal test. Grab the car seat at the belt path, the spot where the seat belt or LATCH strap routes through the seat shell. Pull hard side-to-side and front-to-back.
If the seat moves more than 1 inch (25 mm) in any direction, it’s not tight enough. This is the standard from the Chicco Fit360 manual, the Graco Slimfit manual, and every other reputable brand.
Why there? The belt path is the seat’s structural pivot point. Testing anywhere else, like the top or the cupholder, gives a false reading. You’re checking the connection’s integrity, not whether the padded cover jiggles.
The Tether: Forward-Facing’s Non-Negotiable Partner
If you’re installing forward-facing, the tether strap is not optional. It’s a third point of connection that dramatically reduces forward head movement in a crash.
- LATCH + Tether: You’ve used the lower anchors. Now attach the tether strap to the vehicle’s tether anchor and tighten it.
- Seat Belt + Tether: You’ve used the seat belt. You still must attach and tighten the tether strap.
The rule is simple: Always use the tether with a forward-facing car seat. Rear-facing seats in the U.S. Typically do not use a tether for installation. The NHTSA car seat safety guidelines confirm this, noting it’s a forward-facing safety essential.
Problem → Cause → Fix: A Diagnostic Table
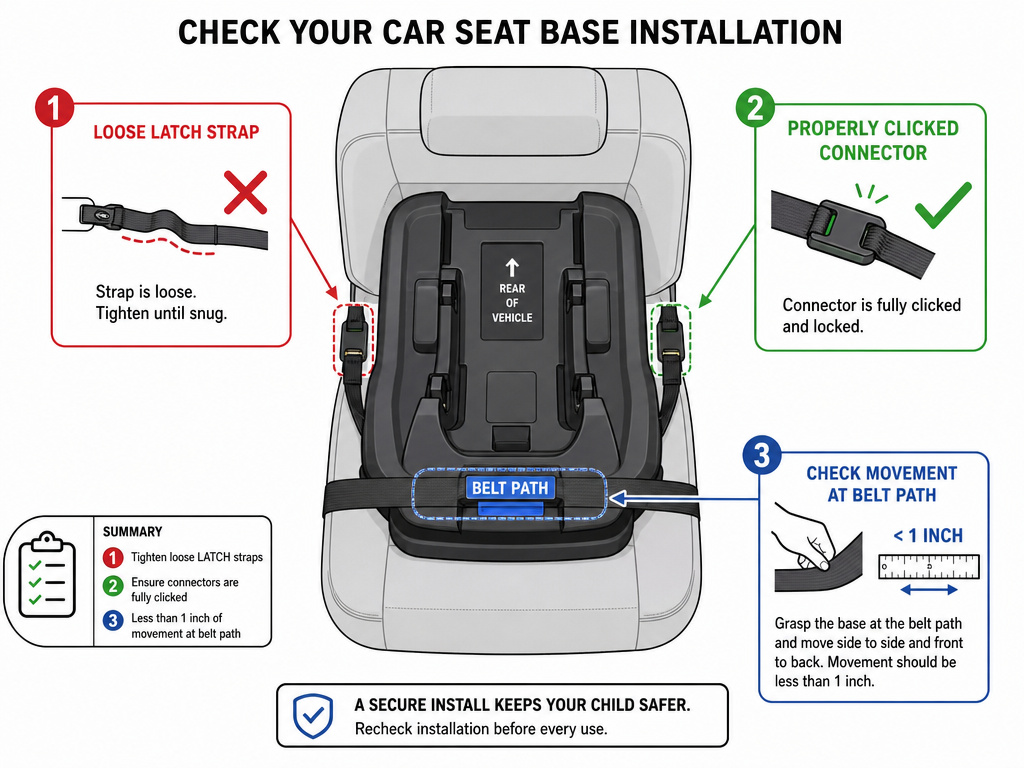
Even with the steps, things feel wrong. Use this chart to diagnose.
| Problem | Likely Cause | The Fix |
|---|---|---|
| Seat moves more than 1 inch at belt path. | Belt or LATCH strap not locked/tightened enough; seat reclined wrong. | Re-lock the belt (pull all the way out) or re-tighten LATCH strap. Check seat’s recline angle. |
| Car seat leans/tilts to one side. | Vehicle seat cushion is uneven; install is off-center. | Try a different seating position. Use a rolled towel (only if manual allows) under the seat base to level it. |
| Can’t get LATCH connectors to click/lock. | Connectors aren’t fully seated on anchor bars; debris in the way. | Clear the seat crease. Press the connector squarely onto the anchor until you hear/see the lock. |
| Seat belt won’t stay locked. | Using wrong locking method for your car. | Consult vehicle manual. Switch from latchplate locking to retractor locking (pull all the way out). |
If you’re struggling with an infant car seat base, the same rules apply. Whether you choose a base with seat belt or base with anchors, you only pick one.
Frequently Asked Questions
Can I use LATCH in the middle seat?
It depends entirely on your vehicle manual. Some cars have dedicated LATCH anchors for the middle. Many others allow you to use the inner anchors from the two outboard seats (“borrowing”), but only if the manual explicitly permits it and the anchors are spaced correctly (usually a standard 11 inches). If in doubt, use the seat belt. It’s universally approved for the middle seat without LATCH.
Is LATCH safer than a seat belt?
No. When installed correctly, both methods provide equivalent levels of safety. The National Highway Traffic Safety Administration (NHTSA) states they are equally safe. LATCH can be easier to use properly, which is its main advantage.
My car is older than 2003. Can I use LATCH?
Maybe. The 2003 model year was the U.S. Federal requirement, but some manufacturers included LATCH earlier. Check your vehicle owner’s manual. If it doesn’t have LATCH, you’ll use the seat belt for all installations.
How do I know if my seat belt is locked?
For switchable retractors: buckle the belt, pull the shoulder belt all the way out slowly until you hear a distinct clicking sound. Let it retract. It should now be locked and not pull out. For locking latchplates: the metal latchplate near the buckle has a small lever or button; flip it or push it into the locked position after buckling.
The Bottom Line
Installing a car seat isn’t about finding the “best” method. It’s about executing one method perfectly. Pick LATCH or seat belt, commit to it, and wrench it tight until it passes the 1-inch test. Remember the hidden LATCH weight limit, 65 pounds minus the seat’s weight, and switch to the seat belt when you hit it. Finally, never forward-face without that top tether snapped and tight. A correct installation is a series of deliberate checks, not a hopeful push into place.
