
How to Safely Install Your Car Seat on an Airplane Flight
This post contains affiliate links. As an Amazon Associate, we earn from qualifying purchases.
To install a car seat on an airplane, you need a seat that is certified for aircraft use, must install it in a forward-facing aircraft seat using the lap belt, and can only use it in harness mode, never as a booster. The installation is tight when the seat moves less than 1 inch side-to-side or front-to-back at the belt path. Convertible and all-in-one seats must be in forward-facing harness configuration; infant carriers install forward-facing without their base.
The 1-inch rule is the whole game. In a car, a slightly loose seat might shift on a turn. On a plane, that same slack lets the top of the car seat tip forward during takeoff acceleration or turbulence. Your child’s weight acts as a lever against the single lap belt. A seat that passes the 1-inch test at the belt path won’t pivot.
What follows: the exact width specs for some airline seats, the manufacturer clauses everyone skips about booster mode, the seven-step install for a convertible seat, and the one tool that makes the 1-inch test possible mid-cabin.
Key Takeaways
- Your car seat must be FAA-approved and used only in forward-facing harness mode on the plane. Booster mode is not certified because aircraft lack shoulder belts.
- The installation is correct when the car seat moves less than 1 inch at the belt path. More movement means the seat can tip dangerously during takeoff or turbulence.
- Contact your airline before you fly. Policies on allowed seats, required labeling, and seat width vary. Some airlines, like Philippine Airlines, publish specific aircraft seat dimensions.
- For a convertible or all-in-one seat, you must remove it from booster mode and reinstall the harness. The Graco 4Ever and Chicco OneFit manuals explicitly state this.
- Use a travel cart or carrier strap to navigate the airport, but never use these accessories during the actual flight installation.
Is Your Car Seat Even Allowed on a Plane?
Not all car seats are certified for aircraft use. The label matters. Look for a sticker on the seat shell, usually near the child’s legs or on the side, that says, “This restraint is certified for use in motor vehicles and aircraft.” It might reference FAA standards 213 or Canadian CMVSS 213.
Common mistake: Assuming a seat that’s safe in your car is automatically approved for a plane. The certification is separate, and the label is the only proof.
If that sticker is missing, faded, or torn off, the airline has grounds to deny its use. Check it before you pack.
More importantly, how you use the seat on the plane is restricted. Every major manufacturer’s manual we reviewed. Graco, Chicco, Nuna, states the same rule: the seat is certified for aircraft use in harness mode only. It is not certified for use as a belt-positioning booster on an aircraft.
The reason is mechanical. A booster seat relies on the vehicle’s lap-and-shoulder belt to position the child and manage crash forces. Aircraft seats only have a lap belt. Without that shoulder belt, the booster cannot function as designed, and the child is at risk of submarining under the lap belt in a sudden stop.
| Seat Type | OK for Plane? | Critical Configuration Rule |
|---|---|---|
| Infant Carrier (e.g., Chicco KeyFit Max) | Yes | Use carrier without the base, installed forward-facing on the aircraft seat. |
| Convertible / All-in-One (e.g., Graco 4Ever, Chicco OneFit) | Yes | Must be in forward-facing harness mode. Booster mode is not allowed. |
| Booster Seat (Highback or Backless) | No | Not certified for aircraft use due to lack of shoulder belt. |
| Travel Vest | Maybe | Depends on specific FAA approval; check the product label and airline policy. |
The takeaway is simple. If you’re flying with a child who uses a booster at home, you need a different plan. That might mean bringing their convertible seat and reinstalling the harness, or using an FAA-approved travel vest. Do not assume the booster is fine.
The 1-Inch Movement Test (And Why It Matters More on a Plane)
You’ll see the “1-inch rule” in every car seat manual. For a Graco or Chicco seat, a proper installation means the seat moves less than 1 inch (2.5 cm) side-to-side and front-to-back when you grip it at the belt path.
In a car, this rule ensures the seat stays put in a collision. On a plane, the stakes are different but just as high. The primary risks are tip-over and ejection during turbulence.
Aircraft acceleration during takeoff pushes everything backward. A loosely installed car seat can pivot at the belt path, tipping the top of the seat toward the seatback in front. Your child’s weight, now off-center, increases the leverage. During severe turbulence, a seat with slack can bounce and shift, potentially compromising the belt’s grip.
Grab the seat at the belt path, where the lap belt threads through. Push and pull firmly. If you get more than an inch of movement, the belt is not tight enough. Re-thread it, kneel into the seat to add weight while you cinch, and lock the buckle.
The belt path is the pivot point. Testing anywhere else, like the top of the seat back, will give you a false sense of security. Focus your effort there.
Why is getting it tight so hard on a plane? Aircraft seat cushions are often softer and more contoured than car seats. The lap belts are shorter and can be harder to lock. You have less room to maneuver. This is where a specific technique beats brute strength.
What You Actually Need (And What to Leave Behind)
You don’t need a full toolkit. You need three things that fit in your seatback pocket.
- Your Car Seat Manual. The digital PDF on your phone is fine. You will need to reference the “aircraft installation” section and the diagram for the forward-facing belt path.
- A Cloth or Small Towel. Not for the seat protector you bought. Use it to fill the “gap” between the back of the aircraft seat and the curve of your car seat’s base. A rolled towel placed in the seat bight (the crack where the bottom and back of the plane seat meet) can help level the seat and prevent it from rocking.
- Your Knee. Your body weight is the best installation tool. You’ll use it.
Leave these items in your checked bag or at home: * The Car Seat Base: Infant car seat bases are for vehicles. On the plane, you install the carrier directly onto the aircraft seat. * Aftermarket Seat Protectors: Most manuals warn against them because they can prevent a tight install by introducing slippage. If you must use one, ensure it’s a thin, non-slip model approved by your car seat brand. * Travel System Stroller Frame: You can use it to get to the gate, but you’ll need to collapse it and gate-check it before boarding.
Step-by-Step: Installing a Convertible Seat on the Plane

This process is for a forward-facing convertible or all-in-one seat, like a Graco 4Ever or Chicco OneFit. The steps are methodical, not difficult.
Before you start: Ensure the seat is in forward-facing harness mode. The harness straps must be at or above your child’s shoulders. Reattach any harness covers or seat padding you removed for booster mode.
Before you start: The aircraft lap belt is your only restraint. Ensure the belt is not frayed, twisted, or caught under the seat. If the buckle mechanism is damaged, ask a flight attendant for a different seat.
Step 1: Position the seat. Lift the car seat onto the aircraft seat, centered as best you can. Push the back of the car seat firmly into the back of the aircraft seat. Step 2: Locate the forward-facing belt path. Check your manual. It’s usually a clear tunnel or slot on the back of the car seat shell. Step 3: Thread the lap belt. Feed the aircraft lap belt through the belt path. Ensure the belt is not twisted. Buckle it. Step 4: Tighten the belt. Pull the free end of the lap belt tight. You may need to lift the buckle flap to access more webbing. On most aircraft belts, you tighten by pulling the loose tail; they automatically lock. Step 5: Apply your weight. Kneel directly into the seat of the car seat, putting all your weight into it. While kneeling, pull the lap belt tight again. This presses the car seat base deep into the soft aircraft cushion. Step 6: Perform the 1-inch test. Grab the car seat at the belt path. Pull side-to-side, then front-to-back. If it moves more than an inch, repeat steps 4 and 5. Often, one more strong pull on the belt while your weight is in it does the trick. Step 7: Secure the child. Place your child in the seat, buckle the harness, and tighten until you cannot pinch any webbing at the shoulder. The chest clip should be at armpit level.
The kneeling step is non-negotiable. It compensates for the soft aircraft seat and is the difference between a seat that passes the test and one that doesn’t.
How to Install an Infant Car Seat Carrier
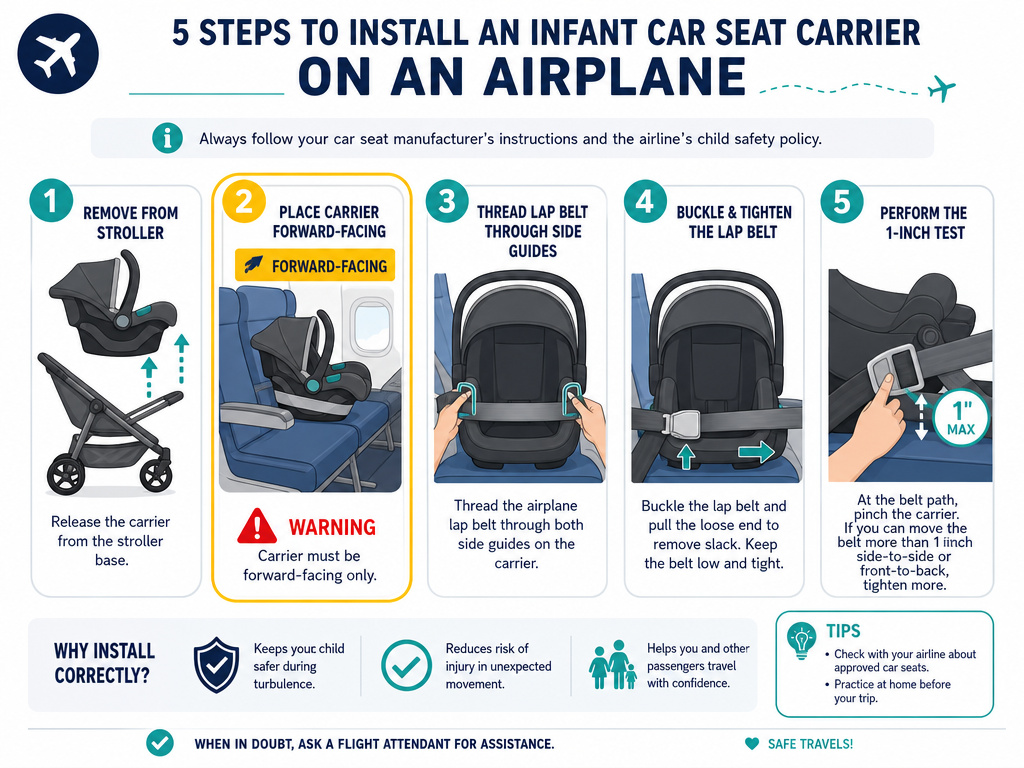
The process for an infant carrier, like the Chicco KeyFit Max, is simpler but has one major difference: you never use the base.
- Remove the carrier from its stroller frame or travel system.
- Position it forward-facing on the aircraft seat. Yes, forward-facing. Even though your infant rides rear-facing in the car, aircraft seats are only certified for forward-facing installation of child restraints.
- Thread the aircraft lap belt through the designated belt guides on the carrier. These are usually built into the shell on the sides.
- Buckle and tighten the lap belt, following the same kneeling and tightening technique.
- Perform the 1-inch test at the belt path.
The Chicco KeyFit Max manual explicitly recommends taking the carrier on the plane for protection during takeoff, landing, and turbulence. It’s the manufacturer’s endorsed safest option.
Will Your Car Seat Fit in the Airplane Seat?
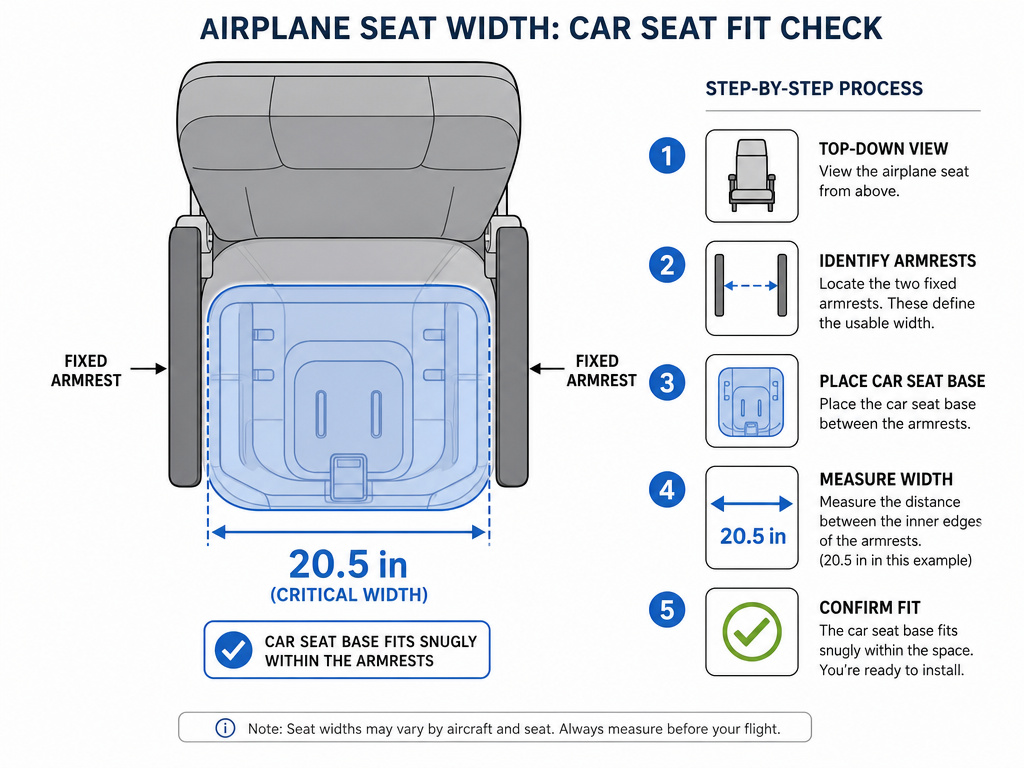
This is the hidden variable. Airlines have the final say, and their seats vary. While U.S. Airlines generally require a car seat to fit within the width of the passenger seat, some international carriers provide specific dimensions.
Philippine Airlines, for example, publishes that their Airbus A330 (363 configuration) seats are 20.5 to 23 inches wide. Their Airbus A340 seats are 18.5 to 19.75 inches wide.
Most standard convertible car seats are about 17-19 inches wide at their base. The problem isn’t usually the base, it’s the armrests. You cannot lift the armrest on most airline seats to accommodate a wider seat. You must fit within the space between them.
Where this goes sideways: Assuming a seat that fits in your SUV will fit on any plane. Older regional jets and some premium cabin configurations have narrower seats.
Your action plan: Contact your airline after booking and ask about the specific aircraft type on your flight and their car seat policy. If you’re flying on a small regional jet (like a CRJ-200 or Embraer 145), assume you will need to gate-check the seat. Have a protective travel bag ready.
Navigating the Airport with a Car Seat
Getting the seat to the gate is a physical challenge. You have two good options and one bad one.
- Travel Cart: A lightweight, foldable cart that straps the car seat to it, turning it into a pull-behind wagon. This is the most efficient method for long terminals.
- Carrier Straps: Specialized straps that let you wear the car seat like a giant backpack. It’s hands-free but can be heavy and awkward.
- Bad Option: Trying to carry it in your arms or balance it on a stroller not designed for it. You’ll be exhausted before you reach security.
At security, you will need to take the child out of the seat (if they’re in it) and send the empty car seat through the X-ray belt. Collapse your stroller or cart and send it through, too. Notify the TSA officer you have a child restraint.
Frequently Asked Questions
Can I use my car seat in booster mode on the plane?
No. The manuals for the Graco 4Ever, Chicco OneFit, and Nuna EXEC all state the seat is certified for aircraft use in harness mode only. Booster mode requires a lap-and-shoulder belt, which aircraft do not have.
What if my car seat is wider than the airplane seat?
The airline can deny its use. You will have to gate-check it. Always check your specific aircraft model’s seat width before you fly, especially on smaller planes or international carriers with published specs like Philippine Airlines.
Do I have to buy a seat for my infant to use a car seat?
Yes. If you want to use a car seat on board, the child must have their own purchased ticket and be in an approved seat. “Lap infants” cannot be secured in a car seat during takeoff, landing, or turbulence.
How do I know if my car seat is FAA-approved?
Look for a label on the seat that states, “This restraint is certified for use in motor vehicles and aircraft.” It is often red and white and includes the relevant standard numbers (FAA 213).
Can I install my car seat rear-facing on the plane?
U.S. FAA regulations and most car seat manufacturers only certify seats for use in a forward-facing aircraft seat. Even infant carriers, which are rear-facing in cars, are installed forward-facing on the plane. Always follow your specific car seat manual’s instructions for aircraft installation.
Before You Go
Installing a car seat on a plane boils down to three verified facts: use the harness, pass the 1-inch test, and confirm your seat’s width fits. The manufacturer warnings against booster mode are not suggestions, they are based on the missing shoulder belt. Your effort at the belt path with your knee in the seat is what stops the top-heavy seat from tipping when the plane climbs.
Check your manual’s aircraft section tonight. Put the PDF on your phone. That’s the document that answers the specific question your model asks when the cabin lights are dim and you have one hand holding a toddler. Everything else is just getting the seat to the right row.
