
How to Put an Infant Car Seat Back Together After Cleaning
This post contains affiliate links. As an Amazon Associate, we earn from qualifying purchases.
Reassembling an infant car seat means reversing your disassembly steps exactly: harness straps through the correct shell slots, crotch buckle aligned forward, and all padding snapped back into place before you reinstall the seat or base. The manual’s “reverse the steps” instruction assumes you took it apart in order, which most people don’t.
The manuals are useless if you didn’t document the tear-down. You’re left with a shell, a pile of fabric, and straps that seem to have a dozen possible paths. Get one strap routed wrong, through the wrong slot, or twisted, and the entire seat’s safety certification is void. It might look right, but in a crash, that twisted webbing can concentrate force and snap.
What follows: the four universal reassembly steps every seat shares, the model-specific traps for a Joie i-Snug 2, Chicco Fit360, and Graco SnugLock, and the single phone call that saves a three-hour headache.
Key Takeaways
- Reassembly is the reverse of disassembly, but only if you disassembled in the documented order. Most people pull everything apart at once, which is why the manual fails.
- A twisted harness strap is the most common reassembly error. It concentrates force in a crash and can tear, voiding the seat’s safety certification.
- The crotch buckle must thread back through the seat shell slot before you reattach the seat pad. If you snap the pad on first, you’ll have to take it off again.
- Never reassemble soft goods the manufacturer forbids. Chicco explicitly warns against removing the harness from the Fit360 child restraint; call them at 1-877-424-4226 for guidance.
- Final installation, whether with LATCH or the seat belt, has a 1-inch (2.5 cm) movement rule at the belt path. Reassembly is pointless if the seat isn’t locked down tight.
The 4-Step Reassembly Sequence (And the One Step Nobody Skips)
You have a shell and a pile of parts. Start here, in this order. Skipping to the padding is how you trap a harness strap under the fabric.
First, lay the seat shell on a clean, flat surface with the back facing up. You need to see the slots.
Before you start: Ensure the seat is not expired (check the label on the back for a “Do Not Use After” date). Never reassemble a seat that has been in a moderate or severe crash, hidden damage compromises the shell. If the harness was cut to extricate a child, the seat is trash.
Step 1: Reroute the harness straps. Find the two shoulder harness slots on the back of the shell. The straps must pass through these slots from the front of the seat, over the child’s shoulders, and out the back. This seems obvious, but the webbing likes to flip. Run your fingers down the entire length of each strap inside the shell to confirm zero twists. A single half-twist invalidates the seat’s engineering.
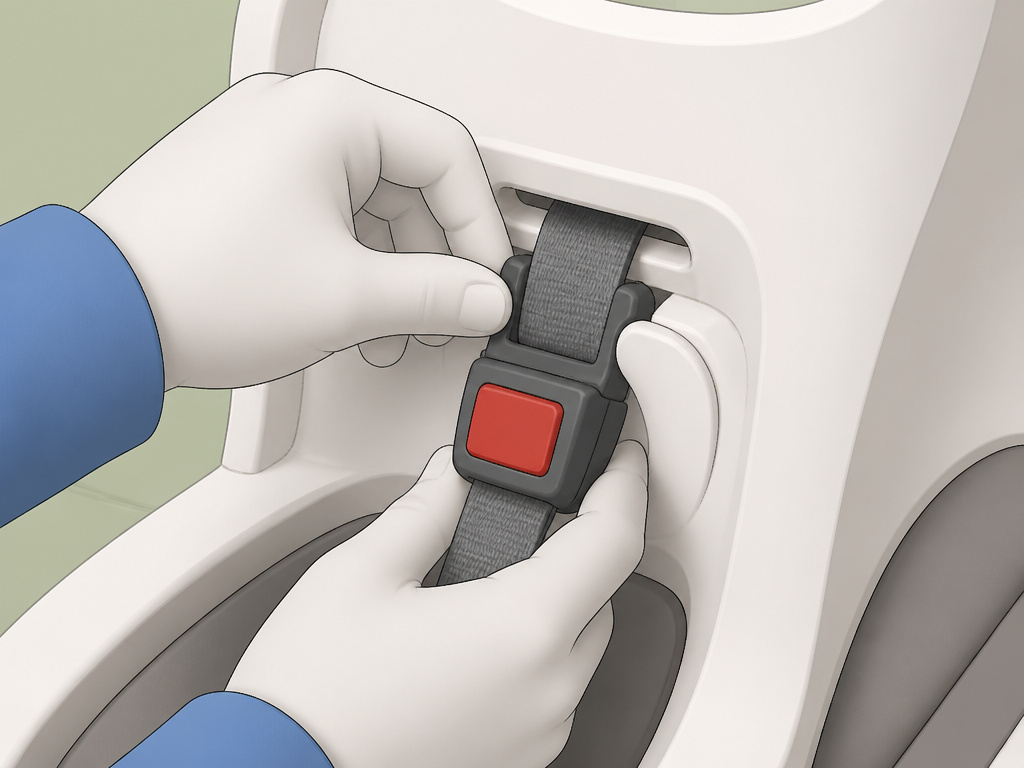
Step 2: Thread the crotch buckle. Locate the adjustment slots in the seat shell near where the child’s legs will go. On seats like the Joie Saffron SI, you pinch the sides of the strap together, twist slightly, and slide the buckle forward or backward into the desired slot. The buckle button must face outward. Pull up on the buckle once it’s through to ensure it’s secured by the shell, not just the fabric.
Step 3: Reattach the seat pad and infant insert. Now you can snap or button the seat pad back onto the shell. The harness straps and crotch buckle should now be sandwiched between the pad and the shell. The infant insert, if you use one, typically attaches with clips or straps at the shoulder and crotch areas. Ensure all snaps are fully engaged, a loose pad can interfere with harness tightening.
Step 4: Reconnect the side impact bolsters. These are often the last pieces. They usually clip or Velcro to the sides of the seat shell, outside the harness path. Their job is to position the child centrally, not to restrain them, so don’t route any harness webbing through them.
Common mistake: Reattaching the seat pad before threading the crotch buckle. You’ll finish all the snaps, then realize the buckle strap is still sitting on top of the fabric. The entire pad comes off again. Thread the buckle first, every time.
Harness Height: Shoulder Slots Are Not Optional
For a rear-facing infant, the harness straps must be at or just below the shoulders. This isn’t a comfort suggestion, it’s a physics constraint. If the straps are above the shoulders, a crash will jerk the child upward and allow excessive head movement. If they’re too far below, the child can submarine down and out of the harness.
Most infant seats have adjustable headrests that move the harness slots as a unit. On the Graco SnugRide SnugLock 35 LX, you press a button at the back of the headrest to slide it up or down. The Chicco Fit360 uses a similar mechanism. The Joie i-Snug 2’s harness height adjusts via slots in the shell itself.
| Seat Model | Harness Adjustment Method | Critical Check |
|---|---|---|
| Graco SnugRide SnugLock 35 LX | Headrest lift with button release | Straps at/below shoulders for rear-facing |
| Chicco Fit360 | Headrest lift, often with a pull-tab | Must remove seat from base to adjust recline |
| Joie i-Snug 2 | Manual re-threading through shell slots | Straps through correct slot for child’s height |
Adjust the harness height before you finish snapping everything together. Doing it after means disassembling the side bolsters or pad again.
The Base Reattachment That Actually Locks
The carrier clicks into the base. Everyone knows that. What they miss is the indicator.
Modern bases like the one for the Joie i-Snug 2 have a color-coded indicator window. You must push the carrier down until it shows a solid green or a “locked” symbol. A click is not enough. If the indicator shows red or isn’t fully green, the seat is not secure. In a frontal crash, an improperly latched carrier can detach from the base.
For LATCH installations, the lower anchor connectors must be fully engaged. You’ll hear a definitive click and see no red warning on the connector itself. Then, tighten the strap by pressing your knee into the base and pulling the tightening strap. The base should not move side-to-side or front-to-back more than 1 inch (2.5 cm) at the belt path.
For seat belt installations, the process is the same but you’re threading the vehicle belt through the base’s rear-facing belt path (marked with a blue label on Graco models). After buckling, lock the seat belt according to your vehicle manual, usually by pulling it all the way out and letting it retract.
Where this goes sideways: Assuming a “click” means secure. The click is the first latch; the visual indicator is the lock. If you skip checking the indicator, you might be driving with only half the connection engaged.
Model-Specific Traps: Joie, Chicco, and Graco
 All seats follow the same principles, but each brand has a quirk that’ll cost you an hour if you miss it.
Joie i-Snug 2 / Saffron SI: The crotch buckle strap adjusts through slots in the hard shell. You must squeeze the sides of the strap to narrow it, twist it slightly, and slide it to the desired position. The manual explicitly warns: “ALWAYS ensure that the crotch buckle strap is NOT twisted and the buckle button is facing outward.” After threading, you pull it back up through the seat fabric. Get this wrong, and the buckle sits at an angle that’s hard for little fingers to press.
Chicco Fit360: This seat has a firm rule. The user guide states: “NEVER remove harness from Child Restraint.” If you’ve taken the entire harness out, you’re in uncharted territory. Your next step is not reassembly, it’s a call to Chicco USA at 1-877-424-4226 for replacement parts or instructions. Attempting to rethread a harness they forbid removing could compromise its integrity.
Graco SnugRide SnugLock 35 LX: The harness adjustment webbing is on the front of the seat, between the child’s legs. It’s easy to thread this webbing over the crotch buckle strap by mistake when reassembling. The webbing must run cleanly through the front adjustment mechanism. If it binds, the harness won’t tighten smoothly, and you’ll fight it every time you buckle your child in.
When Reassembly Isn’t Enough: Full Re-Installation
 Putting the seat together is half the job. Installing it correctly in the vehicle is where safety actually happens.
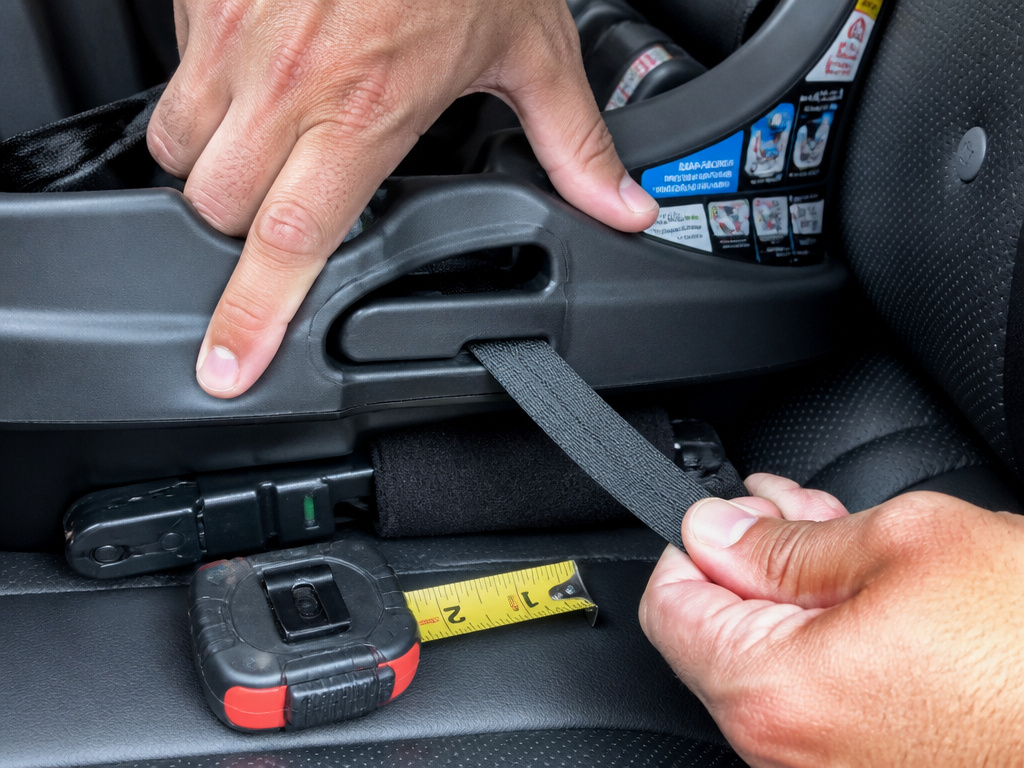
The federal standard is clear: once installed, the car seat should not move more than 1 inch (2.5 cm) side-to-side or front-to-back at the belt path. This applies whether you’re using LATCH or the vehicle seat belt. The NHTSA infant seat installation guide provides the official steps, but the physical test is simple. Grab the seat at the belt path, where the seat belt or LATCH strap goes through the base, and tug hard side-to-side and front-to-back.
If it moves more than an inch, it’s not tight enough. For seat belt installations, ensure the belt is locked. For LATCH, press down on the base with your full weight while pulling the tightening strap. The center seating position is often the safest, but check your vehicle manual, some prohibit using the center with LATCH and require a seat belt install there.
Frequently Asked Questions
Can I wash the harness straps of my infant car seat?
No. Submerging or machine-washing harness webbing can degrade its strength. Most manufacturers only allow spot cleaning with a damp cloth and mild soap. The harness is a load-bearing component; its certification depends on the webbing remaining untouched by detergents and heat. If the straps are heavily soiled, contact the manufacturer for replacement straps.
How do I know if my car seat is too old to use?
Check the manufacturer’s label on the seat for a “Do Not Use After” date. Most seats expire 7 to 10 years from the date of manufacture. Plastic degrades over time due to UV exposure and temperature cycles, becoming brittle. The Chicco Fit360 manual states: “Do NOT use if more than 8 years old.” An expired seat should be disassembled and properly disposed of.
My car seat was in a minor crash. Can I still use it?
It depends on the crash severity. The National Highway Traffic Safety Administration (NHTSA) states a seat should be replaced after any moderate or severe crash. Some manufacturers, like Graco, advise replacement after any crash, regardless of severity. If in doubt, replace the seat. Hidden stress fractures in the plastic shell are not visible.
Why are my reassembled harness straps so hard to adjust?
The webbing is likely pinched somewhere. The most common pinch points are: 1) the harness strap twisted inside the shell, 2) the front adjuster webbing threaded over the crotch buckle strap instead of under it, or 3) the seat pad fabric caught in the harness buckle. Disassemble the area around the difficulty and look for a smooth, straight path for the webbing.
Is it safe to use aftermarket inserts or covers?
Only if they are sold by the car seat manufacturer for your specific model. The manual for the Joie i-Snug 2 warns: “The soft goods should not be replaced with any other than the one recommended by the manufacturer, because the soft goods constitutes an integral part of the restraint performance.” An unapproved car seat insert or cover could interfere with harness fit or the seat’s performance in a crash.
Before You Go
Reassembly is a logic puzzle with real stakes. The harness must be twist-free, the buckle oriented correctly, and every piece of padding snapped back in its documented place. If your manual says “reverse the steps” and you didn’t document the disassembly, start with the harness routing through the shell, everything else builds from there.
When you’re done, the final step isn’t in the seat manual. It’s in the vehicle manual. Install the base or seat tightly, check for less than an inch of movement, and ensure the carrier clicks and shows a positive lock indicator. Then place your child in the seat, buckle the harness snugly, and do the pinch test at the shoulder. If you can pinch a vertical fold in the strap, it’s too loose.
That’s it. No shortcuts, no substitutions. The difference between done and done-right is a twist in a strap you’ll never see until it’s too late.
