
How to Travel with an Infant Car Seat: A Simple 3-Step System
This post contains affiliate links. As an Amazon Associate, we earn from qualifying purchases.
To travel with an infant car seat, you need three things: FAA certification for in-flight use, a protective travel bag for gate-checking, and a plan for the security line that keeps your hands free. The seat must have a label reading “This restraint is certified for use in motor vehicles and aircraft.” Without it, the airline will not let you use it on the plane.
That certification is the physical ticket past the gate agent. Its absence turns your car seat into checked baggage, which means you cannot secure your child during takeoff, turbulence, or landing. The Federal Aviation Administration is clear: a child safety restraint is the only safe option.
What follows is the system: the three FAA rules you cannot skip, the exact security line sequence that prevents a breakdown at the scanner, and the gear that makes carrying a 15-pound seat through a terminal feel manageable.
Key Takeaways
- Your car seat must have the specific FAA certification label to be used on the airplane. A general safety certification is not enough.
- Always use a padded, durable travel bag if gate-checking your seat. A standard trash bag invites damage and denies you the airline’s liability coverage.
- For any flight over two hours, purchase a seat for your infant and bring the car seat on board. The safety and sanity benefit outweighs the cost.
- At TSA, your sequence is: collapse the stroller, remove the child, place the car seat (empty) on the belt. Alert them to formula before your bag enters the X-ray.
- The vehicle’s owner’s manual overrules the car seat manual in any conflict. This is a written rule from manufacturers like CYBEX.
The 3 Non-Negotiable FAA Rules for Your Car Seat
Not every infant car seat is cleared for air travel. The difference is a single line of text printed on a sticker. You will find this label on the plastic shell of the seat, usually near the child’s feet or on the back.
This restraint is certified for use in motor vehicles and aircraft. That is the exact phrase mandated by the Federal Aviation Administration. If the label says anything else, or is missing, the seat is not approved for in-flight use. Airlines train their staff to check for this wording.
Rule 1: The Label is Law. “Certified for use in motor vehicles” alone refers to FMVSS 213, the federal vehicle safety standard. It does not grant airplane permission. The CYBEX CLOUD T manual states its certification for aircraft explicitly. If your seat lacks this, your only option is to check it as luggage and hold your infant on your lap—a significant safety compromise the FAA warns against.
Rule 2: The Airplane Seat Belt Path is Different. On a plane, you secure the car seat using the aircraft’s lap belt only. You thread it through the seat’s airplane belt path, which is a separate, often rear-facing, set of guides. Never use the LATCH system or the seat’s base on the aircraft. The base stays in the travel bag.
Rule 3: Rear-Facing is the Only Option. The FAA and every car seat manufacturer require the seat to be installed rear-facing on the plane. This is non-negotiable for infants. A forward-facing installation violates the seat’s design and the airline’s contract of carriage.
Lap Infant vs. Own Seat: The 90-Minute Rule
The financial temptation is real. Children under two can fly as a “lap infant” for a fraction of the ticket cost, sometimes just taxes. The safety and comfort calculation is less straightforward.
Under 90 Minutes: Lap Infant is Logistical. For short hops, the hassle of lugging, installing, and storing a car seat in a cramped cabin can outweigh the benefit. Your arms are the restraint. This only works if you can maintain a secure hold during unexpected turbulence—which is harder than it sounds.
Over 90 Minutes: Buy the Seat. On any flight long enough for a feeding or a nap, your infant needs a dedicated, safe space. A secured car seat provides it. The American Academy of Pediatrics stresses that a child safety restraint is the safest way to fly. In a car seat, they can sleep safely. You can use your hands. Everyone breathes.
The Reddit parent debating a $2,500 upgrade for a Australia trip from Denver had it right. The consensus from long-haul veterans was unanimous: the separate seat was worth every dollar for sleep alone. Their update confirmed they bought the seat.
| Scenario | Recommended Setup | Why It Wins |
|---|---|---|
| Short domestic hop (< 90 min) | Lap infant | Cost and convenience outweigh the short duration of risk. |
| Long domestic / any international flight | Purchased seat with FAA-approved car seat | Provides a safe sleep space, meets FAA safety guidance, and allows parents hands-free time. |
| Using airline-provided bassinet | Lap infant (with backup plan) | Bassinets are not safe for turbulence; you must lift the child out. The car seat is still the safer sleep option. |
What most people get wrong: Assuming an empty seat on the plane is a free upgrade for their lap infant’s car seat. Most airline policies, like Alaska’s, do allow a lap infant to use an empty seat with their car seat at no extra cost. But you must ask the gate agent, and the car seat must still be FAA-approved. The agent who denies this is often misinformed.
TSA Security Line: A Step-by-Step Walkthrough
The security checkpoint is the highest-stress, shortest-time segment of your journey. A four-month-old’s parent broke down at Dallas TSA after being yelled at for not moving fast enough. Her story is a perfect blueprint for what not to do—and how to prepare.
Your goal is to move your child, your carry-ons, your stroller, and your car seat through the scanner in one fluid sequence without losing your mind. It requires a drill.
Before You Reach the Agent:
- Strip the car seat of any aftermarket toys, cupholders, or head supports. Place them in a carry-on bag.
- Have your child out of the stroller and carrier. Wear them in a soft carrier if possible, so your hands are free.
- Have your formula or breast milk (in quantities greater than 3.4 oz) ready in a separate, clear quart-sized bag. Announce it to the first officer you see.
The Drill:
- Collapse your stroller and place it on the X-ray belt.
- Place your empty infant car seat directly on the belt. It goes through the X-ray machine.
- Send your bags through.
- Walk through the metal detector or body scanner with your child.
Common mistake: Trying to carry the child through in the car seat. TSA requires the seat to be empty so they can get a clear X-ray image. Failing to do this is what triggers the yelling. The seat is designed to take the belt ride; it won’t break.
The Formula Rule: Liquid formula, breast milk, and juice are exempt from the 3.4-oz rule. You must declare them to the officer for separate screening. They may test the liquids with a vapor strip. You have the right to request a private screening and to avoid having the containers opened. State this clearly when you declare them.
How to Pack and Protect Your Seat for Travel
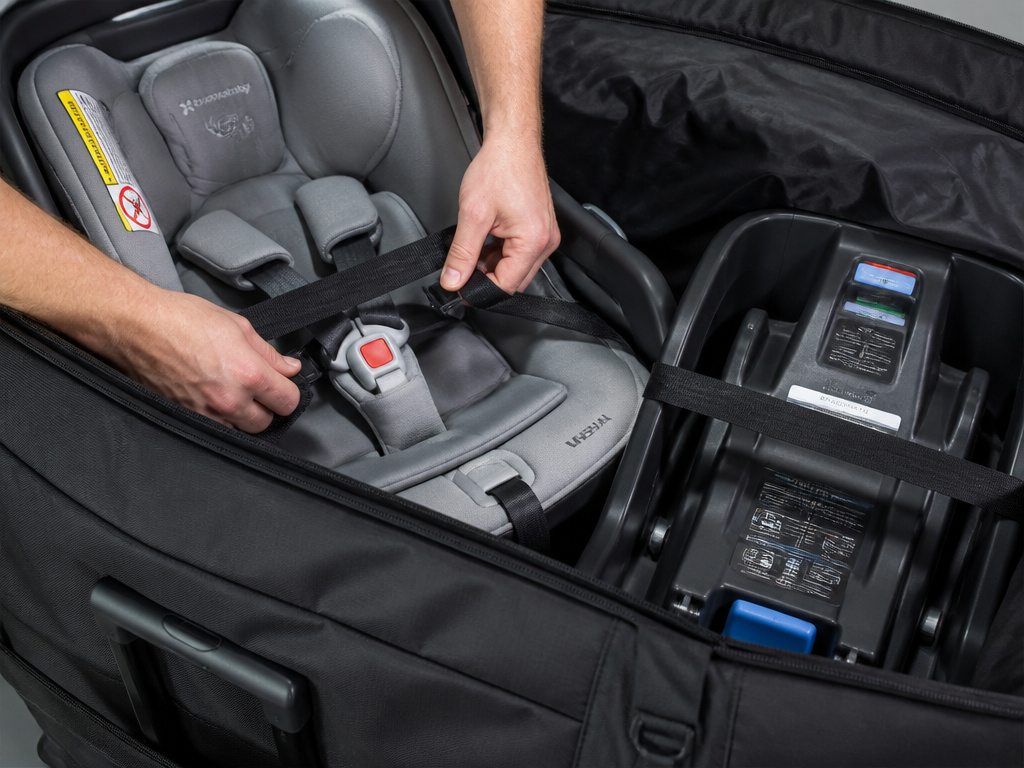
Airlines are rough on gear. A car seat gate-checked in nothing but a plastic bag will come back scratched, wet, and stinking of jet fuel. The solution is a dedicated travel bag.
Why a Bag is Non-Optional: Most airline contracts limit their liability for damaged “sports equipment” or “fragile items” if they are not in a protective case. A proper bag turns your car seat from fragile luggage into protected equipment. It also gives you handles and, crucially, wheels.
Bag Features That Matter:
- Padded Walls: At least 5mm of foam padding on all sides.
- Water-Resistant Material: Cordura nylon or heavy-duty polyester.
- Wheels: Two sturdy, inline skate-style wheels and a telescoping handle. This is the single biggest back-saver.
- Compression Straps: Internal straps to secure the seat from bouncing around.
- Zippered End: A full-length zipper, not a drawstring closure.
The J.L. Childress Ultimate Car Seat Travel Bag is the benchmark here. It hits every feature, and the wheels roll smoothly over carpet and tile. A cheaper bag without padding is a false economy.
Packing the Seat:
- Remove the seat from its base.
- Adjust the harness to its tightest setting so straps don’t dangle.
- Place the seat in the bag, rear-facing.
- Secure the internal straps.
- Place the base and any accessories in the bag around the seat. Use clothing as extra padding.
- Zip it shut.
This packed unit is what you’ll gate-check. The process for checking a car seat is straightforward once the seat is properly bagged.
Installing Your Seat on the Airplane
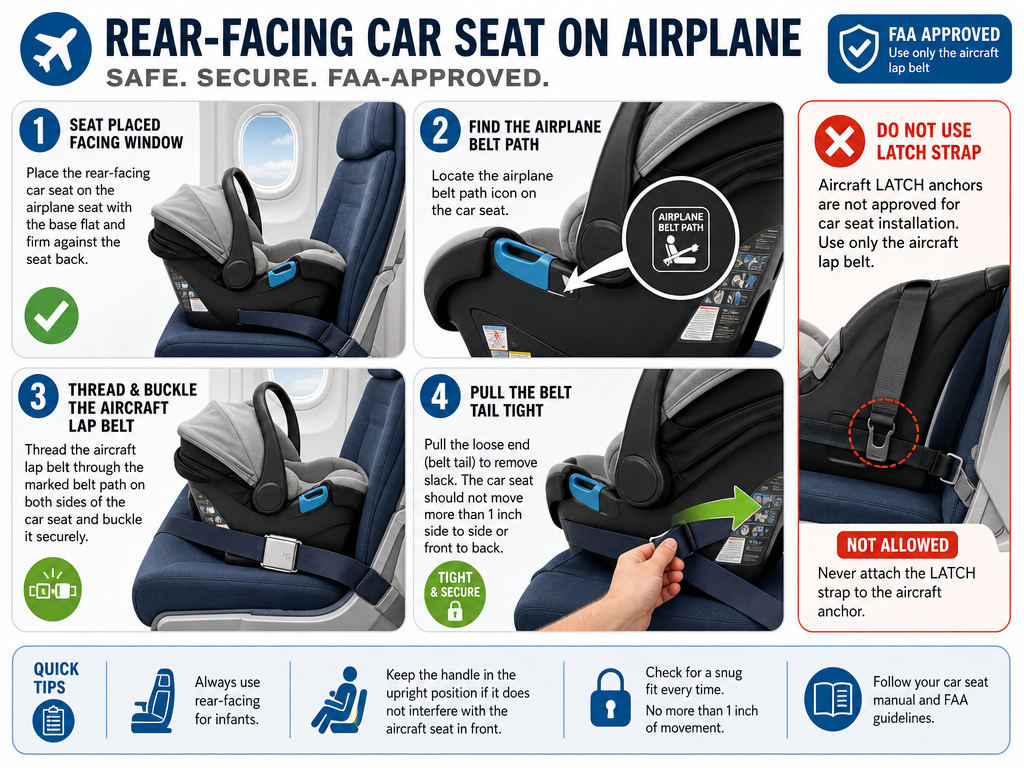
You’ve passed security, checked your bag, and boarded. Now you must secure the seat to the aircraft seat. Flight attendants are required to assist you, but they are not certified car seat technicians. You need to know this.
Before You Board:
- Confirm your ticketed seat assignment is a window seat. Airlines prohibit car seats in aisle or emergency exit rows, as they are considered obstructions.
- Have your car seat manual accessible on your phone. The FAA requires you to follow it.
The Installation Steps:
- Place the car seat rear-facing in the aircraft seat, facing the window.
- Locate the seat’s airplane belt path. This is a separate set of openings, often marked with a small aircraft icon. Refer to your manual.
- Thread the aircraft’s lap belt through this path and buckle it.
- Kneel in the seat and put your full weight into the car seat while pulling the belt tail tight. There should be less than one inch of side-to-side or front-to-back movement at the belt path.
- Attach your child using the car seat’s internal harness, ensuring the straps are at or below their shoulders.
Where this goes sideways: Using the wrong belt path. The LATCH path or the vehicle belt path will not secure the seat correctly on the plane. The belt will be loose, and the seat could rotate in a crash. Find the airplane icon.
If you need a visual guide, our step-by-step tutorial for installing on a plane walks through the common pitfalls.
Choosing the Right Seat for Travel
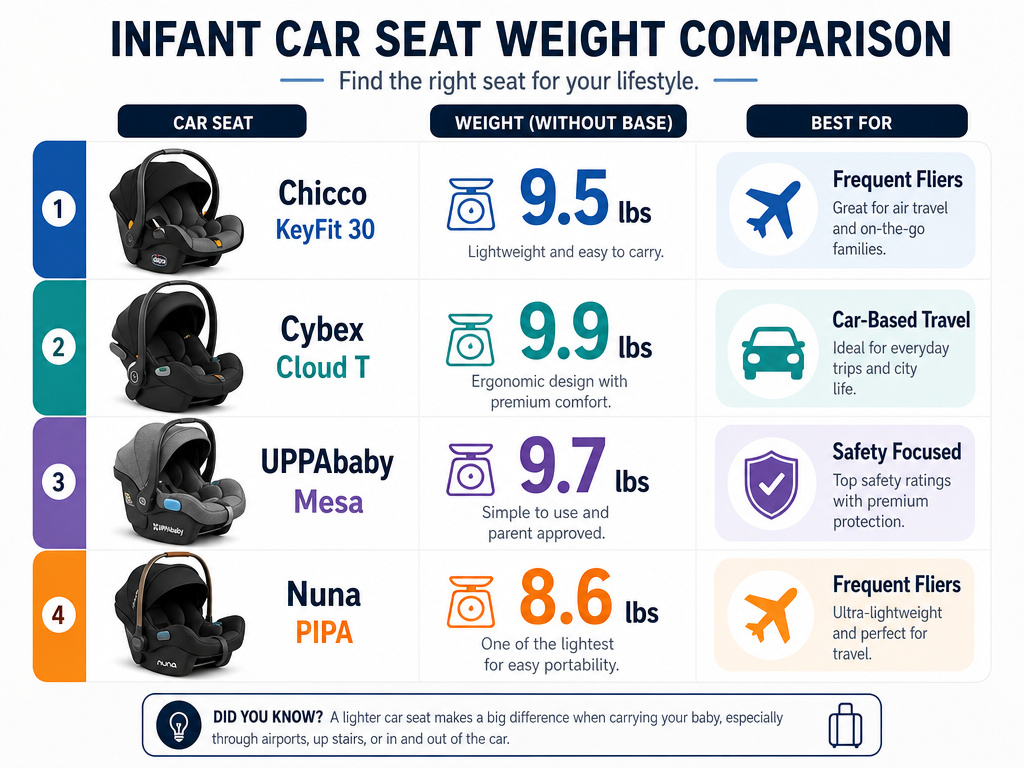
Not all infant car seats are created equal for travel. Portability matters. The lightest seats on the market hover around 7 pounds, while feature-rich models can be over 15 pounds. Your choice depends on your primary travel mode.
For Frequent Fliers: Weight is King. If you will be installing and uninstalling the seat on multiple planes, taxis, and rideshares, every pound counts. The Chicco KeyFit 30 is a standard for a reason: it’s relatively light, universally compatible with travel systems, and easy to install. The Cybex Cloud T is a step lighter and includes a dream canopy, but the base is heavier.
For Car-Based Travel: Features Win. If most of your journey is by car, with only occasional flights, prioritize safety features and comfort. The UPPAbaby Mesa has a no-rethread harness and excellent side-impact protection. The Nuna PIPA Series is incredibly lightweight for its feature set and includes a dream drape.
The Rideshare Caveat: Services like Uber Car Seat provide one model. If your child is at the upper limit of that seat’s height or weight requirements, you cannot use it safely. In that case, bringing your own seat is not a luxury—it’s a necessity. Our list of the best infant car seats for travel compares these key portability specs.
| Seat Model | Approx. Weight (Seat Only) | Best For | Key Travel Feature |
|---|---|---|---|
| Chicco KeyFit 30 | 9.5 lbs | First-time travelers, car-centric trips | Wide compatibility with stroller travel systems. |
| Cybex Cloud T | 8.8 lbs | Frequent fliers, urban travel | Very light, includes a full canopy with sun protection. |
| UPPAbaby Mesa | 9.9 lbs | Families using a UPPAbaby stroller | No-rethread harness adjusts height without disassembly. |
| Nuna PIPA Series | ~8 lbs (PIPA lite) | Parents prioritizing minimal weight | Lightest in its safety class, includes a breathable drape. |
Special Considerations & Edge Cases
Preterm or Low Birth Weight Infants: The rulebook changes. The American Academy of Pediatrics recommends a 90- to 120-minute observation period in the car seat before the first trip for any infant born before 37 weeks or weighing less than 5 pounds. This is to monitor for breathing or heart rate issues. This observation should be done by hospital staff with the seat at the angle it will be used in the vehicle. Minimize trip duration after clearance.
International Travel & i-Size: If you’re traveling to or within Europe, you’ll encounter the i-Size standard (UN Regulation No. 129). Seats like the Joie i-Snug 2 are i-Size approved. They are incompatible with non-i-Size bases and must be used in i-Size designated vehicle seating positions. Renting a car abroad requires verifying i-Size compatibility.
The Manual Conflict Rule: This is printed in the CYBEX manual and is industry-wide: If instructions in the car seat manual and the vehicle owner’s manual conflict, the vehicle owner’s manual takes precedence. The vehicle manufacturer’s rules about seating positions, airbags, and LATCH weight limits are law.
After a Crash: Any car seat involved in a crash, even a minor fender-bender while it was unoccupied, must be replaced. The structural integrity is compromised in ways you cannot see. Airlines do not cover this, but your auto insurance or homeowner’s policy might.
Frequently Asked Questions
Can I use my infant car seat on a plane without buying a seat?
Yes, but only if there is an empty seat next to you and the airline allows it. Policies vary. Alaska Airlines, for example, permits a lap infant to use an empty seat with their FAA-approved car seat. You must ask the gate agent. You cannot expect an empty seat, so planning for a lap-held journey is safer.
Do I have to check my car seat at the ticket counter?
No. You should always gate-check your infant car seat. This means you take it through security and leave it at the jet bridge just before boarding. It is the last item loaded and the first unloaded, minimizing handling and risk of loss or damage. Use a protective wheeled travel bag for this.
What if my car seat gets damaged by the airline?
If you used a proper protective travel bag and the seat is still damaged, immediately file a report with the airline’s baggage service office before leaving the airport. Take photos. Their contract of carriage typically limits liability, but a bagged item is covered. A seat checked in a plastic bag may not be.
How do I clean my car seat after travel?
Remove the fabric cover according to the manual and wash it in cold water on a gentle cycle. Air dry completely—do not put it in the dryer. Wipe the plastic shell with a mild soap and water solution. Never use harsh chemicals, bleach, or submerge the harness straps, as this weakens the webbing.
Can I rent an infant car seat at my destination?
You can, but I don’t recommend it. You have no knowledge of the seat’s history—it could have been in a crash, cleaned improperly, or be missing parts. The installation instructions will be unfamiliar. For safety and peace of mind, bringing your own known, properly fitted seat is always the better choice.
Is a travel cart worth it?
For a long walk through a massive airport, a dedicated travel cart can be a back-saver. It straps the seat in securely and maneuvers better than a wheeled bag. For short connections or smaller airports, a quality wheeled bag is sufficient. Assess your typical airport walk distance.
The Bottom Line
Traveling with an infant car seat is a logistics puzzle, not a mystery. The solution is a system built on three pillars: verification, protection, and preparation.
Verify your seat has the FAA’s aircraft certification label. Protect it with a padded, wheeled travel bag—this is non-negotiable for gate-checking. Prepare for security by drilling the sequence: empty seat on the belt, child in your arms, liquids declared early.
For any journey where sleep or safety is a priority, buy the seat and bring the car seat on board. The alternative is holding a squirming, sleeping infant for hours while worrying about turbulence. The right seat, the right bag, and the right plan turn a daunting trip into a manageable one. Your child’s safety is the one thing you should never check at the counter.
