
Infant Car Seat Plane Installation: Key Methods and Rules
This post contains affiliate links. As an Amazon Associate, we earn from qualifying purchases.
To install an infant car seat on a plane, you need the aircraft’s lap belt, your car seat manual, and knowledge of one model-specific rule: most infant carriers install directly onto the aircraft seat, but some bases are approved while others are not. The universal steps are threading the lap belt through the designated belt guides, buckling, tightening, and leveling the seat. An airline blanket under the front edge often fixes the angle.
That “certified for aircraft use” label on your seat isn’t a general approval. It’s an instruction to open page 102 of your Evenflo manual, page 73 of your Cybex manual, or the “Seat Installation. Lap Belt Only” section of your Graco guide. Each model has its own diagram, its own weight limits for flight, and its own yes-or-no on using the base.
The rest walks you through the three checks to do before you board, the five physical steps that work for any belt-path seat, and the two warnings that keep the installation secure from taxi to landing.
Key Takeaways
- Your car seat must have a label stating it meets FMVSS 213 or an equivalent national standard; the manual must include aircraft installation instructions.
- Always use the aircraft lap belt, routed through the car seat’s belt guides. Never use LATCH/UAS connectors or the tether strap on a plane.
- Most airlines require rear-facing car seats to be placed in a window seat so they don’t block aisle escape paths.
- For the correct recline angle, use an airline blanket under the front of the seat carrier (near the seat back) to level it until the indicator is parallel to the aircraft floor.
- Unfasten any electronic chest clips (like Evenflo’s SensorSafe) during taxi, takeoff, and landing as they can interfere with emergency evacuation.
The Pre-Flight Checklist: 3 Things You Must Verify
Don’t wait until you’re struggling in a narrow airline seat. These three checks happen at home, with your manual and a measuring tape.
First, confirm your seat is actually certified for aircraft use. Look for a label on the seat shell that states it conforms to Federal Motor Vehicle Safety Standard (FMVSS) 213, Canadian Motor Vehicle Safety Standard (CMVSS) 213, or a similar national standard. More critically, the manufacturer’s manual must have a section titled “Aircraft Installation” or similar. If it doesn’t, the seat is not approved for flight, regardless of the standard label.
Second, measure your seat’s width. Aircraft seats, especially in economy, are narrow. The European Union Aviation Safety Agency (EASA) explicitly recommends contacting your airline to check whether the width and height of your child seat will fit. A seat that’s too wide won’t sit flush against the aircraft seatback, making a tight lap-belt installation impossible.
Third, review your specific model’s aircraft rules. This is where the generic advice ends and your manual takes over. Two critical questions are answered there: 1. Does the base stay or go? The Cybex CLOUD G/CLOUD G LUX manual states it is “certified for use in aircraft without the base.” The Graco CityGo manual, however, describes installation “using the base” the same as in a car with a lap-only belt. You must follow your model’s rule. 2. What are the in-flight weight and height limits? For example, the Evenflo REVOLVE 180° LITEMAX NXT allows aircraft use for children weighing 3 to 30 lbs and measuring 15.7 to 32 inches, provided the top of the child’s head is below the top of the car seat shell. Your seat has its own limits.
Common mistake: Assuming “certified for aircraft use” means you can install it exactly like in your car. On a plane, you never use the lower LATCH anchors or the tether strap. The lap belt is the only approved attachment method.
What Does “Certified for Aircraft Use” Actually Mean?
It’s not a marketing term. It’s a legal designation tied to a physical test standard. When a manufacturer prints that label, they are declaring that the seat has been dynamically tested and passed the requirements of a motor vehicle safety standard that also includes provisions for aircraft seating.
The relevant standard in the U.S. Is FMVSS 213. Transport Canada and EASA have equivalent regulations. The seat’s structure, belt guides, and buckle clearance are all evaluated under this standard. The “aircraft use” clause means the seat can withstand the forces of a plane’s takeoff, landing, and turbulence when installed with a single lap belt, a different loading scenario than a car’s three-point belt or LATCH system.
This certification is why you must use the exact belt path shown in your manual. Those guides are engineered and placed to handle the crash forces in the certified orientation. Guessing or using a different path voids the certification entirely.
The 5-Step Universal Installation Method

Once you’re on the plane and the crew gives the okay, this sequence works for any infant carrier that installs directly onto the aircraft seat (most do).
1. Position the carrier rear-facing, foot end against the seat back. The carrier should sit squarely on the aircraft seat cushion. If you’re using the base per your manual, place the base on the seat first.
2. Route the aircraft lap belt through the belt guides. Find the guides on the car seat carrier or base. They are usually marked in red or gray. Pull the entire length of the lap belt through these guides. Ensure the belt isn’t twisted.
3. Buckle the lap belt. Insert the metal tongue into the buckle until you hear a definitive click. Pull on the loose end of the belt to remove all slack from the lap portion. The belt should be tight enough that the car seat moves less than an inch side-to-side or front-to-back at the belt path.
4. Tuck away the loose belt tail. Once tight, secure the leftover length of the belt so it doesn’t become a tripping hazard or get caught in the seat mechanism.
5. Check the recline angle and tighten again. This is the step everyone rushes. After the initial tighten, press your full weight into the carrier or base through the belt path and pull the belt tight once more. The initial settle can create slack.
The Blanket Trick for Getting the Angle Right
Aircraft seats are not level. They recline for passenger comfort, which can tilt your infant carrier into an unsafe position. Your car seat has a level indicator, a line or a window with a ball.
If the level line isn’t parallel to the aircraft floor, place a folded airline blanket under the front edge of the infant carrier (near the seat back) to adjust the angle. The Evenflo REVOLVE 180° LITEMAX NXT manual explicitly shows and permits this.
You are not modifying the seat. You are compensating for the aircraft seat’s design to achieve the angle the seat was certified for. Don’t use pillows, jackets, or your own baggage. A single airline blanket is the accepted, manufacturer-endorsed method.
Model-Specific Nuances That Change the Game
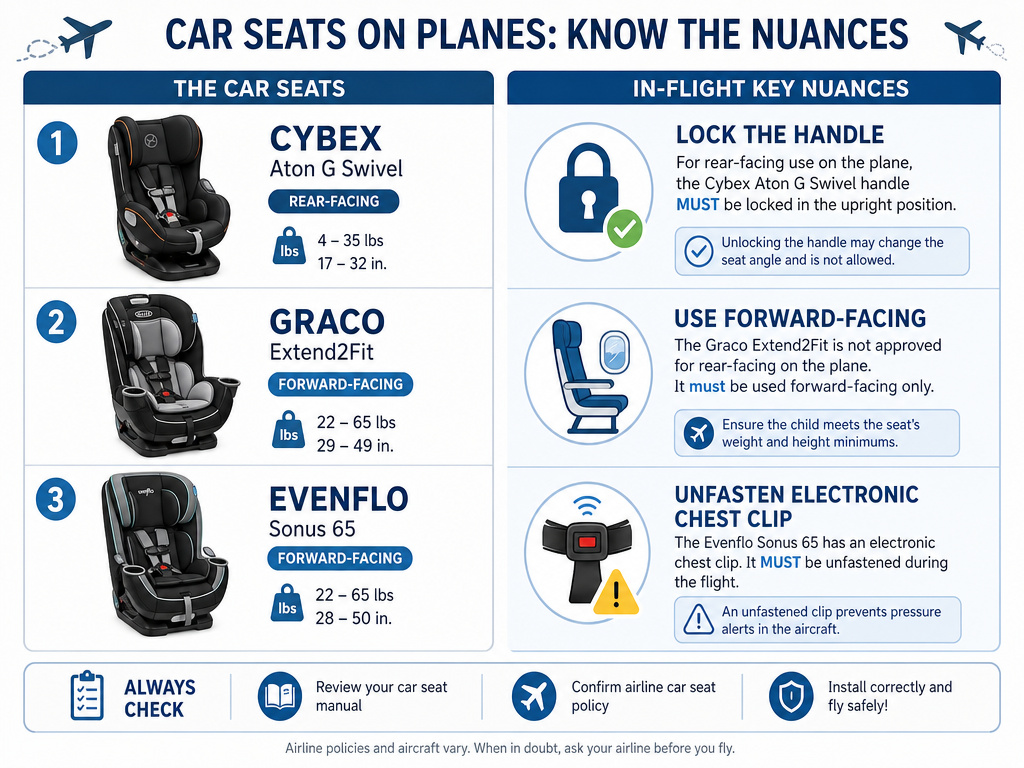
Reading the manual isn’t about being pedantic. It’s about catching the one detail that makes your seat different.
| Model | Base on Plane? | Critical Manual Page | Unique In-Flight Rule |
|---|---|---|---|
| Cybex CLOUD G/CLOUD G LUX | No. Manual states “without the base.” | Pages 73–74 | Handle must be locked in carry position during flight. |
| Graco CityGo | Maybe. Manual describes installation “using the base” like a lap-belt car install. | “Seat Installation—Lap Belt Only” section | Must be used in a forward-facing aircraft seat only. |
| Evenflo REVOLVE 180° LITEMAX NXT | Yes, using lap belt through base guides. | Pages 102–106 | Unfasten SensorSafe chest clip during taxi, takeoff, landing. |
The handle rule on the Cybex matters because a floating handle can become a projectile in severe turbulence. Locking it in the carry position secures that mass.
The “forward-facing aircraft seat” rule for the Graco CityGo is an EASA regulation. A rear-facing child seat can only be installed on a forward-facing aircraft seat. This prevents the child seat from being loaded in a direction it wasn’t designed for if the plane decelerates rapidly.
The SensorSafe clip instruction from Evenflo is about electronics, not harness safety. The harness itself must remain snug. However, the electronic chest clip must be unfastened during critical flight phases so it doesn’t interfere with emergency egress if the crew orders an evacuation. You refasten it once the seatbelt sign is off.
Where This Goes Sideways: 3 Installation Killers
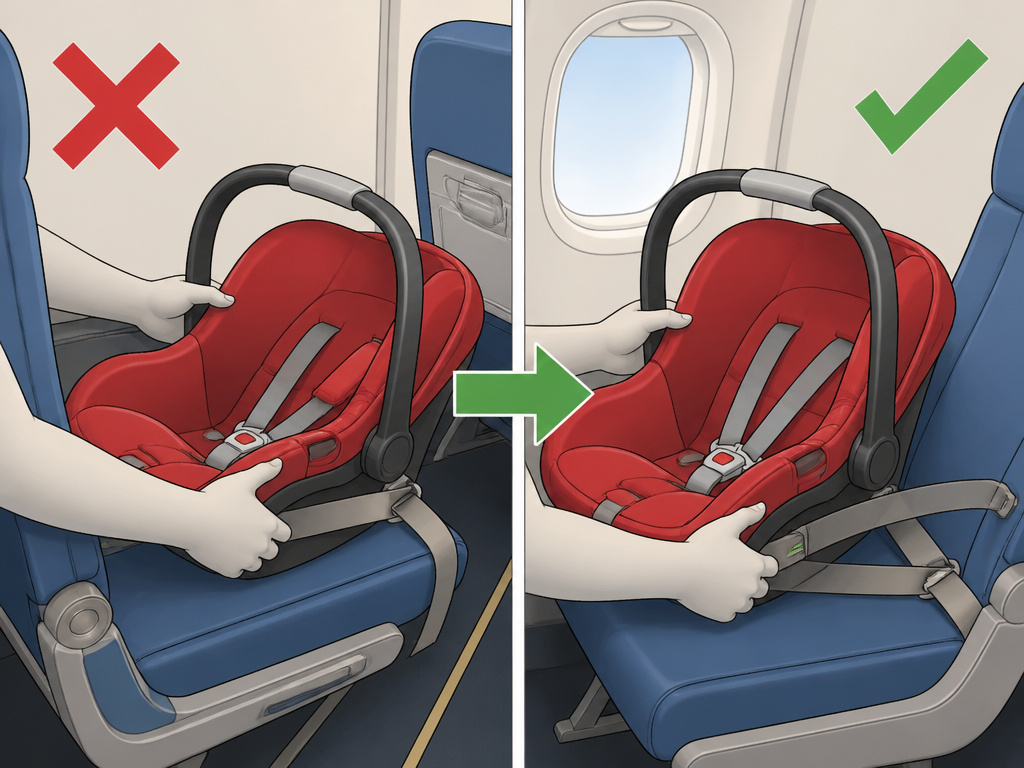
Ignoring the window seat mandate. Most airlines enforce this. A car seat on the aisle blocks the escape path for the entire row in an emergency. Flight attendants will make you move, which means reinstalling during boarding chaos. Always book a window seat when traveling with a car seat.
Using a seat that only has ISOFIX/LATCH connectors. Some European-designed seats are approved only for ISOFIX/LATCH systems. Unless the manual explicitly states the seat can also be installed with a lap belt, it is not usable on a plane. EASA flags this as a common point of confusion.
Installing next to an airbag-equipped seat. Some premium and bulkhead seats have integrated airbags. The EASA warns never to place a child seat where an airbag could deploy. Always ask the cabin crew if your assigned seat has an airbag before you start installing.
How to Secure Your Child in the Seat for the Flight
The harness rules are the same as in the car: snug, with the chest clip at armpit level. The one difference is the layer of clothing. Plane cabins can swing from chilly to stuffy.
Dress your child in thin, fitted layers and tighten the harness over those layers. Do not buckle a puffy winter coat and then tighten the harness, the coat compresses in a crash, creating deadly slack. Place the coat over them like a blanket after they are secured.
For infants who still use the removable insert, keep it in place. It’s part of the crash-tested system. Ensure the harness straps are coming from the slot at or just below your baby’s shoulders for a rear-facing installation.
Frequently Asked Questions
Can I use my infant car seat base on the plane?
Check your manual. For the Cybex CLOUD G, the answer is no. For the Graco CityGo, the manual suggests you can, installing it with the lap belt as you would in a car. The base must be certified for aircraft use, and the manual must include instructions for it. When in doubt, the carrier-only installation is almost universally accepted.
What if my car seat is too wide for the airplane seat?
You’ll have to check it. A seat that doesn’t sit fully on the aircraft cushion cannot be installed securely. This is why measuring beforehand and reviewing airline policies is a non-negotiable first step. Consider using a travel bag if you must check it, though be aware of the risks of checking a car seat on a plane.
Which seat on the plane is best for the car seat?
The window seat is mandatory on most carriers. The middle seat is often prohibited because it blocks aisle access for both neighbors. Never install in an exit row or the row immediately in front of or behind an exit row.
Do I have to buy a seat for my infant to use the car seat?
Yes. The car seat must be installed in a purchased seat. You cannot install it in an empty seat next to you if that seat isn’t ticketed in your name. The only way an infant under two flies without their own ticket is on your lap, which safety authorities like Transport Canada strongly discourage.
Can I recline the car seat during the flight?
No. If your infant carrier has a recline feature, it must remain in the upright, locked position whenever the “fasten seatbelt” sign is on. This is an EASA regulation to prevent the seat from shifting its geometry during turbulence.
The Bottom Line
Installing an infant car seat on a plane comes down to matching three things: your specific seat’s manual, the aircraft’s lap belt, and the airline’s window-seat rule. The physical act of threading the belt and tightening is simple. The expertise is in knowing your model’s quirks, whether the base comes along, if the chest clip needs unfastening, and how a folded blanket gets the angle right.
Print your manual’s aircraft pages. Measure your seat. Book the window. That’s the sequence that gets you from the jet bridge to a securely installed seat before the cabin door closes. Everything else is just following the diagrams you already have.
