
When to Move Straps Up on Infant Seat | Proper Positioning
This post contains affiliate links. As an Amazon Associate, we earn from qualifying purchases.
Move the straps up on an infant car seat when the child’s shoulders are level with the next set of harness slots above their current position. For rear-facing use, straps must be at or just below the shoulders. Once the shoulders reach the next higher slot, you adjust the harness height. Waiting too long creates a dangerous gap that lets the child’s torso slide up in a crash.
This rule is printed in every manual, but the “just below” clause trips people up. You aren’t guessing. You’re matching a physical line on the child’s body to a fixed point on the seat’s shell.
What follows is how to read your specific seat’s manual for the adjustment method, the one tool you need for the job, and the three signs you’ve waited too long.
Key Takeaways
- The rule is physical: straps at or just below the shoulders for rear-facing, at or just above for forward-facing. “Just” means within an inch.
- Check fit monthly. Babies grow in spurts, and a harness that was perfect three weeks ago can now be dangerously loose.
- Most seats require you to unthread the harness from the back of the seat shell to move it up—you cannot adjust it while the child is seated.
- A loose harness isn’t just uncomfortable; it allows up to four inches of torso movement in a crash, which can lead to internal injuries or ejection.
- If the straps are already at the top slots and the shoulders are above them, the child has outgrown the seat in height. It’s time for a convertible seat.
The Shoulder-Level Rule (Rear-Facing vs. Forward-Facing)
Forget calendar dates. The harness height decision is a body mechanics problem. In a crash, the harness’s job is to hold the child’s torso back against the seat shell, distributing crash forces across the strongest parts of the body—the shoulders and pelvis.
If the straps are too low, the force pulls down on the shoulders, risking spinal compression. If they are too high, especially rear-facing, the straps can slip off the shoulders entirely. The child then slides up the seat—a phenomenon called “submarining.”
For rear-facing use, the harness straps must be at or just below the child’s shoulders. For forward-facing use, the harness straps must be at or just above the child’s shoulders. This is the universal standard, confirmed by the Evenflo LiteMax NXT manual and the Joie Saffron SI manual.
The “just” matters. It means within an inch of the shoulder line. A gap of two or three inches is a failure. You confirm this by sitting the child in the seat, buckling them in, and pressing your finger flat at the shoulder point. The harness strap should be level with your fingertip.
Why This Rule Isn’t Optional
The forces in a 30 mph crash multiply a child’s weight roughly 30 times. A 20-pound infant suddenly weighs 600 pounds. A harness that is one slot too low now acts like a vise, pulling straight down on delicate clavicles and the spine. The NHTSA car seat safety guidelines stress correct installation and fit because this math isn’t theoretical.
The shoulder is the load-bearing anchor. Miss that anchor, and the whole restraint system fails.
How to Actually Move the Harness Straps Up
You need the car seat manual. The process is not intuitive, and doing it wrong can damage the webbing or leave the harness insecure. Most infant seats follow one of two methods.
Method 1: Re-threading through the Shell. This is the most common. You’ll find a set of harness slots on the plastic shell behind the child’s back. 1. Fully loosen the harness using the adjustment strap. 2. Unbuckle the chest clip and harness buckle. 3. Lift the child out of the seat. 4. From the back of the seat, unthread the harness straps from their current slots. 5. Thread them up through the new, higher slots, ensuring the straps are not twisted. 6. Re-seat the child, buckle, and tighten.
Method 2: The Splitter Plate Loop (for Smaller Infants). Some seats, like the Evenflo LiteMax NXT, have a second, hidden adjustment. On the back of the harness straps, near where they connect to the metal splitter plate, there may be an extra set of loops.
The Evenflo LiteMax NXT manual specifies this feature: “The top loop should only be used if needed for shortening the straps to fully tighten the harness around a smaller infant.” This isn’t for moving straps up for a growing child—it’s for taking up slack when the straps are already on the lowest slots and are still too long for a tiny newborn.
Using this loop pulls the effective harness anchor point higher on the back, eliminating dangerous slack without re-threading the shell. It’s a nuance most parents miss.
The One Tool You Need
A Phillips-head screwdriver. Many seat covers are secured with snaps and a few sneaky screws hiding under fabric flaps. Trying to muscle the cover off without removing those screws can tear the fabric or break the plastic clips. Find the screws first.
The 3 Signs You’ve Waited Too Long to Adjust
Growth isn’t always gradual. Sometimes you go from a perfect fit to a clear problem between weekly checks. These are the non-negotiable red flags.
1. The Pinch Test Fails. Every Time. After tightening the harness, try to pinch the strap vertically at the child’s collarbone. If you can gather any material between your thumb and forefinger, the harness is too loose. The Joie Saffron SI manual is explicit: “should NOT be able to vertically pinch the harness straps at the collarbone area.”
A pass one day and a fail the next means the child’s torso grew. The straps are now originating from a point too low on their back.
2. The Shoulders Are At or Above the Next Slot. This is the primary sign. With the child sitting flush against the seat back, look at where the harness emerges from the shell. If the child’s shoulder is level with or has passed the next unused slot above the current one, it’s adjustment day.
3. The Chest Clip Sits Too Low. The chest clip must be at armpit level to work correctly. If you find yourself constantly hiking the clip up to the proper position after tightening, it’s because the shoulder straps are too low. They are pulling the clip down with them.
| Sign | What It Looks Like | Immediate Action |
|---|---|---|
| Failed Pinch Test | You can pinch a fold of harness strap at the shoulder. | Tighten the harness. If it still pinches, move straps up. |
| Shoulders at Next Slot | Child’s shoulder is level with the slot above the one in use. | Move harness straps to that higher slot. |
| Low Chest Clip | Chest clip rests on the belly or ribs, not at armpit level. | Adjust harness height; the clip position is a symptom. |
Where this goes sideways: Assuming a winter coat counts as slack. Bulky coats compress in a crash, creating inches of deadly slack. Perform the pinch test with the child in their indoor clothing, then put the coat on over the tightened harness.
Special Cases and Edge Conditions
The standard rule applies to about 90% of infants. The other 10% need you to read the manual’s fine print.
The Preterm or Low-Birth-Weight Infant. The Joie Saffron SI manual directly addresses this: “To ensure the safety of your preterm or low birth weight infant… Joie recommends following the AAP’s guidelines and consulting your doctor or hospital staff before the child’s first car trip.” The issue isn’t just harness fit, but the infant’s ability to maintain an airway in a semi-reclined position. Your pediatrician may recommend a car bed or specific positioning aids.
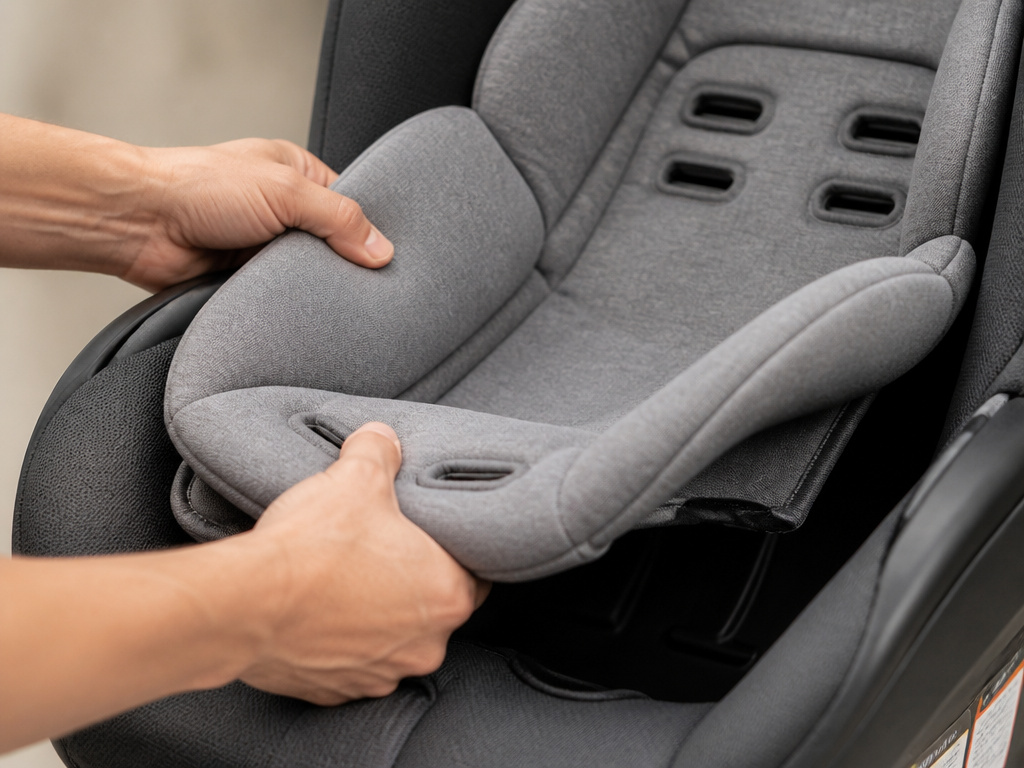
Using the Newborn Insert or Positioner. Many seats come with a removable infant insert. This insert often has its own set of harness slots that are lower than the main seat’s lowest slots. * Rule: Always use the harness slots on the insert when the insert is installed. * When to remove it: When the child’s shoulders are above the insert’s top slots, or as per the manual’s weight/height limit for the insert (often around 11 lbs). The Chicco Fit360 manual states its Newborn Body Positioner is for infants 4-11 lbs.
Removing the insert without moving the harness straps up to the seat’s next slots will leave a dangerously loose fit. This is a two-step process: remove insert, then immediately re-thread harness.
How a Loose Harness Actually Fails
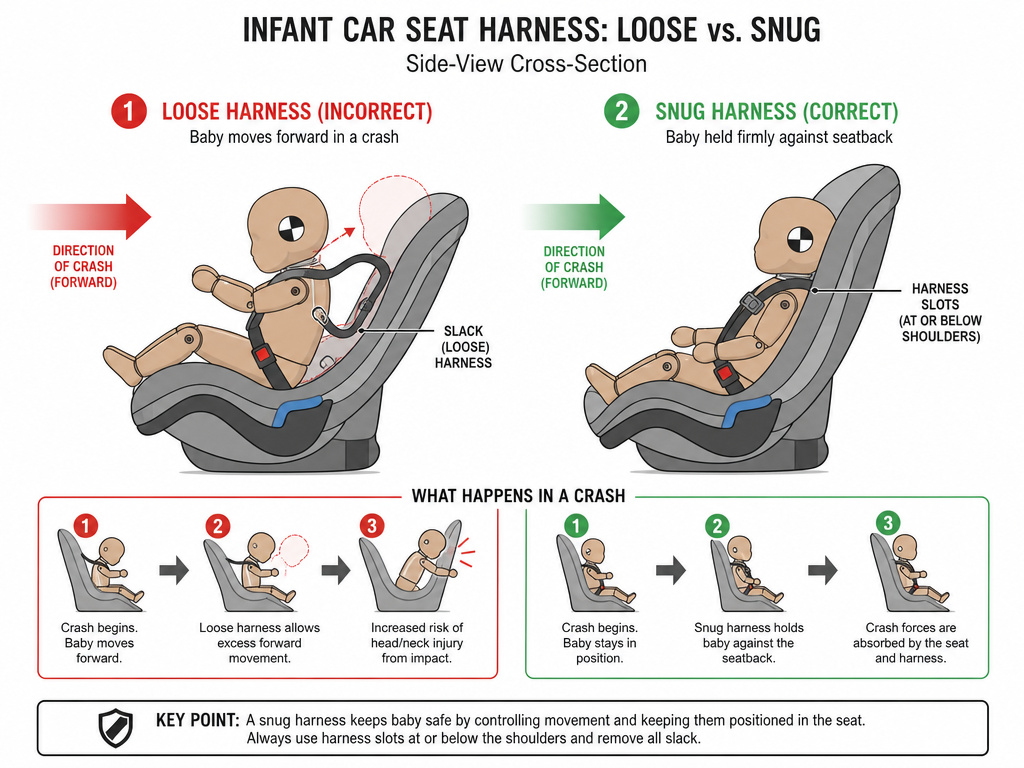
It’s not a minor comfort issue. A harness with slack allows the child’s body to build momentum before the restraint engages.
Think of it like a bungee cord with too much stretch. In a frontal crash, the seat stops immediately. A child in a snug harness stops with the seat. A child in a loose harness continues moving forward until the slack runs out, then jerks violently against the straps. That extra travel distance dramatically increases the force on their neck and chest.
Internal organs keep moving after bones stop. That’s how internal injuries happen even without visible bruising. A proper adjusting harness straps procedure eliminates this slack.
The federal guidelines for proper car seat fit are built around this physics. Your goal is to eliminate all possible movement paths.
Frequently Asked Questions
How often should I check the harness height?
Check it every time you put a new outfit on the child that’s thicker than a onesie, and at least once a month as a formal check. Growth spurts are unpredictable.
Can I just tighten the straps more instead of moving them up?
No. Tightening a strap that originates too low on the child’s back creates a downward pulling angle. It will be uncomfortably tight on the legs and shoulders but still allow upward torso movement. You must get the angle right first at the shoulder, then tighten.
My car seat has three harness slot levels. Which one do I start with?
Always start with the lowest slot position that is at or just below the newborn’s shoulders. For most, this is the very bottom set. Using a newborn body positioner may change which slot you use.
What if the straps are on the top slot and my child’s shoulders are still below them?
That’s fine. The rule is “at or just below.” If the top slot is still above the shoulders, you’re within limits. You only move them up when the shoulders reach the slot level.
When do I know it’s time to switch car seats entirely?
You need a new seat when the child outgrows the seat by height or weight. The height limit is usually when the child’s head is within one inch of the top of the seat shell, OR when their shoulders are above the top harness slots. The weight limit is printed on a label on the seat. At that point, you start researching a convertible car seat.
The Bottom Line
Move the straps when the shoulders tell you to, not the calendar. Find your manual, locate the splitter plate, and use the pinch test as your weekly truth-teller. The process of how to adjust infant car seat straps takes ten minutes the first time you do it.
The goal is a harness so snug that you can’t pinch it, with the straps level with the shoulders. That fit is what stands between your child and the physics of a crash. Get that right, and you’ve done the single most important thing for their safety in the car.
