
How to Install Cosco Car Seat Rear Facing with LATCH Guide
This post contains affiliate links. As an Amazon Associate, we earn from qualifying purchases.
To install a Cosco car seat rear-facing with LATCH, you must route the lower anchor belt through the designated rear-facing belt path slots on the car seat shell, ensuring the belt runs in front of the buckle straps. Attach the connectors to your vehicle’s lower anchor bars, then tighten the strap until the seat moves less than one inch side-to-side at the belt path. Never use the LATCH system and the vehicle seat belt together.
That routing detail—the belt in front of the buckle strap—is the hinge point. Get it wrong, and the tightening mechanism can’t pull the car seat shell flush against the vehicle seat. The seat will feel tight at first, but it works loose after a few drives because the adjuster strap is fighting the buckle hardware.
What follows is the full sequence: how to find your anchors, route the belt correctly for your specific Cosco model, and achieve a rock-solid install. We’ll also cover when you must use the seat belt instead, and the one check that proves the install is safe before you put your child in.
Key Takeaways
- The LATCH belt must be routed in front of the car seat’s buckle straps when rear-facing. Routing it behind creates a gap that prevents a secure fit.
- Never use both the LATCH system and the vehicle seat belt simultaneously. This is prohibited in Cosco manuals and can overstress the car seat structure.
- Tighten the LATCH strap by pushing down hard on the car seat with your knee while pulling the adjuster strap. The seat should not move more than one inch side-to-side at the belt path.
- Always consult your vehicle owner’s manual to confirm LATCH anchor locations and weight limits. Your car’s rules are as important as the car seat’s.
- If your vehicle’s seat belt does not lock (it slides freely when pulled), you cannot use it alone. You must use the LATCH system or a locking clip.
Before You Start: The Two Manuals Rule
You need two documents open: your Cosco car seat manual and your vehicle owner’s manual. The car seat manual tells you how its LATCH belt must be routed. The vehicle manual tells you where your lower anchors are hidden and if there are weight limits for using them.
Common mistake: Assuming all rear seats have LATCH. Many vehicles have anchors only for the window seats, not the center. Your manual has the map.
Missing the vehicle manual is how parents install a seat perfectly, only to find it’s attached to a cargo tie-down, not a LATCH anchor. That mistake isn’t visible once the seat is in. Pull your manual from the glovebox or find it online with your model year and make.
The 5-Step LATCH Installation (and the One Mistake That Loosens It)
This process is physical. You’ll be kneeling in the footwell, pushing with your body weight. Wear clothes you don’t mind getting a bit dirty from the vehicle seat.
1. Locate Your Vehicle’s Lower Anchors
Look between the vehicle seat cushion and the seat back. You should feel two rigid metal bars, usually marked with a small symbol. They might be hidden behind a flap of fabric. Your vehicle manual will confirm their position. The center seat often lacks them.
2. Prepare the Cosco Car Seat’s LATCH Belt
Remove the lower anchor belt from its storage location. For rear-facing, you’ll pull the entire belt out so both connectors are on the same side of the car seat. Find the rear-facing belt path slots on the car seat shell—they are typically marked.
3. Route the Belt Through the Correct Path
Thread the LATCH belt through the rear-facing belt path slots on the shell. This is the step with a hidden rule.
The LATCH belt must pass in front of the buckle straps (the hardware that holds the harness buckle). If you route it behind the buckle straps, the straps create slack that the tightening mechanism cannot remove. The manual for the Cosco Apt 40RF specifies this explicitly.
The adjuster mechanism for the LATCH strap can be on either side. Just ensure the belt isn’t twisted.
4. Connect and Tighten
Hook the LATCH connectors onto your vehicle’s anchor bars. You should hear and feel a solid click. Tug on them directly to confirm they are locked.
Now, place your knee firmly into the center of the car seat and push it down and back into the vehicle seat cushion. While maintaining that pressure, pull the LATCH adjuster strap to tighten. You will feel the slack disappear and the seat become rigid.
Pull until the seat moves less than one inch side-to-side at the belt path. Test by gripping the seat near where the LATCH belt routes through it and shaking. If it shifts more than an inch, re-tighten.
5. Perform the Final Safety Checks
Check the level line on the car seat shell. For infants who cannot sit up unassisted, this line must be parallel to the ground. For older babies, a more upright angle is acceptable. Recline the vehicle seat back if needed to achieve the correct angle.
Ensure the LATCH belt is not twisted and the harness buckle is not pinned underneath it. Finally, attach the top tether if your Cosco model and vehicle allow it for rear-facing. Not all do—check both manuals.
When LATCH Isn’t the Answer: Using the Vehicle Seat Belt
The LATCH system has weight limits. Your vehicle manual states a maximum combined weight for the child and car seat for using the lower anchors. Once your child approaches that limit, you must switch to a vehicle seat belt installation.
More commonly, you’ll need the seat belt if your chosen seating position doesn’t have lower anchors. The center rear seat is a frequent culprit.
| Installation Method | Best For | Critical Check |
|---|---|---|
| LATCH System | Simplicity, standard side seating positions. | Vehicle anchor weight limit. Belt routed in front of buckle straps. |
| Vehicle Seat Belt | Center seating, older/heavier children, vehicles without LATCH. | The belt must lock. If it doesn’t, use a locking clip. |
Switching methods means completely removing the LATCH belt from the belt path and storing it. You cannot use both systems together. The Cosco Apt 40RF manual explicitly prohibits this: “Do not use the LATCH system along with the [vehicle seat belt system].” It stresses the structure.
How to Lock a Seat Belt
This is the make-or-break skill for a seat belt install. Buckle the seat belt through the rear-facing belt path. Pull the shoulder belt all the way out until you hear it ratchet. Let it retract slowly—this engages the automatic locking retractor. For lap-only belts, you may need a locking clip, a small metal H-shaped piece that should be stored on your Cosco seat.
If the belt still slides freely when you tug on it, it’s a non-locking belt. You cannot use it without a locking clip. This is non-negotiable.
Common LATCH Installation Mistakes and Their Fixes
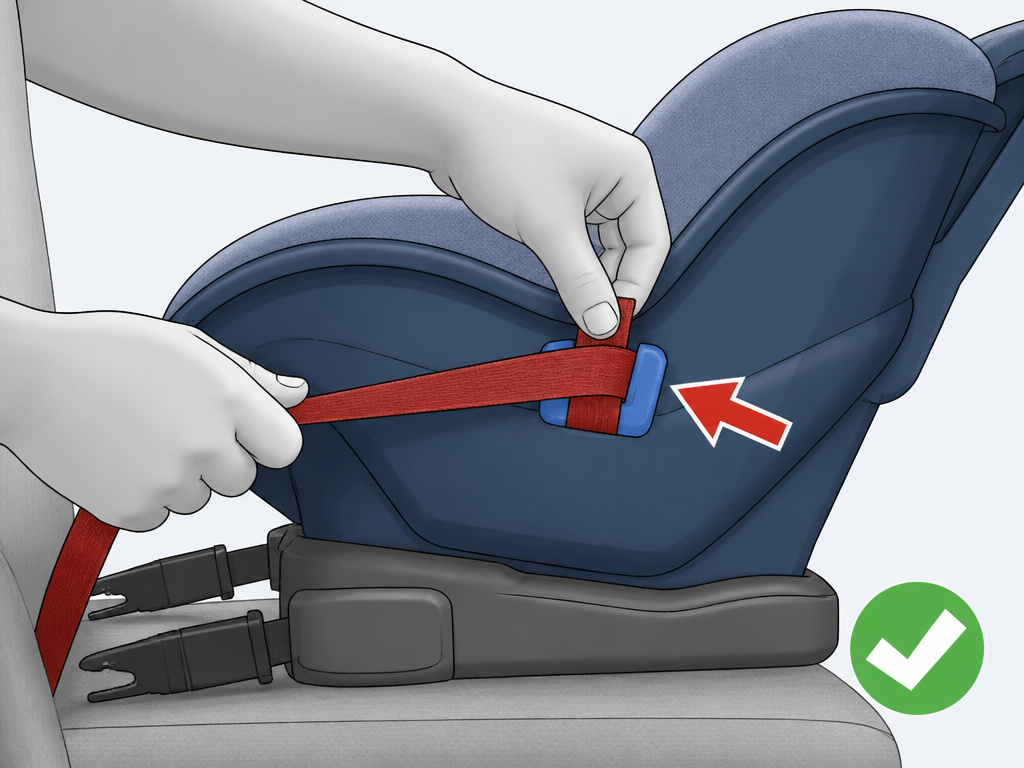 A loose seat usually traces back to one of these errors. They’re easy to miss in the moment.
Where this goes sideways: Connecting to the wrong metal bars. Stadium seat tracks, cargo tie-downs, and seat frame parts can feel solid but are not crash-tested anchors.
| Mistake | Why It’s a Problem | The Fix |
|---|---|---|
| Belt routed behind buckle straps | Creates slack that cannot be tightened out. Seat loosens over time. | Re-route the LATCH belt so it passes in front of the buckle hardware. |
| Using both LATCH and seat belt | Places unknown stress on the car seat shell. Prohibited by manufacturer. | Choose one system. Remove the other completely from the belt path. |
| Connectors not fully locked | A partial connection can release in a crash. | Listen for a definitive click. Tug each connector directly toward the front of the car. |
| Not tightening at the belt path | The seat can be tight at the head but loose at the base. | Push down on seat, pull strap, and test for movement at the belt path, not the top. |
The belt path is the seat’s pivot point in a crash. If it’s loose there, the whole seat can rotate, increasing the risk of injury.
The Tools You Already Have (And One You Might Need)
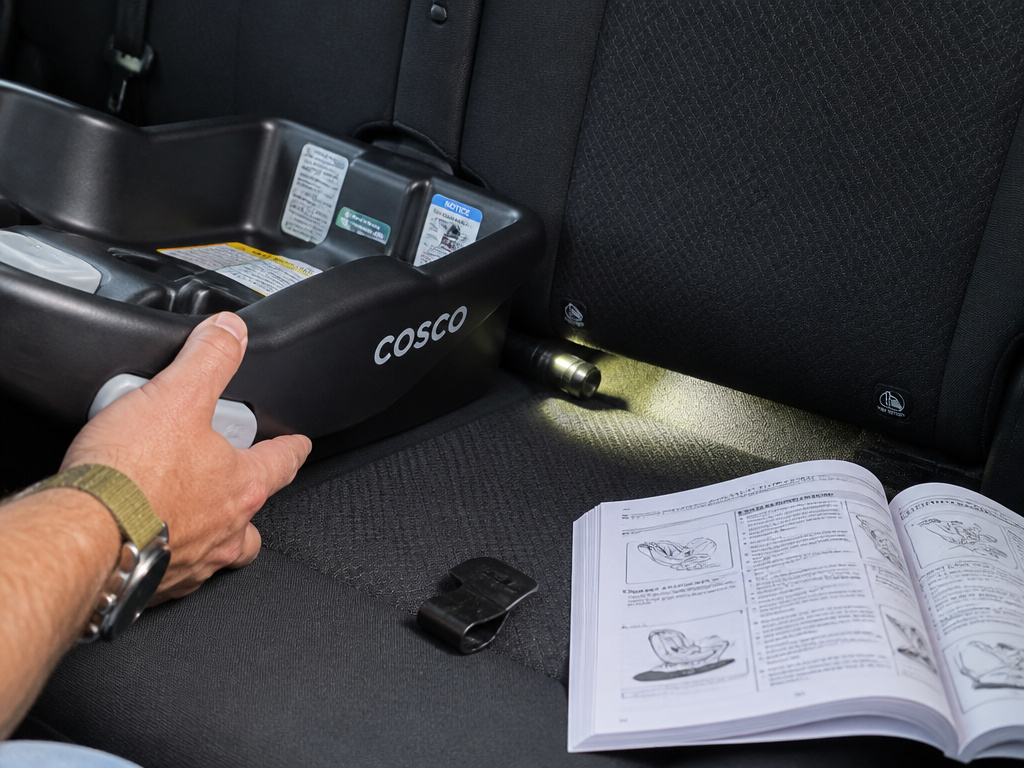 You don’t need a specialty kit. Your hands, your knee, and a bit of patience are the primary tools. However, keep these items nearby:
* A flashlight. For seeing deep into the seat bight for anchor bars.
* Your vehicle owner’s manual. The definitive guide for your car’s rules.
* The locking clip stored on your Cosco seat. Essential for non-locking seat belts.
A clean, dry vehicle seat makes the job easier. Remove loose items and crumbs so the car seat base can sit flat without rocking on a stray toy.
Why the Rules Are So Specific: A Quick Look at the Physics
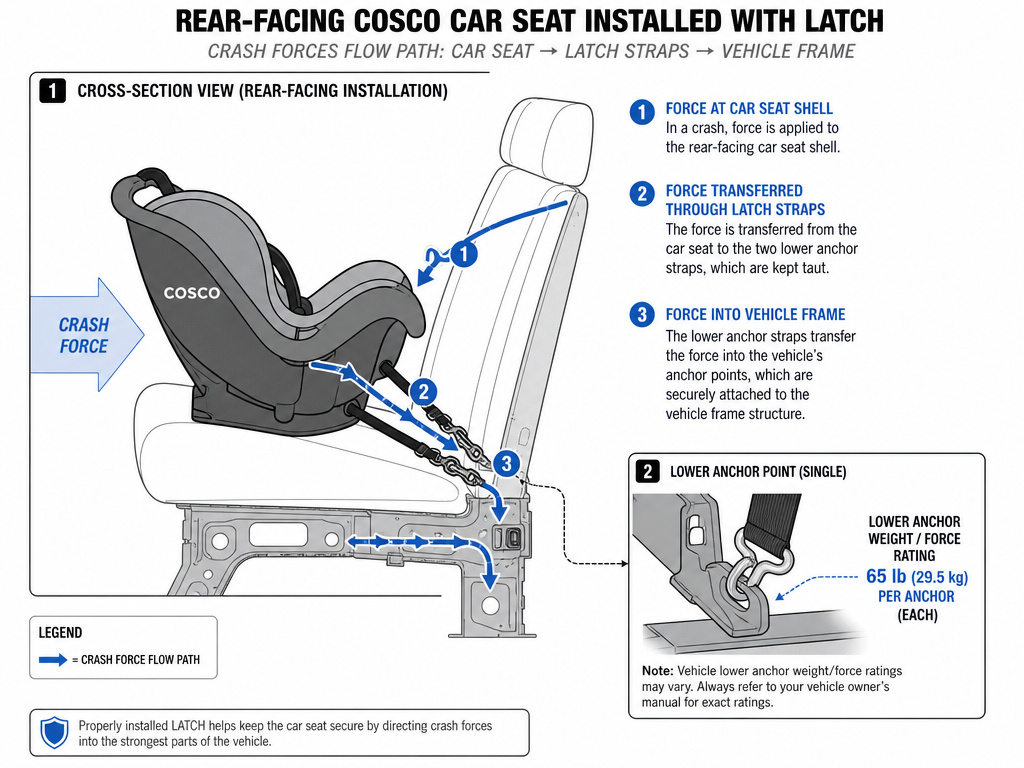 Car seat installation isn’t about convenience. It’s about managing crash forces. In a frontal collision, an unsecured car seat becomes a projectile. A properly installed seat transfers those forces through its rigid shell and the LATCH belt or seat belt into the vehicle’s frame, which is designed to absorb them.
The “one inch” movement rule exists because more slack allows for a dangerous buildup of momentum before the seat is caught by the restraint. The prohibition against using LATCH and a seat belt together is because engineers cannot predict how the forces would distribute between the two systems, potentially overloading one attachment point.
This is also why you must stop using the lower anchors when your child’s weight exceeds the vehicle’s limit. Those anchors are attached to the vehicle frame with a specific force rating in mind.
Frequently Asked Questions
Can I install my Cosco car seat in the middle seat with LATCH?
Only if your vehicle owner’s manual shows dedicated lower anchors for that center seating position. Most vehicles do not have center LATCH. In that case, you must use the vehicle seat belt for a center installation. Always check your specific vehicle manual.
How tight is “tight enough” for a LATCH installation?
The seat should not move more than one inch side-to-side or front-to-back when you grip it at the belt path. If you can shift it easily with one hand, it’s too loose. Use more of your body weight to press the seat down while tightening the strap.
What if my car doesn’t have LATCH anchors?
All vehicles manufactured after September 1, 2002, are required to have LATCH in at least two seating positions. If your car is older than that, or if the anchors are missing or damaged, you will use the vehicle seat belt to install your Cosco car seat. Ensure you know how to lock your specific seat belt.
My Cosco seat seems to rock forward at the front even with a tight LATCH belt. Is that okay?
Some rocking at the front (the part farthest from the vehicle seat back) is normal, as long as the movement at the belt path is less than one inch. The key test is at the base where the LATCH belt or seat belt routes through the shell. That’s the pivot point that must be secure.
When should I switch from LATCH to a seat belt installation?
Switch when your child’s weight plus the weight of the Cosco car seat approaches the lower anchor weight limit listed in your vehicle owner’s manual. This limit is often 65 pounds total. Since many Cosco seats weigh around 15-20 pounds, you may need to switch when your child weighs about 45 pounds. The seat belt installation has no such weight limit.
The Bottom Line
A secure rear-facing install with LATCH comes down to three things: correct routing in front of the buckle straps, a tight connection to the true vehicle anchors, and knowing when to use the seat belt instead. The difference between a good install and a dangerous one is often that single, unassuming step of threading the belt. Take the ten minutes to do it right. Your vehicle’s interior might feel like a gym, but that solid, immovable car seat at the end is the only grade that matters.
