
How to Install the Cosco Scenera Next Convertible Car Seat
This post contains affiliate links. As an Amazon Associate, we earn from qualifying purchases.
Installing a Cosco Scenera Next forward-facing requires matching three things: your child’s size against the seat’s limits, the correct belt path for your vehicle, and a final tightness check where the seat moves less than 1 inch side-to-side at the belt path. The seat must be installed using either the vehicle’s seat belt (with its built-in lockoff) or the LATCH lower anchor belt—never both. The level line on the seat shell must be parallel to the vehicle seat, and the top tether strap is mandatory for forward-facing mode.
That 1-inch-or-less movement check is the line between a safe install and a dangerous one. Most guides mention it; few explain why a loose seat is a physics problem in a crash. A forward-facing seat acts like a pivot point—excess movement multiplies the forces on your child’s neck and spine. Getting it tight enough isn’t about strength; it’s about routing and locking the belt correctly the first time.
What follows: the exact forward-facing weight and height limits, the visual difference between the LATCH and seatbelt routing paths, a step-by-step walkthrough for each method, and the one spec sheet discrepancy you need to know about before you turn your child around.
Key Takeaways
- The Cosco Scenera Next CC254 allows forward-facing use for children 22–40 pounds (10.1–18 kg) and 29–43 inches (73.6–110 cm) tall. The manufacturer’s age minimum conflicts between documents: one says at least 1 year old, another says at least 2 years old. The stricter 2-year rule is the safer default.
- You must use the top tether strap when forward-facing. It’s not optional. This strap limits the seat’s forward rotation in a crash, reducing head excursion and the risk of head injury.
- The final installation tightness is measured by the “1-inch rule.” Grasp the car seat at the belt path (where the seatbelt or LATCH strap goes through) with your weakest hand and push/pull side-to-side. Movement over 1 inch (2.5 cm) means the install is too loose.
- Never lubricate a sticking buckle or harness release lever. If it sticks, contact Cosco Consumer Relations or a Child Safety Seat Inspection Station. Adding oil or WD-40 can degrade the plastic and cause a catastrophic failure in a crash.
- The seat’s level line must be parallel to the vehicle seat for a proper recline angle. If it’s not, the install is unsafe regardless of tightness. Use rolled towels or a pool noodle under the front edge of the seat base to adjust the angle if your vehicle seats are sloped.
Forward-Facing Readiness: Weight, Height, and the Age Conflict
Before you touch the seat, check your child. The manual gives clear numbers, but one line is confusing.
The forward-facing level line on the seat shell must be parallel with the ground. If it’s not, redo the installation. An angled seat changes the harness geometry and can let the child’s head pitch forward dangerously in a crash.
What are the forward-facing weight and height limits for the Cosco Scenera Next?
Your child must weigh between 22 and 40 pounds (10.1–18 kg) and measure between 29 and 43 inches (73.6–110 cm) in height. The seat also has a maximum seated shoulder height of 13.5 inches (34.3 cm)—the harness straps must emerge from the seatback at or above your child’s shoulders.
The age minimum is where the documents disagree. The primary user guide for model CC254 states “at least 1 year old.” A separate troubleshooting PDF from the same manufacturer says “at least 2 years old.” This isn’t a minor detail.
Why the conflict matters: The American Academy of Pediatrics and most safety experts recommend keeping children rear-facing until at least age 2, or until they max out the rear-facing limits of their seat. The Scenera Next rear-faces up to 40 pounds and 40 inches. If your child is under 2 but meets the forward-facing size limits, the safest choice is to keep them rear-facing in this seat. The 2-year guideline in the troubleshooting document aligns with best practice, even if the main manual says 1 year.
Is my child too tall for the Scenera Next forward-facing?
The seated shoulder height is the real limiter. Have your child sit in the seat (not installed in the car) with the harness adjusted to the correct slot height. The top of the harness slot should be at or above the top of their shoulder. If their shoulders are above the top slot, they have outgrown the seat in forward-facing mode, regardless of their overall height or weight.
The 1-Inch Rule: Why “Good Enough” Isn’t
The official test is simple: hold the car seat at the belt path with your weakest hand and push and pull from side to side. If it moves more than 1 inch (2.5 cm), it’s not tight enough.
This isn’t an arbitrary standard. A forward-facing seat secured with a loose belt or LATCH strap can pivot violently in a collision. That pivot multiplies the crash forces transmitted to your child’s body, focusing energy on the neck and chest. The 1-inch limit is the engineering threshold where that pivot effect is controlled.
If you fail the test, the manual suggests four fixes, in order: 1. Put your knee in the seat and pull the belt tighter. 2. Reinstall the child restraint completely. 3. Try a different seating location in the vehicle. 4. Switch installation methods (e.g., from seat belt to LATCH) if possible.
Common mistake: Checking tightness by shaking the seat at the top or back. The pivot point is at the belt path, near the vehicle seat cushion. That’s the only place you should test.
LATCH vs Seatbelt: Which One Wins?
You must pick one installation method. Using both the LATCH lower anchors and the vehicle seat belt at the same time (“double-buckling”) is prohibited. It places conflicting stresses on the seat’s structure and can cause both systems to fail.
| Installation Method | Best For | The One Step People Miss |
|---|---|---|
| LATCH (Lower Anchors and Tethers for Children) | Vehicles manufactured after September 1, 2002. Provides a dedicated, standardized attachment point. | Routing the lower anchor belt through the forward-facing belt path, which is different from the rear-facing path. The hooks must connect to the vehicle’s lower anchor bars, not the seat belt buckle stalks. |
| Vehicle Seat Belt | Older vehicles, center seating positions (where LATCH is often not available), or when LATCH weight limits are exceeded. | Engaging the seat’s built-in lockoff on the belt path. This lockoff clamps the seat belt webbing so it doesn’t need a separate locking clip. |
Forward-facing LATCH installation
The LATCH belt has two hooks that attach to metal bars buried between your vehicle’s seat back and cushion. The Scenera Next’s lower anchor belt is stored in the rear-facing belt path when new.
- Remove the lower anchor belt from its storage spot in the rear-facing belt path so both hooks are on the same side of the seat.
- Locate the forward-facing belt path openings on the back of the seat shell.
- Route the belt. Pull the hook across the seat, under the seat pad, in front of the harness buckle, and out through the other forward-facing belt path opening. Do not twist the belt.
- Attach the hooks to your vehicle’s lower anchors. Consult your vehicle manual for their exact location.
- Tighten the adjuster strap until the seat is snug. The adjuster can be on either side.
- Attach the top tether strap to the designated tether anchor in your vehicle (check your manual) and tighten it. This step is not optional.
Where this goes sideways: Connecting the LATCH hooks to the wrong metal—like a seat frame leg or a cargo hook. The lower anchors are specifically designed U-shaped bars. Hooking to anything else can shear off in a crash.
Forward-facing seat belt installation
This method uses your car’s existing lap/shoulder belt (or lap-only belt) and the seat’s integrated lockoff.
- Place the seat forward-facing in your vehicle’s back seat.
- Thread the seat belt through the forward-facing belt path (again, different from the rear-facing path).
- Buckle the seat belt.
- Pull the seat belt tail to remove all slack, then let it retract slightly to engage the vehicle’s retractor locking mechanism (if it has one).
- Close the lockoff. Press the red lockoff lever down over the seat belt webbing until it clicks and locks. This physically clamps the belt to prevent slippage.
- Attach and tighten the top tether strap.
The seat belt lockoff is your friend. If your vehicle has a switchable retractor (common in newer cars), you might not need to use the lockoff—the retractor itself locks. But if the belt still slips after you let it retract, the lockoff is your backup. Using it is never wrong.
Step-by-Step Forward-Facing Installation
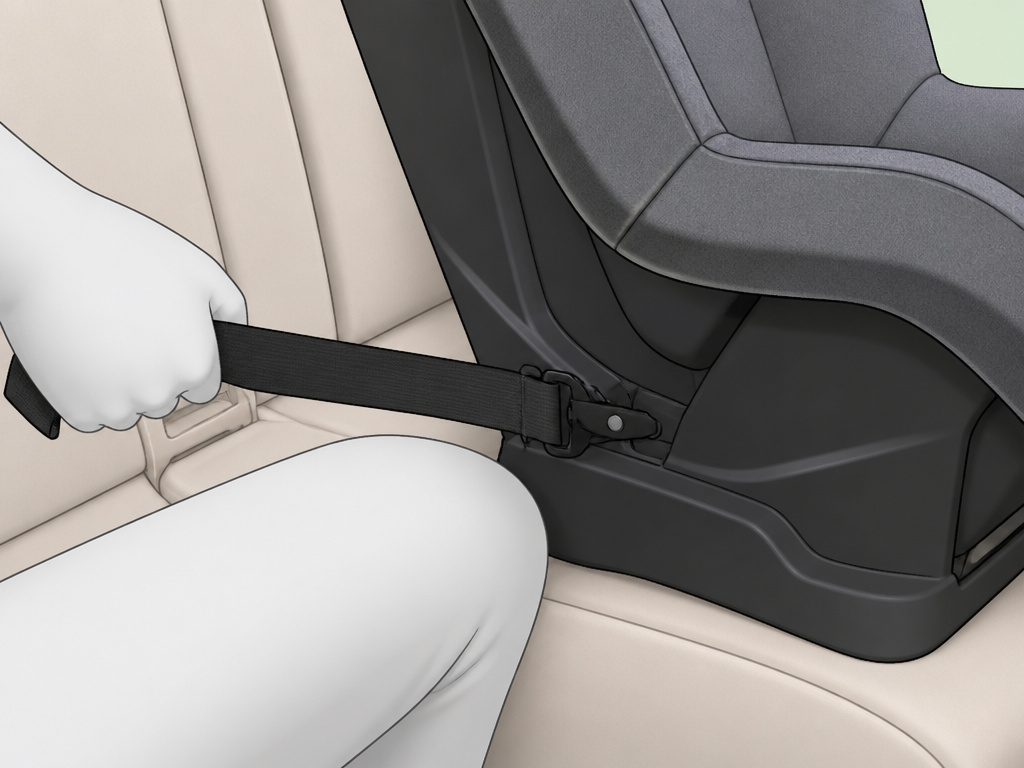
Follow this sequence regardless of your chosen method (LATCH or seat belt). Skipping a step compromises the whole system.
- Adjust the harness height first. Before you install the seat in the car, set the harness straps to the correct slot height for your forward-facing child. The straps must come from the seatback at or above the child’s shoulders. You cannot adjust this after the seat is tightly installed.
- Check the level line. Place the seat in the vehicle. The forward-facing level line on the seat shell must be parallel to the ground. If your vehicle seat is sloped, place a rolled towel or a pool noodle under the front edge of the car seat base to achieve level.
- Choose your method: LATCH or seat belt. Do not use both.
- Route and connect. For LATCH, route the belt through the forward-facing path and attach hooks. For seat belt, thread the belt through the path, buckle, and engage the lockoff.
- Apply your weight. Put your full weight (knee and hand) into the seat and pull the LATCH strap or seat belt tail as tight as you can. You should not be able to pinch any slack in the webbing at the belt path.
- Attach the top tether. Route the tether strap over the top of the vehicle seat back (or through the designated route) and connect it to the tether anchor. Tighten it until snug. This strap limits forward head movement.
- Perform the 1-inch test. Grasp the seat at the belt path with your weakest hand. Push and pull side-to-side. Movement over 1 inch means redo from step 4.
Why you adjust the harness first: Once the seat is cinched down with 40+ pounds of force, you cannot easily thread the harness straps through a different slot. Trying to force it can damage the seat shell or misroute the straps.
The Non-Negotiables: Tether, Level Line, and Harness Fit
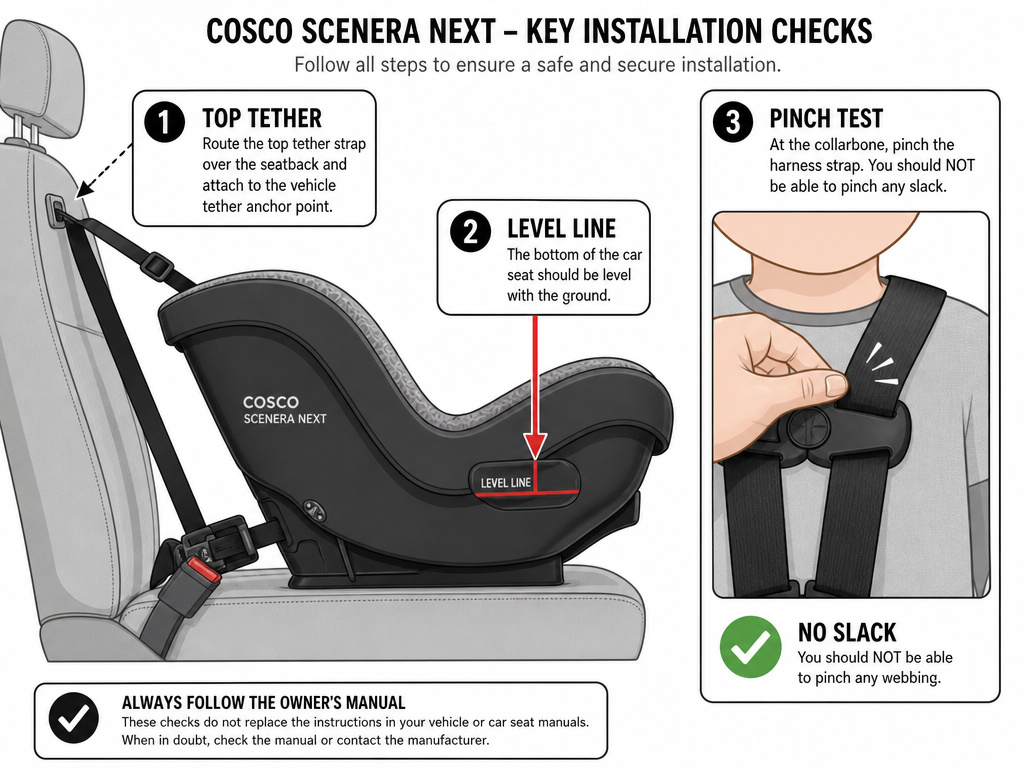
Three things get people into trouble every time. They seem like small details, but they’re the difference between a seat that contains your child and one that fails.
The top tether is mandatory. In a forward-facing crash, the seat wants to rotate forward. The tether strap, anchored to the vehicle frame, limits that rotation. A study by the Children’s Hospital of Philadelphia found that tether use reduces forward head excursion by 4 to 6 inches on average. That’s the difference between your child’s head hitting the front seat and not.
The level line is not a suggestion. If the seat is tipped too far back, the child’s body can submarine under the harness in a frontal crash. If it’s too upright, the crash forces are directed straight into the spine. The level line ensures the seat is at the angle engineers designed it for.
Harness tightness has a test. After buckling your child in, perform the “pinch test” on the harness straps at the child’s collarbone. If you can pinch a horizontal fold in the webbing, it’s too loose. Tighten until you can’t pinch any slack.
Skip this if: You’re reusing a seat from an older sibling or a second-hand buy. Check the manufacture date on the label. The Cosco Scenera Next CC254 user guide is effective 07-16-19. Your seat’s manufacture date must be on or after that. Seats older than 6 years, or that have been in any crash, should be retired.
Frequently Asked Questions
Can I use both LATCH and the seat belt to install the Scenera Next?
No. The manual explicitly states to use only one system. Using both (sometimes called “double-buckling”) can place conflicting forces on the seat’s structure and may cause both systems to fail in a crash. Pick the one that gives you the tightest, most correct install.
My Scenera Next buckle or harness release is sticking. Can I spray it with lubricant?
Do not lubricate. The manual’s troubleshooting guide explicitly says “DO NOT LUBRICATE.” Lubricants can degrade the plastic components and attract grit, making the problem worse and potentially causing the buckle to fail in a crash. Contact Cosco Consumer Relations for a replacement part or visit a Child Safety Seat Inspection Station (find one at nhtsa.gov) for help.
What if my vehicle doesn’t have a top tether anchor?
All passenger vehicles manufactured after September 1, 2000, are required to have tether anchors. They are often located on the rear shelf, the back of the seat, or on the floor behind the seat. Check your vehicle owner’s manual for the exact location. If you have an older vehicle without one, a dealership or certified installer can often have one retrofitted.
Is the Scenera Next approved for use on an airplane?
The Cosco Scenera Next is certified for aircraft use. Look for the label on the seat that says “This restraint is certified for use in motor vehicles and aircraft” in red lettering. You’ll use the aircraft’s lap belt routed through the forward-facing belt path. You cannot use the top tether or LATCH system on a plane.
How do I know when my child has outgrown the Scenera Next forward-facing?
They outgrow it in forward-facing mode when any one of these limits is reached: they exceed 40 pounds, their shoulders go above the top harness slot (max seated shoulder height is 13.5 inches), or the top of their ears go above the top of the seat shell. The height limit is 43 inches.
Before You Go
Installing the Cosco Scenera Next forward-facing boils down to three checks: fit, route, and tightness. Match your child to the seat’s limits, thread the belt or LATCH strap through the correct forward-facing path, and pull until it passes the 1-inch test. The tether strap is not an extra—it’s the anchor that keeps the seat from becoming a projectile. And if you hit a snag, the answer is never to lubricate a stuck buckle. Call Cosco or find a inspection station. Your local fire department or police station often hosts certified technicians who will check your work for free. That final pair of eyes is the best insurance you can get.
