
How to Install a Front Facing Car Seat | Key Steps & Rules
This post contains affiliate links. As an Amazon Associate, we earn from qualifying purchases.
Installing a forward-facing car seat requires two secure attachments: the primary hold (either the vehicle’s seat belt OR the lower LATCH anchors) and the mandatory top tether strap. The car seat must not move more than 1 inch side-to-side or front-to-back at the belt path. Never use both the seat belt and lower anchors together.
That 1-inch movement limit is the physical standard every manual cites, from a Joie Saffron to a Graco Extend2Fit. It’s not a suggestion. It’s the line between an installation that holds during a crash and one that rotates enough to cause head injury.
What follows is the breakdown of that standard: the two installation methods, the non-negotiable tether, the hidden weight limits for LATCH, and the vehicle-specific quirks that turn a simple strap into a puzzle. By the end, you’ll know how to read your car’s manual for the tether anchor location and your car seat’s manual for the weight ceiling that forces a switch to the seat belt.
Key Takeaways
- Always use the top tether for a forward-facing seat, whether you install with LATCH or the seat belt. It reduces forward head movement by 4-6 inches in a crash.
- Pick one primary method, seat belt OR lower LATCH anchors, never both. Using both can create conflicting force paths and is prohibited by every manufacturer and the NHTSA.
- The installation is only correct if the car seat moves less than 1 inch (2.5 cm) at the belt path. Test this by gripping the seat where the seat belt or LATCH strap passes through it.
- Lower anchors have weight limits, typically between 40-48 lbs combined child and seat weight. Exceed this, and you must reinstall using the vehicle’s seat belt.
- Harness straps must be at or just above the child’s shoulders in the forward-facing position, and the chest clip should be at armpit level.
The Two-Part System: Belt Path & Tether
A forward-facing car seat is secured by a two-part system. The first part is the primary restraint, which takes the brunt of the crash forces. The second is the top tether, which is mandatory and controls head movement.
You have exactly one choice for the primary restraint: the vehicle’s seat belt or the lower anchors of the LATCH system. This is not a “more is better” situation.
Common mistake: Using both the seat belt and the lower LATCH anchors simultaneously. This is explicitly forbidden by the NHTSA and every car seat manual. The systems can interfere with each other, preventing either from tightening properly and creating unpredictable force loads in a crash.
The top tether strap is the constant. It must be used every single time the seat is forward-facing. This strap connects to a dedicated tether anchor in your vehicle, usually located on the back of the seat, on the rear shelf, or on the floor.
| Installation Component | Its Job | What Happens If It’s Wrong |
|---|---|---|
| Primary Restraint (Seat Belt OR LATCH) | Absorbs the main crash forces, securing the seat’s base. | Seat rotates excessively, increasing risk of head strike and injury. |
| Top Tether Strap | Limits forward head rotation and rebound. | Child’s head travels 4-6+ inches farther forward, likely impacting vehicle interior. |
| Harness Straps | Restrain the child’s body within the seat shell. | Child can be ejected or submarined under the lap belt in a crash. |
The 1-Inch Rule & Tightness Test
A tight installation is non-negotiable. The benchmark comes straight from OEM manuals like the Joie Saffron SI: “MOVE in any direction MORE THAN 1 in. (2.5 cm) at the belt path.”
This child restraint should not move more than 1 inch (2.5 cm) at the belt path when pulled in all directions. This is the pass/fail line for any installation, regardless of method.
The test is specific. Don’t push on the top of the seat or the child’s seating area. You must grip the car seat firmly where the seat belt or LATCH strap routes through the seat’s built-in belt path. Pull hard side-to-side and front-to-back. Use your non-dominant hand if you have to, the goal is to simulate crash forces, not gentle pressure.
If it shifts an inch or more, it is loose. The fix is almost always one of three things: you haven’t fully tightened the seat belt or LATCH strap, the vehicle seat’s contour is preventing full contact, or the recline angle isn’t locked.
Where this goes sideways: Testing at the wrong place. Pulling the top of the seat will always show some flex. That’s normal. The seat shell can move independently of the secured base. Focus your test at the belt path, where the metal buckle or anchor connects to the vehicle.
Seat Belt vs. LATCH: Choosing Your Method
You must choose one. The decision concerns convenience, weight limits, and your specific vehicle, as both correctly installed methods are equally safe.
Using the Vehicle Seat Belt
This is the universal method. Every seat and every vehicle allows it. The process involves routing the seat belt through the seat’s forward-facing belt path and locking it.
- Find the forward-facing belt path. It’s usually marked in red or labeled on the seat shell.
- Route the seat belt through. Ensure it’s not twisted.
- Buckle it.
- Lock the seat belt. For most modern cars, pull the shoulder belt all the way out until it retracts in “locking mode.” For older lap-only belts, you may need a locking clip.
- Kneel into the seat and use your body weight to compress the vehicle seat cushion while you pull the belt tight.
- Perform the 1-inch test.
Using the LATCH System
LATCH (Lower Anchors and Tethers for Children) is a standardized system with U-shaped metal anchors in the vehicle seat bight. It can be easier to get a tight fit.
- Locate your vehicle’s lower anchors. They are typically spaced 11 inches apart.
- Attach the car seat’s LATCH connectors to the anchors until you hear/feel a click.
- Tighten the LATCH strap according to your seat’s mechanism (often a pull strap or ratchet).
- Perform the 1-inch test.
The part nobody mentions: Lower anchors have a weight limit. It’s not just the child’s weight, it’s the combined weight of the child and the car seat. Most vehicle manufacturers set a limit of 65 lbs for the lower anchor system. Your car seat manual states the child weight limit for LATCH use (commonly 40-48 lbs). Whichever limit is lower is the one you must obey. Exceed it, and you must switch to a seat belt installation.
The Non-Negotiable Top Tether
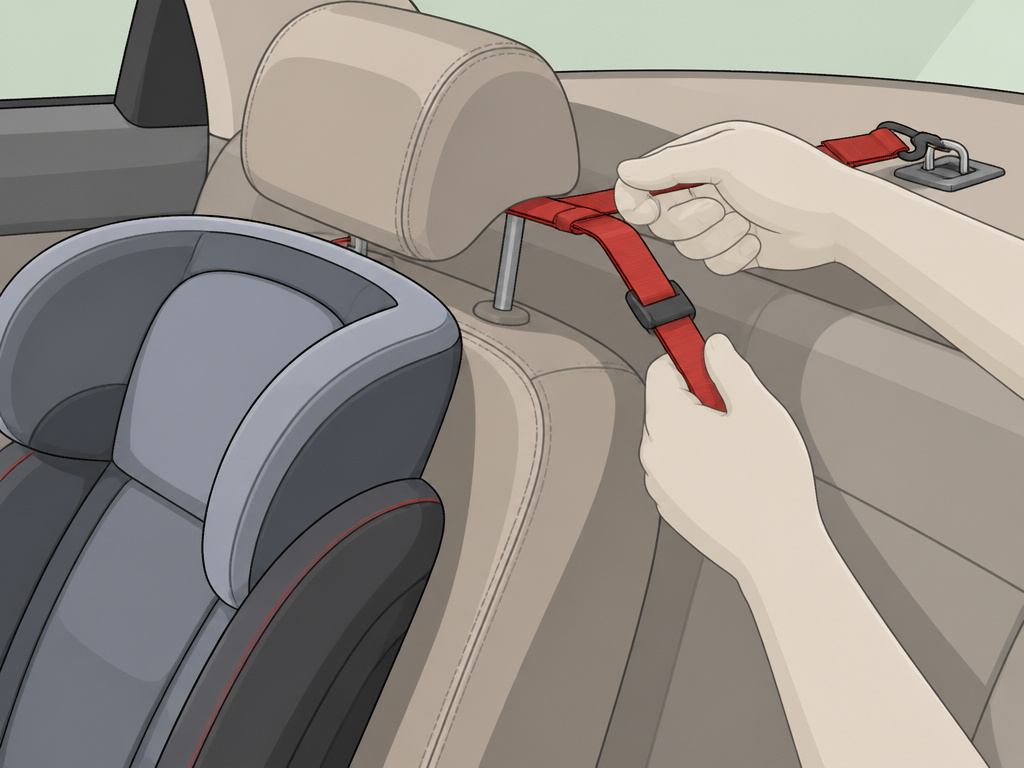 The tether is a mandatory strap that runs from the top rear of the car seat to a dedicated anchor in your vehicle. In a frontal crash, it prevents the top of the car seat from rotating violently forward.
Why does this matter? Without a tether, the child’s head can travel far enough to strike the front vehicle seat or the door frame. The tether reduces this head excursion, lowering the risk of severe head and neck injuries.
- Locate your vehicle’s tether anchor. Consult your vehicle manual. Anchors can be on the back of the seat, on the rear parcel shelf, on the floor, or even on the ceiling in some vans.
- Adjust the tether strap to its longest length.
- Route the tether over the top of the vehicle seat (or as directed) and connect the hook to the anchor.
- Remove all slack by tightening the tether strap. It should be snug, with no loose strap.
Vehicle-Specific Tether Quirks
This is where real-world confusion happens. Some vehicles, like certain Honda models, have a “travel route” for the tether where it must loop over a crossbar before descending to a floor anchor. A tether strap that is too short is a known compatibility issue, and the tether must still be used.You may need to consult a certified Child Passenger Safety Technician or consider a different seating position.
Forward-Facing Harness Fit
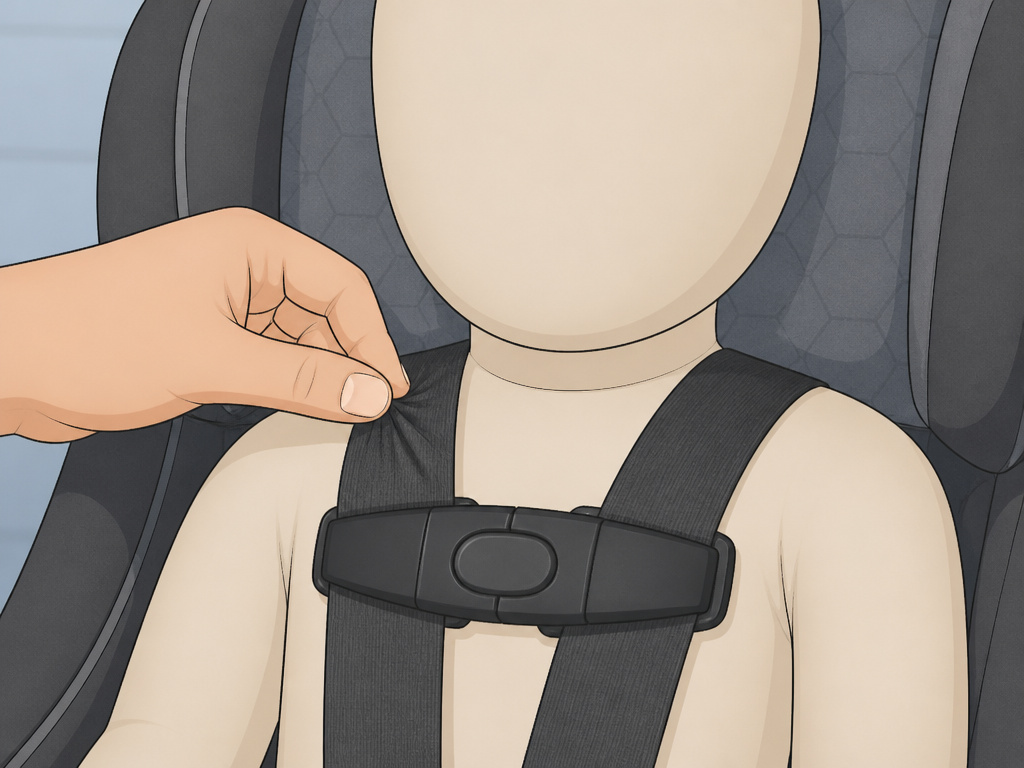 A perfectly installed seat is useless if the child isn’t secured properly in the harness.
- Harness Height: The shoulder straps must be at or just above the child’s shoulders. You can usually adjust them by rethreading the harness through slots in the seat shell.
- Chest Clip: Position it at armpit level. It’s a pre-crash positioner, not a restraint.
- Tightness: Perform the “pinch test.” Try to pinch the harness strap vertically at the child’s collarbone. If you can pinch any material, it’s too loose. The straps should lie flat without sagging.
When to Switch from Rear-Facing
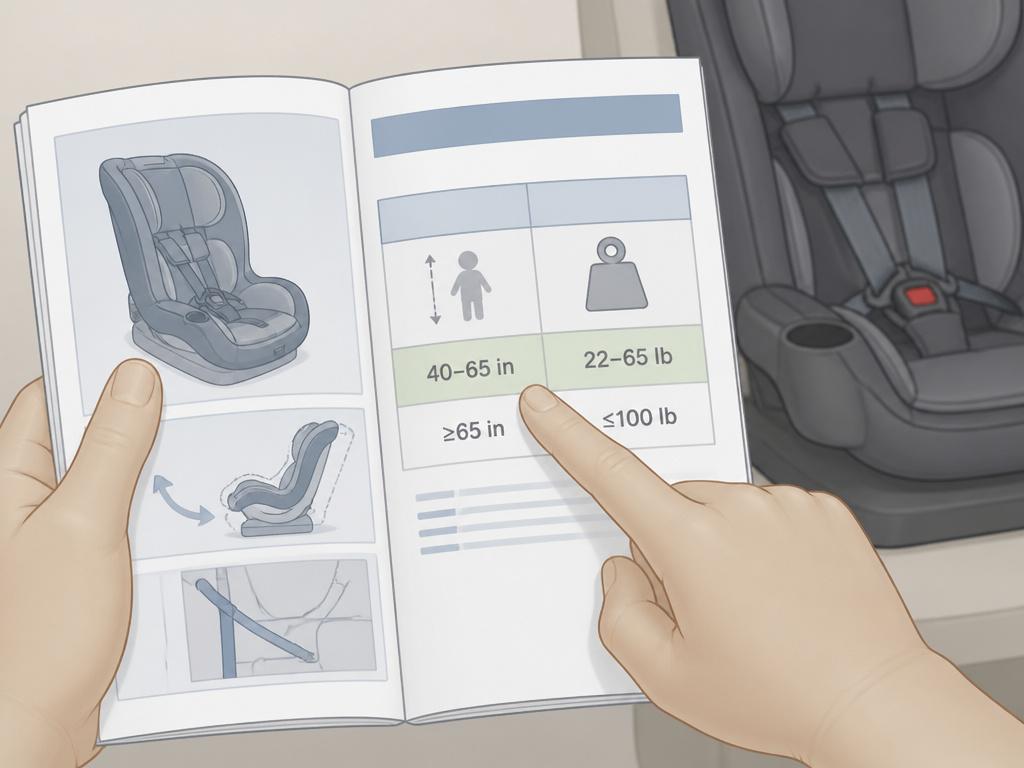 This is a pre-installation decision. The best practice is to keep your child rear-facing until they reach the maximum height or weight limit of their convertible seat in the rear-facing mode. Many seats now allow rear-facing up to 40, 45, or even 50 pounds.
The minimum to turn forward-facing is at least 2 years old, but “minimum” is not the same as “safest.” Age is a poor indicator of skeletal maturity. Weight and height limits are your definitive guides. Check your specific seat’s manual for its forward-facing requirements.
Frequently Asked Questions
Can you use LATCH and a seat belt together?
No. Never. Use one system or the other. This is a firm rule from the NHTSA and all car seat manufacturers. Using both can compromise the integrity of the installation.
Where is the tether anchor in my car?
The location varies wildly by vehicle make, model, and year. The only sure way to find it is to check your vehicle’s owner’s manual. Look in the child safety seat section. Common spots include the back of the seat, the rear shelf, the floor, or the cargo area in SUVs.
What if my tether strap isn’t long enough?
This is a known compatibility issue with some car and car seat combinations. Do not forgo the tether. First, ensure you are routing it correctly (some vehicles have specific paths). If it’s genuinely too short, your options are to try a different seating position in the vehicle, consult the NHTSA car seat safety guidelines for a inspection station, or contact the car seat manufacturer for guidance. In rare cases, you may need a different car seat.
How tight should the car seat really be?
Tight enough that it moves less than 1 inch at the belt path when you pull it side-to-side and front-to-back. Use your knee and body weight in the seat to compress the vehicle cushion while you tighten the belt or LATCH strap.
When do I stop using the lower LATCH anchors?
When your child’s weight exceeds the LATCH limit stated in your car seat manual. This limit is often 40-48 lbs. Do not guess, check the manual. Some vehicles also have a 65 lb combined weight limit. You must switch to a seat belt installation once either limit is reached.
The Bottom Line
Installing a forward-facing car seat is a mechanical process with zero room for interpretation. Match the seat’s belt path to your chosen method, seat belt or LATCH. Crank it down until it passes the 1-inch test. Then, find that tether anchor and pull the strap snug. The harness gets the final check: at or above the shoulders, clip at the armpits, tight enough to pass the pinch test.
If your vehicle manual’s tether diagram looks like a maze, or your child is nearing the LATCH weight limit, that’s the moment to stop and verify. The rules are strict because the physics of a crash are unforgiving. Get the installation tight, use the tether, and you’ve built the best possible shield for the ride ahead.
