
How to Recline a Peg Perego Convertible Car Seat Safely
This post contains affiliate links. As an Amazon Associate, we earn from qualifying purchases.
To recline a Peg Perego convertible car seat, locate the recline lever or knob on the front or side of the seat shell. For rear-facing mode, adjust the angle while the seat is uninstalled, using multiple positions to achieve a proper fit. For forward-facing mode, you may need to extend the anti-rebound bar after adjusting the recline to ensure a tight vehicle installation.
The recline isn’t just about comfort. It’s a safety adjustment that ensures the seat shell contacts the vehicle seatback correctly, which affects how crash forces are managed. Get the angle wrong, and the seat can rock or install loosely, even with a tight belt.
What follows is a walkthrough of the two recline systems on Peg Perego models like the Primo Viaggio Convertible Kinetic, the one belt type you must never use with it, and the step where most installations go from secure to rock-solid.
Key Takeaways
- Peg Perego convertibles have separate recline mechanisms for rear-facing and forward-facing modes; don’t force one when the seat is in the wrong orientation.
- After adjusting the forward-facing recline, extend the anti-rebound bar until it firmly contacts the vehicle seatback—this is the step that locks the installation.
- The seat is not compatible with vehicle lap/shoulder belts that have an inflatable airbag in the shoulder portion; using one voids safety certification.
- You can continue using the seat after a minor crash only if the vehicle was drivable, the nearest door wasn’t damaged, no one was injured, airbags didn’t deploy, and the seat shows no visible damage.
- Always perform a final installation check: the car seat should not move more than 1 inch side-to-side or forward at the belt path.
The Two Recline Systems You’re Actually Adjusting
Peg Perego convertible seats, like the Primo Viaggio Convertible Kinetic, don’t have one universal recline. They have two distinct systems triggered by the seat’s mode. Confusing them is how parents end up with a seemingly tight belt but a seat that still wobbles.
The rear-facing recline adjusts the angle of the entire seat shell relative to its base. This is for infant comfort and airway positioning, and it’s done with the seat uninstalled. The forward-facing recline is different. It often changes the seatback angle independently and is designed to improve the fit against your vehicle’s seatback. This adjustment usually happens after the seat is loosely placed in the vehicle.
The Primo Viaggio Convertible Kinetic is designed to be installed in a vehicle in Rear Facing mode (RF) or in Forward Facing mode (FF) on a forward facing vehicle seat. Peg Perego always recommends use of a Top Tether and ARB to increase safety and stability of the child seat.
Why the distinction matters: A rear-facing seat needs a deep recline to cradle a newborn. A forward-facing seat needs a more upright position to properly route the top tether and engage the anti-rebound bar. Using the wrong adjustment in the wrong mode can prevent these safety features from working.
The Belt Type That Voids Your Seat’s Safety
Before you touch the recline lever, you must verify your vehicle’s seat belt type. This is non-negotiable.
The manual for the Primo Viaggio Convertible Kinetic explicitly calls out one incompatible belt: the lap/shoulder belt (3 point) with an inflatable shoulder belt. This is a newer belt where the shoulder portion contains a small airbag.
Important note: DO NOT USE Primo Viaggio Convertible Kinetic with this belt. Please, contact Peg Perego Customer Service for additional information.
If your vehicle has this belt in the position you want to use, you cannot install the Peg Perego seat there. The force of the inflating airbag could damage the seat’s structure or compromise the installation. Your only option is to try a different seating position with a standard belt or use the LATCH system instead.
How to Recline a Peg Perego Convertible Car Seat (Step-by-Step)
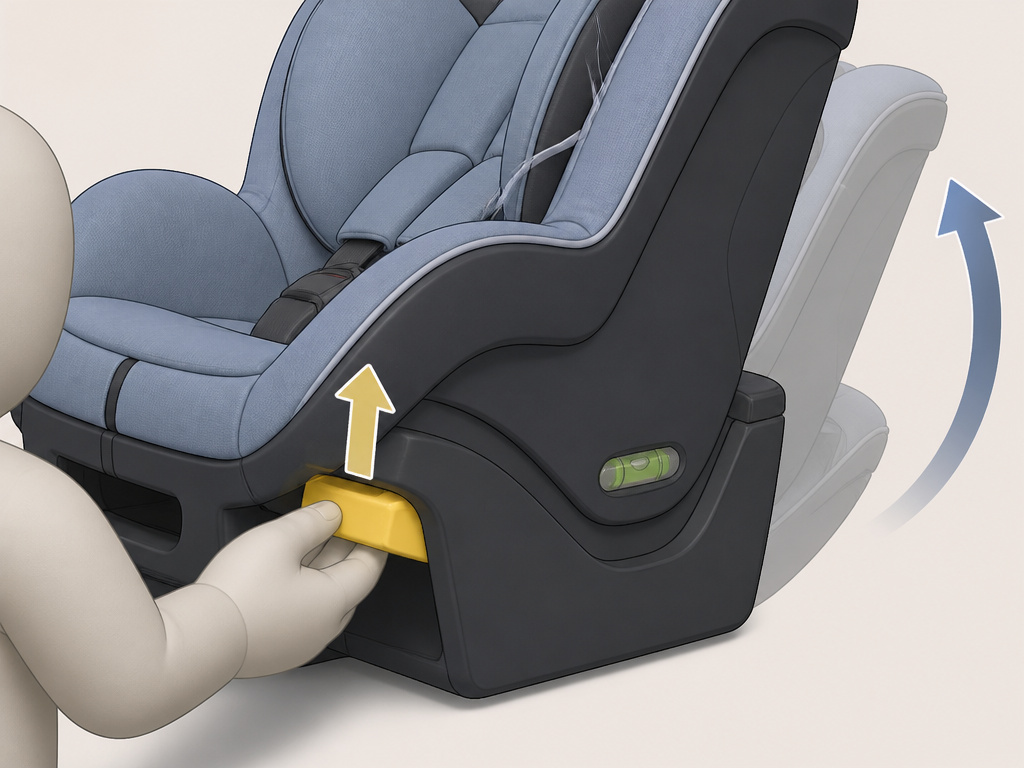
Always start with the seat uninstalled from the vehicle. This gives you room to work and see the mechanism clearly.
For Rear-Facing Mode
- Locate the rear-facing recline lever. On most Peg Perego convertibles, this is a large, often yellow, lever or knob at the very front of the seat base, between where the child’s feet would go.
- Lift or pull the lever while tilting the seat shell. You’ll feel the seat shell pivot on its base. Most models have 3-5 distinct recline positions. You’ll hear or feel a click when it locks into a new slot.
- Place the seat in your vehicle to check the angle. The ideal rear-facing angle is usually indicated by a level line or bubble on the seat shell. The seat should sit flush against the vehicle seatback without a gap at the top. If there’s a gap, return to step 2.
- Proceed with installation. Once the angle is set, install the seat using LATCH or the vehicle belt, and tighten. The recline should not change during tightening.
Common mistake: Trying to adjust the rear-facing recline after the seat is belted in. The mechanism won’t move under tension, and forcing it can break the plastic latch.
For Forward-Facing Mode
- Convert the seat to forward-facing. Ensure the harness is at or above the child’s shoulders and the seat is in the forward-facing orientation.
- Locate the forward-facing recline adjustment. This is often a different lever, sometimes on the side of the seatback or near the top of the shell.
- With the seat loosely placed in the vehicle, activate the lever. Adjust the seatback to a more upright or reclined position. The goal is to achieve the best contact with your vehicle’s seatback.
- Extend the anti-rebound bar. This is the critical step. The anti-rebound bar (ARB) is a U-shaped piece of metal at the front of the seat base. After recline, extend it until it presses firmly against the vehicle seatback. It should take some weight off the seat’s rear when you push down on the foot area.
- Complete the installation. Tighten the LATCH or seat belt, then attach and tighten the top tether strap. The ARB should remain firmly planted.
| Mode | Primary Adjustment | Key Follow-Up Step | Goal |
|---|---|---|---|
| Rear-Facing (RF) | Seat shell angle via base lever | Check level indicator | Proper infant positioning & shell contact |
| Forward-Facing (FF) | Seatback angle via side/top lever | Extend anti-rebound bar | Engage anti-rebound feature & improve fit |
When a Recline Adjustment Isn’t Enough: The Installation Check
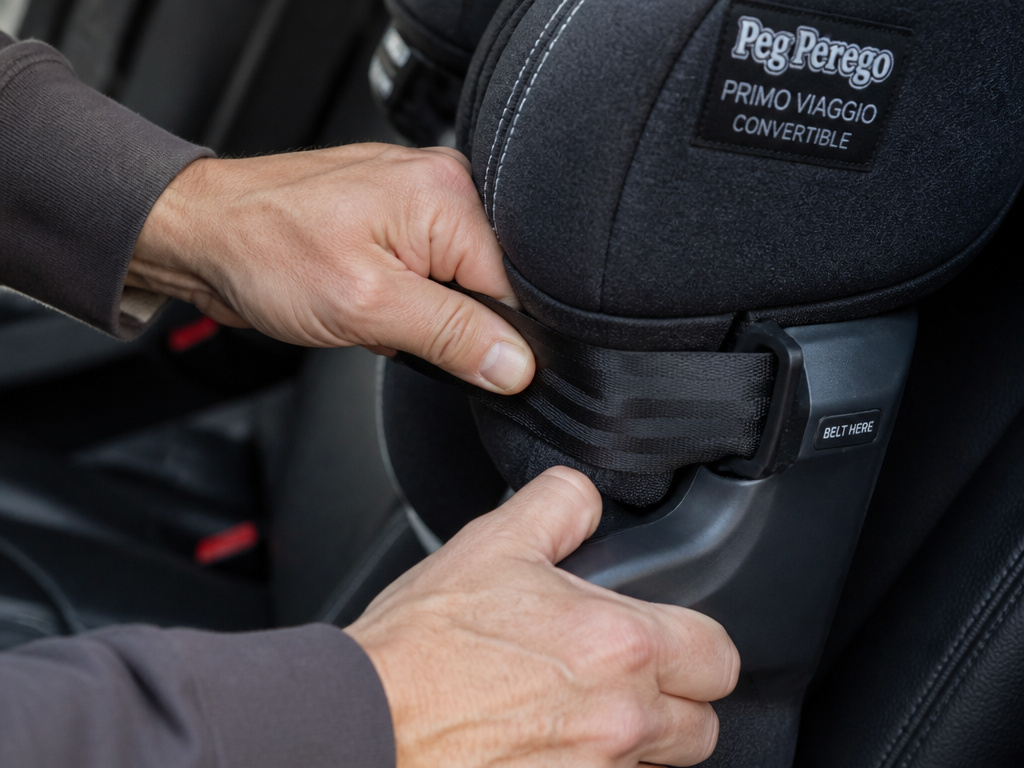
A perfect recline angle means nothing if the seat isn’t installed tightly. After any recline change, you must re-check the installation.
The gold-standard test is the 1-inch rule. Grab the car seat at the belt path (where the seat belt or LATCH strap goes through the seat) and try to move it side-to-side and forward. It should not move more than 1 inch in any direction. If it does, the belt isn’t tight enough.
This is where many parents benefit from a professional check. A certified child passenger safety technician can spot issues you might miss, like a twisted strap or a belt locked in the wrong spot. Peg Perego’s own manual recommends this.
If you’re unsure, your local fire department often has technicians available, though you should call ahead to confirm. Don’t guess with your child’s safety.
The Crash Question: Can You Still Recline a Damaged Seat?
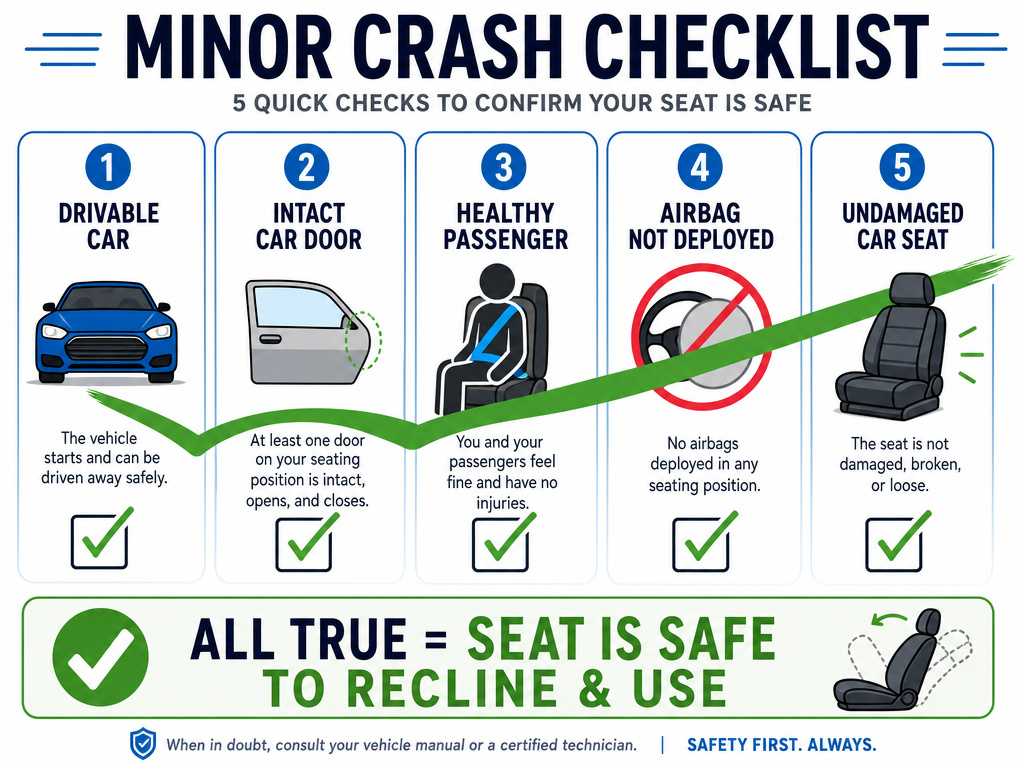
This is the scenario nobody wants to think about. The Primo Viaggio Convertible Kinetic manual provides a clear, five-point checklist to determine if a seat involved in a crash can still be used.
A minor crash is one where ALL of the following are true: * The vehicle was drivable away from the crash. * The vehicle door nearest the car seat was not damaged. * No passengers in the vehicle sustained any injuries. * The vehicle airbags did not deploy. * There is no visible damage to the car seat.
If any one of these five statements apply, the seat may be damaged and should not be used. If these statements do not apply, refer to the next section to check for hidden damage.
If your crash meets all five points, you can continue to use—and recline—the seat. If any one point is false, the seat’s energy-absorbing materials may be compromised. It might look fine, but it could fail in a subsequent crash. In that case, do not attempt to adjust or use it. Contact your insurance and Peg Perego customer service for a replacement.
Frequently Asked Questions
Why won’t my Peg Perego seat recline?
The most common reason is that you’re trying to adjust it while it’s tightly installed. The recline mechanisms are not designed to move under the pressure of a tightened seat belt or LATCH strap. Uninstall the seat, then try the recline lever. If it still won’t budge, check for obstructions like the vehicle seatbelt caught in the mechanism.
Can I recline the seat more for my child to sleep?
For rear-facing, you can use the deepest recline position allowed by your vehicle’s seatback contact. For forward-facing, the seat should be fairly upright to properly route the top tether. Excessive recline forward-facing can cause the child’s head to slump forward uncomfortably. Comfort for sleeping is better addressed with supportive head pillows designed for the seat, not extreme recline angles.
Does the recline affect the harness tightness?
Yes, indirectly. If you change the recline after the child is harnessed, you change the angle of their back relative to the harness straps. This can make the straps feel looser or tighter. Always check and adjust the harness tightness after any recline adjustment, using the pinch test at the child’s collarbone.
My vehicle seats are already sloped. How does that change things?
You must work with your vehicle’s contours. The goal is for the car seat to have full, firm contact along its back. If your vehicle seat is deeply bucket-shaped, you may need to use a less reclined position on the car seat itself to achieve that contact. Never use aftermarket products like towels or pool noodles to fix the angle unless specifically permitted by both the car seat and vehicle manuals.
Before You Go
Reclining a Peg Perego convertible is a straightforward task once you know which lever does what and when to pull it. Remember the split: base lever for rear-facing, seatback lever for forward-facing. The forward-facing move isn’t complete until you’ve extended the anti-rebound bar into the vehicle seatback.
The final word is always the installation check. A proper recline leads to a tighter fit, and a tight fit is what you’re after. If your seat moves more than an inch at the belt path, something’s off—go back, loosen everything, and start the sequence again. Your patience here is the real safety feature.
