
How to Check Your Car Seat Is Installed Correctly & Safely
This post contains affiliate links. As an Amazon Associate, we earn from qualifying purchases.
**Grab the car seat at the belt path, the spot where the seat belt or lower anchor strap threads through the frame, and tug side-to-side and front-to-back. The baseline check is that the seat must not move more than one inch in any direction to be tight enough.But a seat that passes the one-inch test can still be wrong in five other ways that a tug won’t catch.
The one-inch rule is a pass/fail for basic security, but it says nothing about harness routing, recline angle, or whether the seat itself is even compatible with your car’s specific geometry. A Britax RÖMER DUALFIX can click solidly into its ISOFIX guides and still be unsafe if the support leg isn’t planted firmly on the vehicle floor, a fact its manual stresses with a green indicator check. You need a checklist that goes beyond the wiggle.
What follows: the five-point inspection that matches the ISO 13215-2 standard for adult installers, the hidden math on lower anchor weight limits, and the one harness mistake that 85% of test panels got wrong within five minutes.
Key Takeaways
- The one-inch movement rule applies at the belt path, not the top of the seat. Tugging the seatback gives a false pass.
- Lower anchors have a hard weight limit, 65 pounds minus the seat’s weight. Exceed it, and you must switch to the seat belt.
- Harness straps must be at or just above the shoulders for rear-facing seats. At or just below for forward-facing. Behind the back is an instant fail.
- Vehicle fit isn’t guaranteed. A seat that installs tightly in a sedan might lift off the cushion in an SUV, failing the contact rule.
- Never use LATCH and a seat belt together. It’s one or the other, and the vehicle manual dictates how to lock the belt.
The 1-Inch Test (and Why It’s Not Enough)
Pull at the belt path. Not the top of the seat, not the headrest, the path. On a rear-facing infant seat, that’s where the seat belt or LATCH strap routes through the molded plastic shell near the child’s feet. On a convertible, it’s the reinforced channel marked on the sides. Your force should be directed through that path.
The NHTSA car seat safety guidelines specify that you must check for tightness at the rear-facing belt path or lower anchor connector assembly strap. If the restraint moves more than 2.5 cm (1 inch) side-to-side or front-to-back, it is not tight enough.
That’s the federal standard, pulled straight from an Evenflo manual. It’s a good start. But it’s only a start.
A seat can be rock-solid at the belt path and still be angled wrong. A rear-facing seat for an infant needs a specific recline to keep the airway open, usually indicated by a level line on the side. Too upright, and the head can flop forward. Too reclined, and crash forces become dangerous. The one-inch test doesn’t measure angle.
It also doesn’t catch a more subtle failure: the seat lifting off the vehicle cushion at the front edge. This happens often in SUVs with deeply contoured seats. The car seat base sits in the “bucket,” but the front lip hangs in the air. In a crash, that gap lets the seat rotate violently. Run your hand under the front edge of the base. If you can slide fingers underneath, you’ve failed the contact test. No amount of tightness at the belt path fixes that.
Checking the Harness: It’s About Position, Not Just Tightness
You can cinch a harness so tight it leaves marks, and still have it routed wrong. The strap height is everything.
For a rear-facing seat, the harness straps should emerge from the shell at or just above the child’s shoulders. For forward-facing, they should be at or just below. This is a physics requirement for safety. In a frontal crash, a forward-facing child’s body wants to pitch forward.Straps that are too high will pull the child upward and out of the seat. Straps that are too low let the torso jackknife over the lap belt.
The Britax RÖMER DUALFIX manual is blunt: “The shoulder straps must run at shoulder height or a little above the height of the child’s shoulders. The shoulder straps must not run behind the back of the child or at ear height or above the ears.If the straps are behind the back, they fail to restrain the child and serve only as decoration.
Common mistake: Moving the harness straps up “to grow into them.” That gap between strap and shoulder is a launch ramp in a crash. Adjust the headrest or the internal harness slots every time your child outgrows the current setting.
The pinch test is the final step. After buckling, tighten the harness until you can’t pinch any horizontal slack in the strap at the child’s shoulder. Vertical slack is fine, you’re checking for loose material that would let the child’s torso move forward. The chest clip should be at armpit level. Too high, and it’s on the sternum. Too low, and it’s on the soft abdomen.
LATCH vs. Seat Belt: The Weight Limit Nobody Checks
Lower Anchors and Tethers for Children (LATCH) seems foolproof. Click, click, tighten. Done. Except LATCH has a hidden ceiling that most owners miss.
Every vehicle and every car seat sets a combined weight limit for the lower anchor system. The federal maximum is 65 pounds. That’s the combined weight of the child and the car seat. The math is simple but almost never done: 65 pounds minus the weight of your empty car seat. Find the seat’s weight in the manual, a typical convertible is 18 to 22 pounds. If your seat weighs 20 pounds, the LATCH system is only rated until your child hits 45 pounds.
| Car Seat Type | Typical Seat Weight | Maximum Child Weight for LATCH |
|---|---|---|
| Infant Carrier | 8–12 lbs | 53–57 lbs |
| Convertible Seat | 18–22 lbs | 43–47 lbs |
| All-in-One Seat | 25–30 lbs | 35–40 lbs |
Once your child exceeds that limit, you must unclip the lower anchors and reinstall the seat using the vehicle’s seat belt. The tether strap should still be used for forward-facing installations, regardless of whether you’re using LATCH or the seat belt.
Where this goes sideways: Continuing to use LATCH anchors past the weight limit. The anchors themselves aren’t designed to handle the forces of a heavier child in a crash, and the plastic connectors on the car seat can fracture. The switch isn’t optional.
Seat belt installations have their own trick. Most cars made after 1996 have seat belts that lock automatically when you pull them all the way out and let them retract. But some older models, or center seats with a lap-only belt, require a locking clip, a small metal H-shaped piece that holds the belt tight. If your vehicle manual says you need one, you do. Skipping it means the belt can slowly loosen with every bump in the road.
Forward-Facing Specifics: The Non-Negotiable Tether
A forward-facing seat without a top tether is a hazard. The tether strap, which connects from the top rear of the car seat to an anchor in your vehicle’s rear shelf, seatback, or floor, limits forward head movement in a crash by up to six inches. That’s the difference between a controlled stop and a whiplash injury.
Finding the tether anchor can be a scavenger hunt. Look for a symbol of a child in a seat with a tether, often on the back of the seat, the parcel shelf, or the floor behind the seat. Once attached, pull the tether strap tight. There should be no visible slack, but you shouldn’t have to crank it with all your weight either.
The tether is always used with a forward-facing seat, whether that seat is secured by LATCH or a seat belt. It is not an either/or. The NHTSA recommends using it every time, as long as both the car seat and vehicle manufacturers permit it.
The ISO Standard Most Parents Never Hear About
The International Organization for Standardization publishes test protocols for everything, including how easy a car seat is to use correctly. ISO 13215-2:2022 is the standard for evaluating the risk of installation misuse. Its pass/fail criteria are revealing.
The standard says that for a child restraint system to be considered correctly installable, at least 85% of adults in a test panel must be able to correctly install it in a vehicle within 10 minutes. For harnessing a child, 85% must correctly fit the harness within 5 minutes. If a seat’s design is so confusing that more than 15% of adults get it wrong inside those time limits, it fails the usability test.
What most people get wrong: The harness height adjustment. The ISO test found this is the step where panels most often exceed the 15% error rate. They either leave the straps routed through slots far above the child’s shoulders, or they thread them behind the child’s back to avoid adjusting the headrest.
This is why reading the manual isn’t a formality. The engineers who designed your Britax or Evenflo seat wrote those steps because they know where test panels failed. Skipping the manual means you’re likely to repeat the exact mistake that 15% of other adults made under timed observation.
Vehicle Compatibility: The Fit You Can’t Force
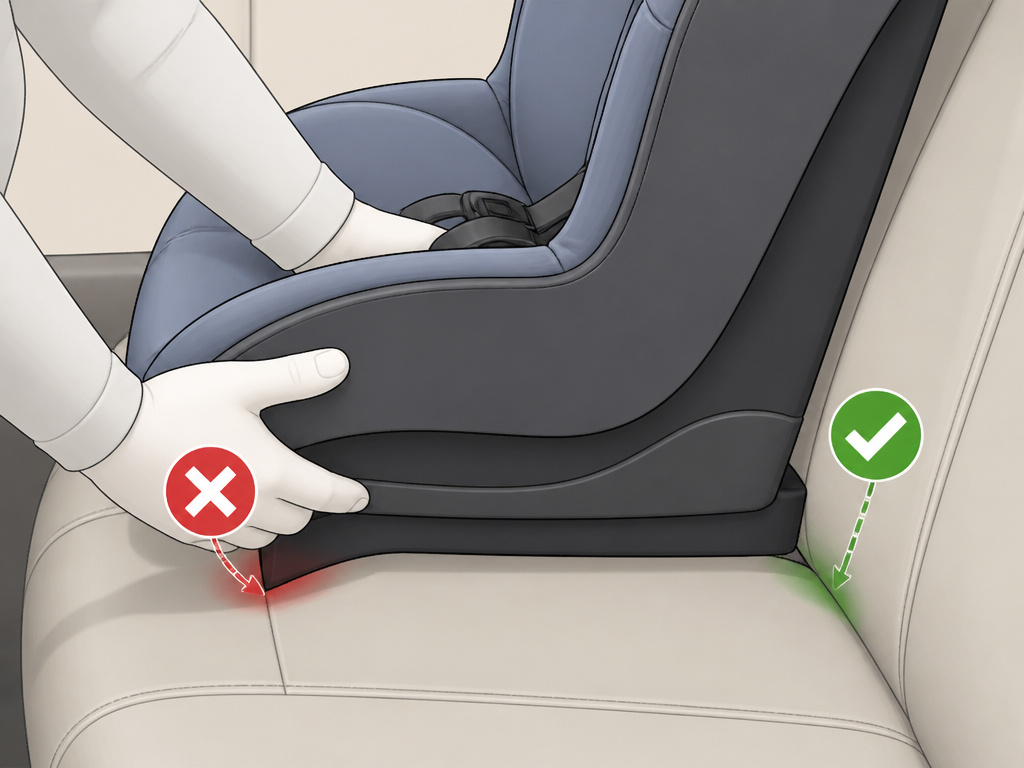
Not every car seat fits in every car. Vehicle seat contours, seat belt geometry, and the angle of the backrest all play a role. A seat that installs rock-solid in a Honda Civic might teeter on the rounded bench of a Ford F-150.
The official advice is to try before you buy. Put the seat in your car and attempt a full installation. If you can’t get a tight fit with less than one inch of movement at the belt path, or if the seat doesn’t make full contact with the vehicle cushion, that seat and vehicle are incompatible. Don’t try to shim it with pool noodles or towels unless the car seat manual explicitly allows it, and even then, only use the materials they specify.
Skip this if: Your vehicle seat is side-facing or only has a lap belt. UK regulations flatly prohibit child car seats on side-facing seats. In the US, a lap-only belt can only be used if the car seat manufacturer specifically approves it for that configuration. Most don’t.
If the car seat can’t be installed properly in your preferred seating position, try a different spot in the vehicle. The center rear is statistically safest, but only if you can get a secure install there. Often, the outboard positions behind the driver or passenger provide better belt geometry or LATCH anchor access.
Frequently Asked Questions
How much should a car seat move when installed correctly?
It should not move more than one inch side-to-side or front-to-back when you grasp it at the belt path and pull. Any movement at the top of the seat is irrelevant, the test is at the path where the belt or LATCH strap connects to the vehicle.
Can you install a car seat with both LATCH and seat belt?
No. Never use both systems together. They are not designed to work in tandem, and using both can create conflicting forces that compromise the seat’s integrity in a crash. Pick one: LATCH or the vehicle seat belt.
Where is the tether anchor in my car?
Look for a small metal loop or bar, often labeled with a tether anchor symbol (a child in a seat with a tether). Common locations include the rear shelf (in sedans), the back of the vehicle seat (in SUVs and vans), or the floor behind the seat. Your vehicle owner’s manual will have a diagram.
What if my car doesn’t have LATCH anchors?
If your vehicle was manufactured before September 1, 2002, it likely does not have LATCH anchors. In this case, you must use the vehicle seat belt to secure the car seat. Ensure you know how to lock your specific seat belt type, which may require a locking clip.
How do I know if my child has outgrown the LATCH weight limit?
First, find the weight of your empty car seat in its instruction manual. Subtract that number from 65 pounds. The result is the maximum combined weight of your child and the seat for LATCH use. Once your child’s weight alone exceeds that number, stop using LATCH and switch to a seat belt installation.
The Bottom Line
The one-inch tug test is your first checkpoint, not your last. A seat that passes it can still fail on harness height, tether use, lower anchor weight limits, or basic vehicle fit. The real standard is the ten-minute install test from the ISO protocol: if you, the manual, and your vehicle can’t get it right within that window, something is wrong. Either the seat is incompatible, or a step is being missed.
For a convertible seat, the Graco Extend2Fit is the default pick for most families, its rigid LATCH connectors click with a solid thunk, and the weight limit is clearly marked. For an infant carrier, the Chicco KeyFit 30 snaps into its base with a sound you can feel in your chest. Both have color-coded level indicators that remove guesswork.
Your final move after any installation is the same one the Britax manual commands: shake the seat firmly at the belt path, then re-check every indicator. Green means go. Anything else means stop.
