
How to Put a Car Seat Base in Your Car Correctly & Safely
This post contains affiliate links. As an Amazon Associate, we earn from qualifying purchases.
To put a car seat base in your car, you must use either the vehicle’s LATCH (lower anchor) system or the seat belt, never both at the same time unless your specific base manual explicitly allows it. The base must be installed tightly, moving less than 1 inch side-to-side or front-to-back, and positioned at the correct recline angle indicated by the base’s level indicator.
The “never both” rule is where most confusion starts. The Nuna PIPA series base manual says it’s acceptable, while NHTSA, Graco, and Transport Canada all state “never both.” This isn’t a minor detail, using both systems simultaneously can create conflicting force paths in a crash, potentially overloading the vehicle’s anchorage points. Your car’s manual and your base’s manual are the final authorities; when they disagree, the stricter rule wins.
What follows is a breakdown of the two installation methods, the model-specific checks that matter more than a generic “tight fit,” and the edge cases that change the entire process. By the end, you’ll know how to read your base’s indicators, when a towel is a legitimate tool, and why that 11-inch measurement for center seats is non-negotiable.
Key Takeaways
- Pick one system: Install your base using either the LATCH lower anchors or the vehicle seat belt. Do not use both unless your base’s instruction manual explicitly permits it.
- The 1-inch rule is literal: After installation, grip the base at its belt path and pull. It should not move more than 1 inch (2.5 cm) in any direction.
- Load leg deployment is mandatory: If your base has a load leg (a support leg that extends to the vehicle floor), it must be fully extended and making firm contact. A green indicator means it’s correct.
- Center seat LATCH has a spacing rule: You can only use LATCH in the center seat if your vehicle manual allows it and the lower anchors are spaced 11 inches (28 cm) apart, center-to-center.
- Recline matters for breathing: Use the base’s built-in level indicator to achieve the correct recline angle for your child’s age and size. An incorrect angle can compromise a newborn’s airway.
The Two Tools You Have (and the One You Don’t)
You have two approved tools to secure a car seat base: the vehicle’s LATCH system or its seat belt. The goal is a rigid, non-moving connection between the base and the vehicle’s frame. These systems are engineered to manage crash forces independently. Using both doesn’t make it “doubly safe”, it can create a scenario where the forces aren’t distributed as designed.
The tool you don’t have is guesswork. Every modern base and vehicle has a specific, non-negotiable language for confirming a correct install. It’s not about feeling “pretty tight.” It’s about audible clicks, green indicators, and a numeric movement threshold.
The Single Biggest Rule: Every car seat needs to be installed using either the lower anchors or a seat belt to secure it in place, never both. Once your child outgrows the vehicle or car seat manufacturer’s established limits for the lower anchors, stop using the lower anchor attachments and reinstall the car seat using the vehicle’s seat belt.
NHTSA Car Seat & Booster Seat Safety Guide
LATCH vs. Seat Belt: The Single Biggest Rule
The LATCH system (Lower Anchors and Tethers for Children) is a standardized installation method in vehicles made after September 2002. In Europe and elsewhere, it’s called ISOFIX. It consists of two metal anchor bars hidden in the vehicle seat crack.
The seat belt method uses the car’s existing lap and shoulder belt (or lap-only belt) to lock the base down. This is the universal fallback and is required once your child’s combined weight (child + seat) exceeds the LATCH limit, usually 65 pounds.
The critical conflict is that most manufacturers, and the NHTSA car seat safety guidelines, say “never both.” However, the Nuna PIPA Series Base User Manual states: “It is acceptable to install with both latch (lower anchors) and the vehicle belt.”
| Installation Method | Best For | The Hard Stop |
|---|---|---|
| LATCH (Lower Anchors) | Quick, standardized install in outboard seats. Easier to get tight. | Weight limits. Child + seat weight > 65 lbs means you must switch to seat belt. |
| Vehicle Seat Belt | Universal use. Center seat installs. The only option once LATCH limits are exceeded. | Must be locked. Use built-in lock-off on base or vehicle belt locking mechanism. |
| Using BOTH | Only if your base manual explicitly allows it (e.g., Nuna PIPA). | If your manual is silent or says “never both,” using both is incorrect and potentially unsafe. |
Your first step is always to read your base manual and your vehicle manual. The vehicle manual will tell you where the LATCH anchors are and if the center seat can be used. The base manual tells you how to attach to them.
Pre-Installation: The 5-Minute Setup Most People Skip
Don’t just pull the base out of the box and put it in the car. The setup you do on your living room floor prevents frustration in the back seat.
- Locate the level indicator. It’s usually a bubble level or an angle guide on the side of the base. Know where the “correct zone” is for a newborn.
- Unfold and understand the load leg. If your base has one, practice extending it and retracting it. Find the green/red indicator window.
- Find the belt path. There are clear labels or molded arrows showing where the seat belt or LATCH strap should thread through. Identify them.
- Check the lock-off. If using seat belt, find the little flip-up plastic piece (the lock-off) that will clamp down on the belt. Make sure it moves freely.
- Store LATCH connectors. If you’re using the seat belt, tuck the LATCH connectors into their designated storage slots so they don’t interfere.
Skipping this means you’ll be wrestling with a load leg for the first time while kneeling on a gas station parking lot pavement. Do the familiarization dance at home.
How to Install a Car Seat Base with LATCH
This is the most straightforward method when your vehicle has accessible lower anchors in an outboard seat. The process is standardized, but the confirmation steps are model-specific.
The 7-Step LATCH Installation Walkthrough
- Position the base. Place the base on the vehicle seat, pushing it back firmly into the seat back. Ensure it’s centered.
- Attach the guides (if equipped). Some bases, like the Joie i-Base 2, have plastic ISOFIX guides. Hook these onto the metal anchor bars first. They protect your seat upholstery and guide the connectors.
- Connect the lower anchors. Push the LATCH connectors onto the metal anchor bars until you hear and feel a solid click. Do one side, then the other.
- Apply weight and tighten. Put a knee in the center of the base and press down firmly into the vehicle seat cushion. While holding this pressure, pull the LATCH tightening strap to remove all slack. The strap should be taut.
- Deploy the load leg. Extend the support leg down to the vehicle floor until it makes firm contact. Squeeze the adjustment buttons and push down. You must hear or feel a final click or see the indicator turn green.
- Check for movement. Grab the base where the LATCH strap passes through and pull hard. It should not move more than 1 inch (2.5 cm) side-to-side or front-to-back.
- Verify visual indicators. This is the non-commodity step. Don’t just tug it. Look. On a Joie i-Base 2, the indicators on both ISOFIX connectors must be “completely green.” On many bases, the load leg has a green window. No green means it’s not locked.
Where this goes sideways: Not using the load leg because it “seems tight enough.” The load leg is a primary crash management component on bases that have one. It prevents the base from rotating forward. An undeployed load leg is an incomplete installation, full stop.
The Center Seat LATCH Exception
Can you use LATCH in the middle? Sometimes. Your vehicle manual must permit it. Then, you must measure. Many vehicles have anchor bars only for the outboard seats. Some have a third set in the center.
For a base like the Graco SnugRide SnugFit 35, the manual specifies it can be used in the center only if the anchor spacing is 11 inches (28 cm) or greater, measured from the center of one anchor to the center of the other. Borrowing the inner anchors from the two outboard positions is called “borrowing” or “creative use.” It’s only allowed if both manuals give the green light. When in doubt, use the seat belt in the center. It’s always permitted.
How to Install a Car Seat Base with a Seat Belt
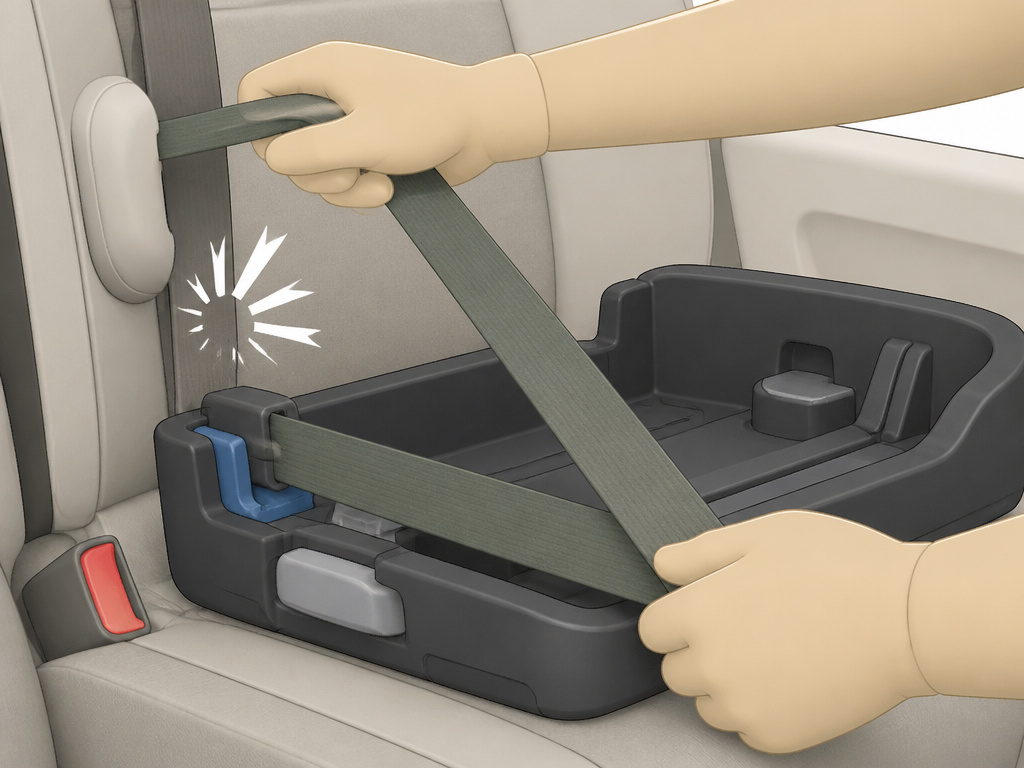
This is the universal method. It works in any seating position, in any car, and is your only option once your child outgrows LATCH weight limits. The key is locking the seat belt.
- Place and position. Set the base on the seat, pushed back into the seat back. Ensure the belt path is clear.
- Thread the seat belt. Pull the vehicle seat belt out completely. Route it through the correct belt path on the base as indicated by the labels or arrows. Buckle it.
- Lock the belt. This is the critical step. For most modern vehicles, slowly pull the shoulder belt all the way out until you hear a ratcheting sound. Let it retract, it will now be in “locking mode” and won’t extend freely. For older cars or lap-only belts, you may need a locking clip (provided with the base).
- Use the lock-off. Most bases have a built-in lock-off, a flip-up lever near the belt path. Close this over the seat belt. It physically clamps the belt to prevent slippage.
- Tighten. Get a knee in the base and press down hard. While holding pressure, pull the slack out of the seat belt by tugging on the shoulder portion. You should feel the belt cinch down tightly.
- Check the angle. With the base compressed, verify the level indicator is in the correct zone. If it’s not, you’ll need to adjust the recline.
- Final check. Grasp the base at the belt path and test for movement. Again, the rule is less than 1 inch.
Common mistake: Letting the seat belt retract into a twisted webbing. A twisted belt cannot lay flat and distribute force evenly. It can also slip more easily. Before you lock it, run your hand along its entire length to ensure it’s flat.
Adjusting the Recline: When a Towel is a Tool
If your level indicator is out of range even with the load leg fully raised or lowered, you need to adjust the base’s angle. This is especially crucial for newborns, who need a specific recline to keep their airways open.
The Graco SnugRide manual provides the sanctioned method: place a tightly rolled towel or a pool noodle under the front edge of the base (the end near the vehicle seat back), between the base and the vehicle seat cushion. Then, re-tighten the installation. The towel fills the gap, tipping the base back. Do not use aftermarket seat protectors or bulky blankets, they can compress in a crash and loosen the fit. The towel trick is in the manual; an unapproved seat protector is not.
Attaching the Infant Carrier and Final Safety Checks
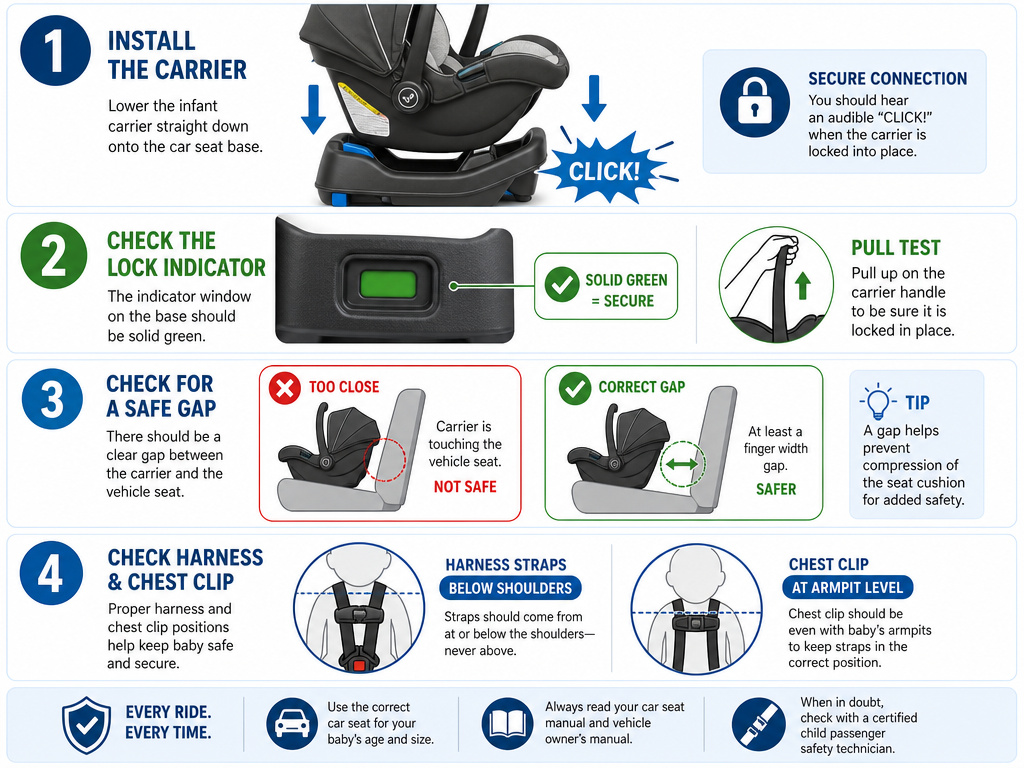
The base is just a platform. The carrier must be securely attached every single time.
- Listen for the click. Lower the infant carrier onto the base. You should hear a distinct, audible click from the attachment mechanism. Don’t assume, listen for it.
- Perform a visual and physical check. Look for a visual indicator (often a green window or button) that shows the carrier is locked. Then, grab the carrier’s handle and pull up firmly. The carrier should not separate from the base.
- Clear the zone. Ensure the carrier handle and the car seat itself are not touching the front vehicle seats. In a crash, this contact can transfer dangerous force.
- Harness check. Finally, buckle your child in. The harness straps should be at or below the shoulders for rear-facing. The chest clip should be at armpit level. Perform the pinch test: pinch the harness strap at the child’s collarbone. If you can pinch any excess webbing, it’s too loose.
Your car seat base setup is worthless if the carrier isn’t locked onto it. That click is your most important sound.
Frequently Asked Questions
Can I install the base in the front seat?
No. Never install a rear-facing car seat or base in the front seat with an active airbag. The force of a deploying airbag can cause severe injury or death to a child. The back seat is the safest place for children under 13.
How do I know if my base is installed tightly enough?
Use the 1-inch test. Grab the base with both hands at the belt path (where the seat belt or LATCH strap goes through). Pull and push hard from side-to-side and front-to-back. If it moves more than 1 inch (2.5 cm), it’s not tight enough. Re-tighten the strap or belt.
What if my car doesn’t have LATCH anchors?
Vehicles manufactured before September 2002 may not have LATCH. In this case, you must use the vehicle seat belt to install the base. The process is the same as a seat belt installation. Ensure you lock the belt properly using the vehicle’s locking mechanism or the base’s lock-off.
Is it safe to use a second-hand car seat base?
It is not recommended. You cannot know its full history, whether it has been in a crash, is past its expiration date (usually 6-10 years from manufacture), or has been recalled. Crashes can cause damage that isn’t visible. Always use a new base or one whose history you know with absolute certainty.
Do I always need to use the base?
No. Every infant car seat can also be installed directly in the vehicle using just the seat belt. This is called a baseless installation. It’s useful for travel, taxis, or grandparents’ cars. However, using the base is generally easier and more convenient for daily use in your primary vehicle.
Before You Go
Installing a car seat base isn’t about strength; it’s about precision. The goal is to eliminate movement, not just reduce it. Your confirmation tools are specific: a measured inch of movement, a green indicator, an audible click.
For most families, the path is clear. Use LATCH in an outboard seat if it’s available and you’re within weight limits. Get it tight, deploy the load leg, and check for green. If LATCH isn’t an option or you’re in the center, the seat belt method is just as safe when done correctly, lock the belt, use the lock-off, and kneel your weight into it.
The one thing you can’t do is guess. Your vehicle manual and your base manual have the answers. When they conflict, the stricter rule protects your child. Now go check that install. Pull on it. Look for the green. Listen for the click. That’s the sound of safety.
