
The Right Way to Get Your Doona Car Seat Out of the Base
This post contains affiliate links. As an Amazon Associate, we earn from qualifying purchases.
Getting a Doona car seat out of its base is a two-part press: rotate the handle to its vertical position (B), then press and hold the Doona release button (#3) on the base until the color indicator (#4) turns red. Tilt the seat forward to lift it free.
That color change is the only confirmation you get. If the button isn’t held long enough, the indicator stays green and the seat stays locked. Most first-time jams happen because the button is tapped, not held.
What follows: the exact sequence for ISOFIX and LATCH bases, the one-step mistake that jams the mechanism, what to do if the seat won’t budge, and how to safely remove the base itself from your car. You’ll also get the belt-only method for when a base isn’t an option.
Key Takeaways
- Press and hold the Doona release button until the indicator turns red, a quick tap won’t unlock it.
- Rotate the handle to position B (vertical) before pressing anything; the anti-rebound bar in position C blocks the release.
- Never leave the base unattached inside the vehicle; an unsecured base becomes a projectile in a crash.
- If the seat feels stuck, check for twisted harness straps caught in the anchor points.
- For belt-only installation, you must use the vehicle’s locking clip if the seat belt doesn’t lock on its own.
The 5-Second Release (ISOFIX & LATCH Bases)
The process is identical for the Doona ISOFIX Base and the Doona LATCH Base. Both use the same seat-to-base attachment system. The difference is how the base itself connects to your car, metal ISOFIX anchors versus the LATCH system’s lower anchors. Removing the seat is the same.
Rotate the handle to the vertical position (marked B on the handle). Press and hold the Doona release button (#3) on the base. The color indicator (#4) will turn from green to red. Tilt the seat forward and lift it clear of the anchor points.
That blockquote is the entire procedure from the official Doona ISOFIX Base User Guide. The button is on the front of the base, near your feet when you’re standing outside the car. The indicator is a small window right next to it.
The handle position is non-negotiable. If the handle is in the stroller position (A) or the anti-rebound position (C), the internal locking bar physically blocks the seat from disengaging. Position B aligns everything.
Why the hold matters: The release button is not a toggle. It’s a direct mechanical link to the latches that grip the seat’s metal bars. A quick press might start the disengagement, but releasing the button too soon lets the latches snap back. You’ll hear a click, see the indicator flash red, and the seat will remain locked. Hold until the indicator is fully red, then keep holding as you start the tilt.
The tilt is the final step. Once the indicator is red, the latches are retracted. Pulling straight up can bind the mechanism. Tilt the top of the seat toward you, toward the front of the car, about 30 degrees. The seat’s metal bars will slide up and out of the base’s anchor points.
What Most People Get Wrong
They confuse the two release buttons. Every Doona base has at least two: the Doona release button (#3) for the seat, and the ISOFIX release button (#6) or LATCH connector release button (#7) for the base itself. Pressing the base’s release button does nothing to free the seat. You’ll just hear a click from the ISOFIX arms or LATCH connectors loosening, but the seat stays firmly attached.
This mix-up is the source of most “stuck seat” calls. The buttons are close together. On the ISOFIX base, the seat release is a large, rectangular button centered on the front. The ISOFIX releases are smaller, round buttons on each side. On the LATCH base, the seat release is the same large front button, while the LATCH connector releases are red tabs on the sides.
If you’ve pressed the wrong button and now the seat feels jammed, don’t force it. Stop, identify the correct button, and try again with the handle in position B.
What If the Seat Won’t Budge?
First, verify the obvious. Is the handle in position B? Is the color indicator red? If yes and the seat still won’t tilt free, the problem is usually physical interference.
Check for harness strap twist. A twisted shoulder strap can get pinned between the seat shell and the base’s anchor point. This creates enough friction to resist the tilt. Before you try to release, run your fingers behind the seat where the straps enter the shell path. Straighten any twists.
Inspect the anchor points. Look at the two metal bars on the bottom of the Doona seat and the corresponding slots on the base. Is there debris, a Cheerio, a pebble, a folded receipt, jammed in there? Even a small obstruction can wedge the bars. Clear it with your fingers.
Re-seat and re-release. Sometimes the latches don’t fully retract on the first attempt. Lift the seat handle to position C, then firmly press the seat down onto the base until you hear a solid click and the indicator turns green. Now repeat the release procedure: handle to B, hold the button until red, tilt forward. The second attempt often works.
If none of this helps, the mechanism itself might be faulty. The warranty covers manufacturing defects for two years from purchase. Contact Simple Parenting at the address in your manual. Do not attempt to disassemble the base.
Removing the Base from the Vehicle
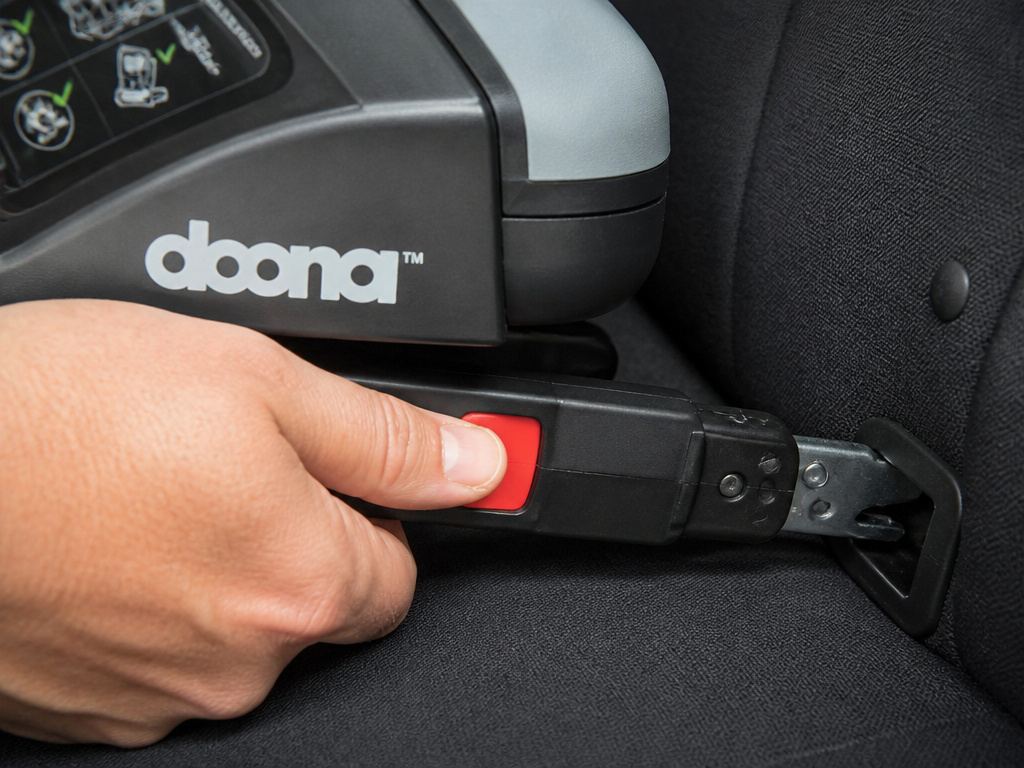
Once the seat is out, you might need to remove the base. For the ISOFIX base, pull the ISOFIX release button (#6) on each side to retract the metal arms from the vehicle’s anchors. Then fold the support leg (#10) flat against the base. You can now lift the base out.
For the LATCH base, press and hold the red LATCH connector release button (#7) on each side to detach the connectors from the lower anchors. There’s no support leg to fold on this model.
Before you start: An unsecured base is a 10–15 pound projectile in a crash. The Doona ISOFIX Base User Guide includes a specific warning: “Do not leave the Doona ISOFIX Base unattached inside the vehicle.” Either secure it with the vehicle seat belt or take it out of the car.
Storing the base in the trunk? Use the seat belt to strap it down. Leaving it on the seat “for later” is a risk. In a sudden stop, it flies.
When You Don’t Have a Base
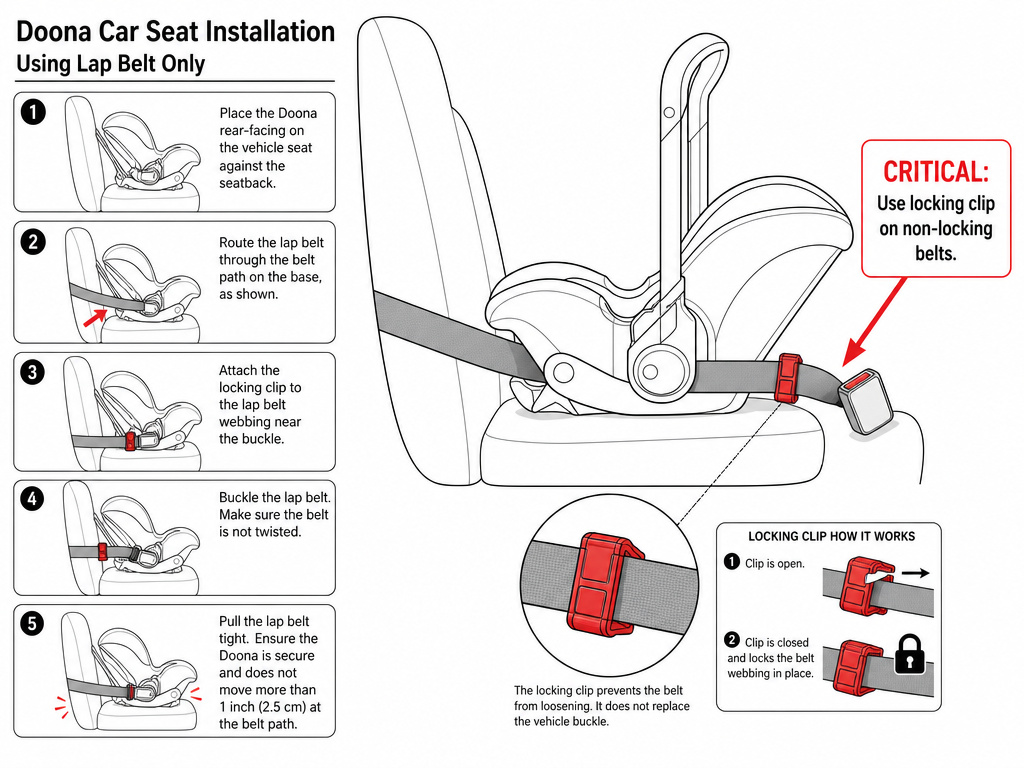
The Doona car seat can be installed directly with your vehicle’s seat belt. The manual calls this “Installing without a Base.” It’s a valid, safe installation method, but it has a specific edge case.
The preferred European installation uses the lap-shoulder belt routed through the belt path. If the shoulder portion isn’t long enough, the manual specifies a Lap Belt Standard Installation as the fallback. This isn’t a choice, it’s the only option when the belt physically won’t reach.
Here’s the catch: many vehicle seat belts have an emergency locking retractor (ELR) that only locks in a crash. For a lap-belt installation, you must use the locking clip provided with the Doona. The manual is clear: “Vehicle seat belt must lock, otherwise use a locking clip.” Skipping the clip because the belt feels tight is a critical error. The seat can shift several inches on impact.
| Installation Method | Best For | Critical Step Often Missed |
|---|---|---|
| ISOFIX/LATCH Base | Daily use, quick in/out | Holding release button until indicator is solid red |
| Lap-Shoulder Belt (European) | Most vehicles with long belts | Ensuring shoulder belt isn’t twisted in the guide |
| Lap Belt Only (Standard) | Short seat belts, center seats | Using the locking clip on non-locking belts |
The Belt-Only Installation and Removal
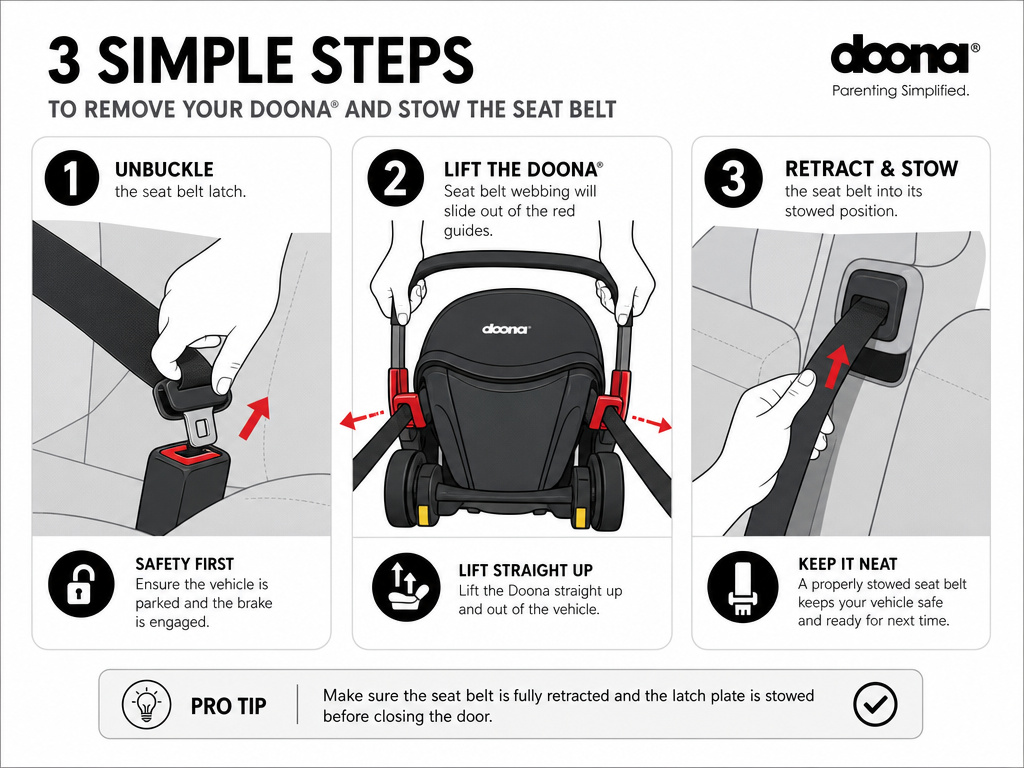
Installing the Doona without a base is a more involved process, but removing it is straightforward. You’re just unbuckling the seat belt.
- Unbuckle the vehicle seat belt.
- Carefully lift the seat, pulling the belt out of the guides. The seat is free.
- Stow the seat belt so it doesn’t get caught in the door.
The complexity is in the setup. You must route the belt through the correct guides on the seat, ensure it’s not twisted, and engage the locking mechanism. For a complete walkthrough of that process, see our guide on installing the Doona car seat without a base.
The takeaway: belt-only is a solid backup. It turns the Doona from a quick-click system into a traditional car seat installation. For frequent swapping, a base is worth it. But knowing you can use the Doona car seat without the base covers you in a rental car or grandma’s sedan.
Frequently Asked Questions
Why won’t my Doona car seat release from the base?
The handle isn’t in position B, you’re tapping the release button instead of holding it, or you’re pressing the wrong button. Confirm the handle is vertical, find the large rectangular Doona release button on the front of the base, and press and hold it until the adjacent color window turns solid red. Then tilt the seat forward.
What does the red/green indicator light mean?
It’s not a light; it’s a mechanical color indicator window. Green means the seat is correctly latched onto the base’s anchor points. Red means the latches are retracted and the seat is unlocked. The change happens when you press and hold the Doona release button. If it flashes red and goes back to green, you didn’t hold the button long enough.
Can you use the Doona without the base?
Yes. The Doona car seat is certified for installation using your vehicle’s lap-shoulder belt or lap belt alone. The manual provides specific instructions for both methods. For lap-belt installations, you must use the included locking clip if your vehicle’s belt doesn’t lock on its own. Our article on whether you need a base for the Doona breaks down the pros and cons.
How do you remove the Doona ISOFIX base from the car?
First, remove the car seat. Then, pull the ISOFIX release button (#6) on each side of the base to retract the metal arms. Finally, fold the support leg (#10) up toward the base. The base can now be lifted out of the vehicle seat.
Is it safe to leave the Doona base in the car unattached?
No. The Doona ISOFIX Base User Guide explicitly warns against this: “Do not leave the Doona ISOFIX Base unattached inside the vehicle.” In a crash, an unsecured base can become a dangerous projectile. Always secure it with a seat belt or remove it from the vehicle entirely.
Before You Go
The Doona’s design is clever, when you know which button does what. The seat release is the big one on the front. Hold it until red, then tilt. The base releases are on the sides. Forget that sequence and you’ll fight it every time.
For daily use, the base is the way to go. The two-year warranty from Simple Parenting covers defects, but wear from forcing the mechanism isn’t included. If your seat still won’t release after checking the handle position, button, and straps, it’s time to contact support. For everything else, from installing the Doona base to removing the newborn insert, the manuals have the answers, if you read them.
