
How to Install Doona Infant Seat Without the Base Properly
This post contains affiliate links. As an Amazon Associate, we earn from qualifying purchases.
Install a Doona car seat without its base by using your vehicle’s 3-point seat belt. The handle must be in the anti-rebound position C, and the seat must be reclined until the red level line on its side sticker is parallel to the ground. Route the lap belt through the guides on the handle and the shoulder belt around the seat’s back for the European method, or through the rear shoulder belt guide if the belt is too short.
That red line is the only visual cue you get. It’s printed on a sticker, not molded into the plastic. Get the angle wrong by a few degrees, and the seat’s geometry in a crash changes.
What follows is the walkthrough the manual assumes you’ve already read: the two belt-routing methods, the exact specs that make an installation fail, and the one step everyone skips until the seat rocks side-to-side.
Key Takeaways
- The handle must be locked in anti-rebound position C before you thread any belt. Position A or B will compromise crash safety.
- Use the European installation method (shoulder belt behind the seat) unless your vehicle’s shoulder belt is too short, then switch to the Standard method (shoulder belt through the rear guide).
- The red level line on the side sticker must be perfectly parallel to the ground for correct recline. Check it on the vehicle seat, not on your floor.
- Never route the shoulder portion of the seat belt through the lap belt guides on the handle. This is the most common installation error.
- If the seat belt doesn’t lock, you must use a locking clip or switch the retractor to locking mode. A non-locking belt cannot secure the seat.
Before You Start: The Non-Negotiables
Before you start: This is a rear-facing-only seat for infants. Never install it forward-facing. Never install it on a vehicle seat with an active frontal airbag. The vehicle’s seat belt must be a 3-point lap-shoulder belt approved to a standard like ECE R 16.
Your car’s manual and the Doona’s manual are equal authorities. If they conflict on a point, like side airbag clearance, the stricter rule wins.
You need a clean, flat vehicle seat. Remove any aftermarket seat covers, cushions, or protectors not certified for use with child restraints. They can hide slack and compromise the belt’s grip. The Doona’s own Vehicle Seat Protector accessory is the only one Simple Parenting approves.
The Pre-Installation Checklist
Get these three things right before you touch the seat belt. Missing one voids the entire installation.
Handle Position. Fold the handle down toward the vehicle seatback until it clicks into the rearmost notch. This is Position C, the anti-rebound position. You should not be able to wiggle it forward or back. In this mode, the handle acts as a stabilizer, not a carrying handle.
Seat Recline. Place the Doona on the vehicle seat. Gently press down on the foot area while adjusting the seat’s angle. Your target is the small red line on the sticker affixed to the shell’s side. That line must be parallel to the ground. Use a small level app on your phone if you’re unsure. An overly upright seat strains an infant’s airway; a too-reclined seat compromises crash protection.
Vehicle Belt Check. Grab the seat belt and pull it all the way out. Let it retract slowly. Listen and feel for a click that stops the belt from extending further. That’s the locking mechanism engaging. If it doesn’t lock, if it just retracts smoothly and stays loose, you need a locking clip. Also, verify it’s a 3-point lap-shoulder belt. Two-point lap belts are incompatible.
The Two Seat Belt Methods (And When to Use Each)
The official Doona user guide details two 3-point belt installation methods. Your car’s seat belt length decides which one you use.
The Lap-Shoulder Belt European Installation is the preferred method. The shoulder belt wraps around the back of the car seat shell. This provides the most direct, stable load path to the vehicle’s anchorage points.
Use the European method first. It’s simpler and more secure. Thread the lap portion of the belt through the two plastic guides on either side of the Doona’s handle. These are the lap belt guides. Then, route the shoulder portion of the belt around the back of the seat shell, ensuring it lies flat and isn’t twisted. Buckle it. The belt should look like it’s hugging the seat.
Switch to the Standard method for one reason only. If the shoulder belt is not long enough to wrap around the back of the Doona without straining, you must use the Standard method. This is common in smaller rear seats or certain vehicle models. Ford and Lincoln vehicles with inflatable seatbelts also require the Standard method.
Where this goes sideways: Routing the shoulder belt through the lap belt guides on the handle. This misdirects crash forces and can cause the seat to rotate violently. The lap guides are for the lap belt only.
The Lap-Shoulder Belt Standard Installation uses a different path. You still thread the lap belt through the handle’s lap belt guides. But instead of going behind the seat, the shoulder belt is routed through a dedicated shoulder belt guide, a plastic loop located at the very back of the Doona’s shell. You must access this from the front of the vehicle seat, feeding the belt through carefully.
| Installation Method | Belt Routing | When to Use It |
|---|---|---|
| European (Preferred) | Lap belt: through handle guides. Shoulder belt: around back of seat shell. | Default for most vehicles. Provides the most direct load path. |
| Standard (Alternative) | Lap belt: through handle guides. Shoulder belt: through rear shoulder belt guide. | Shoulder belt is too short to wrap around seat, or vehicle has inflatable seatbelts. |
Step-by-Step: Securing the Seat
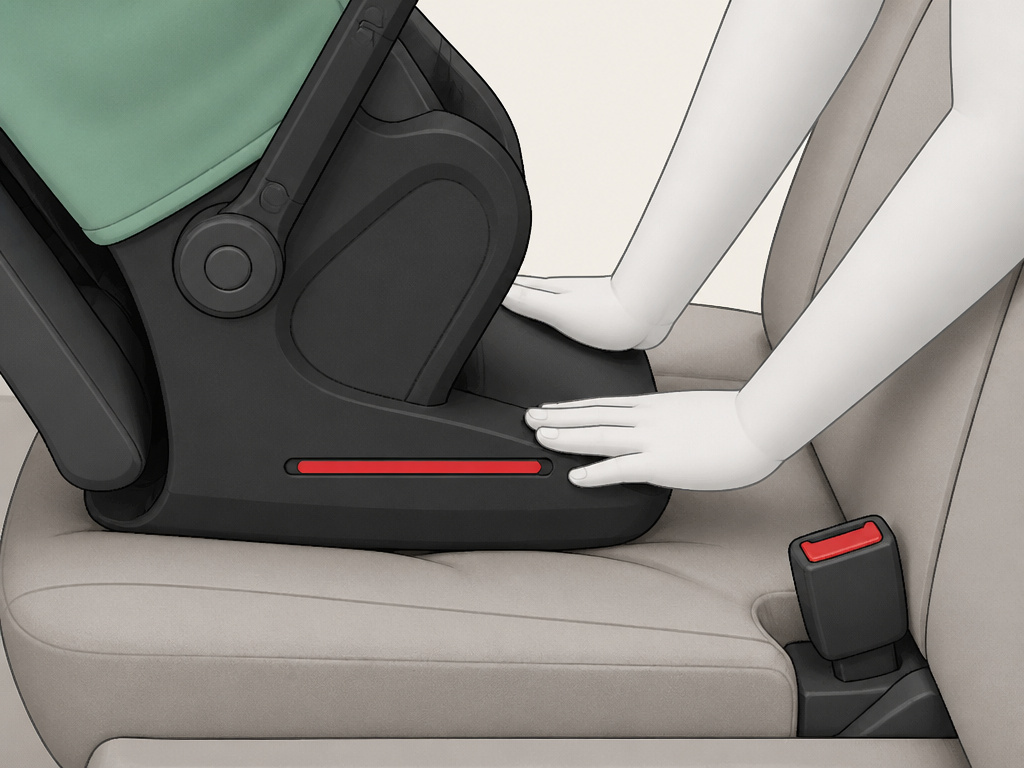 Follow this sequence. The order matters because each step removes slack from a different direction.
- Position and Recline. Place the Doona rear-facing on the vehicle seat. Press down firmly on the foot end to compress the vehicle seat cushion. Adjust until the red level line is parallel to the ground. Hold that pressure.
- Route the Lap Belt. With your other hand, thread the lap portion of the vehicle seat belt through the two lap belt guides on the handle. Ensure the belt lies flat without twists. Listen for the buckle click.
- Route the Shoulder Belt. For the European method, pull the shoulder belt across the back of the Doona shell. For the Standard method, find the shoulder belt guide at the back of the shell and thread the belt through it. The belt must not be routed through the lap belt guides.
- Kneel and Tighten. Kneel on the Doona seat, putting your full weight into the child’s sitting area. This mimics the force of a child and presses the seat deep into the vehicle cushion. While kneeling, pull the shoulder belt tail firmly to tighten the entire belt system. You should not be able to pinch any horizontal slack in the lap belt.
- Lock the Retractor. If your seat belt has a switchable retractor, flip it to locking mode. For belts that lock only at the latchplate, you’re done. If the belt still doesn’t lock, you must install a locking clip on the lap belt, within an inch of the latchplate.
- Final Rock Test. Grasp the Doona at the belt path, near the lap belt guides, and try to move it side-to-side and front-to-back. It should not shift more than one inch in any direction. If it moves more, unbuckle, re-tighten with more weight, and check for twists.
I won’t recommend the front passenger seat. The manual says it’s possible if the airbag is off, but locating that switch and verifying it’s disabled is a hidden failure point most parents miss. The back seat is always safer.
What to Do When the Installation Fails
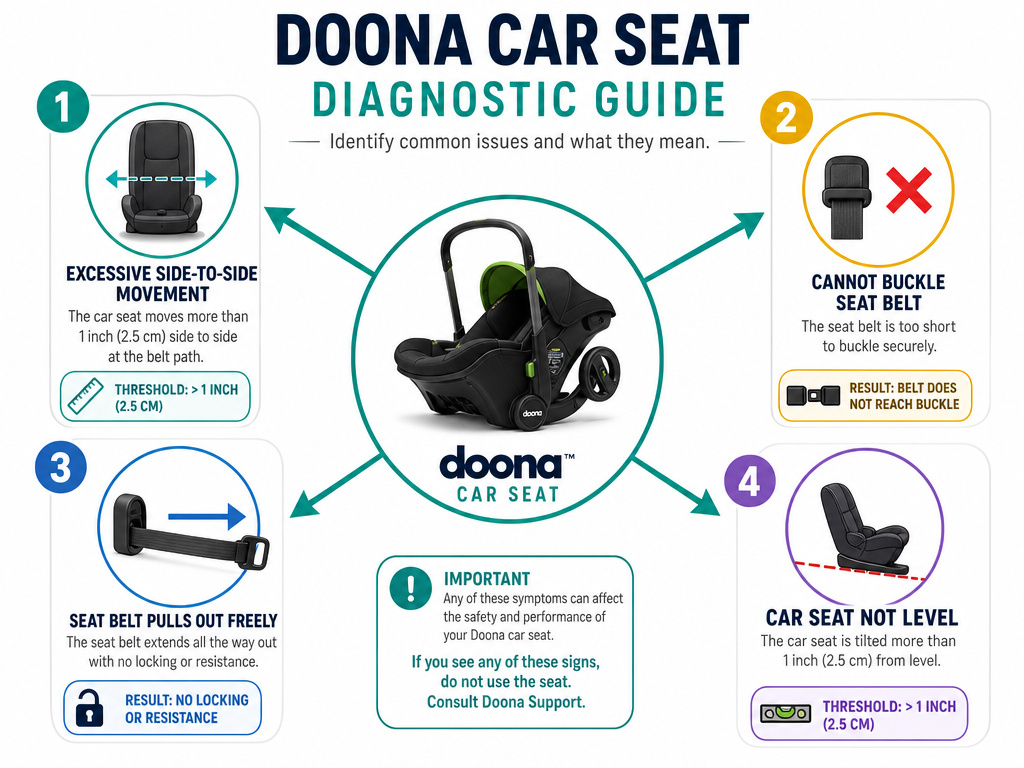 If you can’t get a tight, secure fit, stop. Do not assume “good enough” is safe. Work through this diagnostic tree.
| Symptom | Likely Cause | The Fix |
|---|---|---|
| Seat rocks side-to-side >1 inch | Lap belt has slack; seat not compressed enough. | Unbuckle. Kneel harder into seat during step 4. Pull shoulder belt strap aggressively. |
| Shoulder belt won’t reach | Belt is too short for European method. | Switch to Standard method and route through rear shoulder belt guide. |
| Belt pulls out freely | Non-locking retractor; no automatic locking mode. | Obtain and correctly install a locking clip on the lap belt near the latchplate. |
| Red line won’t go level | Vehicle seat slope is too steep or contoured. | Try a different seating position in the vehicle. Do not use towels or pools to adjust. |
Try a different seating location. Vehicle seats are not uniform. The center rear seat might have a hump, while the outboard seat might be flatter. The Doona manual explicitly states that if you cannot achieve a secure installation in one spot, move the seat to another. This is your most powerful tool.
Incompatible vehicle belts. Some seat belt types cannot be used. The manual lists belts attached to the door, motorized belts, and lap belts that anchor forward of the seat bight (the crease where the seatback meets the cushion). If your car has these, you cannot install the Doona without its proprietary base. Check your vehicle owner’s manual.
Frequently Asked Questions
Can you install the Doona in the front seat?
You can, but Simple Parenting strongly recommends against it. If you must, the vehicle’s frontal airbag for that seat must be deactivated, a function not available in all cars. You must also consult your vehicle manual for specific rules. The rear seat is always the safer choice.
Is it safe to use the Doona without the base?
Yes, when installed correctly per the manual. The Doona car seat holds ECE R 44/04 or similar certification for baseless, seat-belt-only installation. This means it passed crash tests with the belt alone. The base is a convenience feature for quick in-and-out, not a safety requirement.
What if my car only has a lap belt?
The Doona cannot be installed with a 2-point lap belt in a vehicle. This configuration is explicitly prohibited in the manual as it “substantially increases the risk of injury.” You must use the seat in a seating position with a full 3-point lap-shoulder belt or use the Doona with its base and the vehicle’s LATCH system.
How tight should the seat belt be?
Tight enough that you cannot pinch any horizontal slack in the lap belt section after you’ve buckled and tightened it. When you grasp the Doona at the belt path and try to move it, it should have less than one inch of movement in any direction.
Do I need a locking clip?
You need a locking clip if your vehicle’s seat belt does not have a locking retractor. Most newer cars have belts that lock automatically when pulled all the way out. Older cars may require a clip. The clip is placed on the lap belt within an inch of the latchplate after you’ve tightened the belt.
Before You Go
Installing the Doona without its base isn’t about convenience. It’s about matching three physical things: the handle’s locked position, the seat’s recline angle, and the correct belt path for your specific car.
The European belt route is the default. The red level line is your guide. The one-inch rock test is your final exam. Skip the front seat. If the belt won’t lock, get a locking clip. If it still moves, try another seat in the car.
That’s the procedure. It works because the manual’s engineers tested it that way. Your job is to replicate their test setup in your back seat.
