
Master the Doona Car Seat Base Installation Process Easily
This post contains affiliate links. As an Amazon Associate, we earn from qualifying purchases.
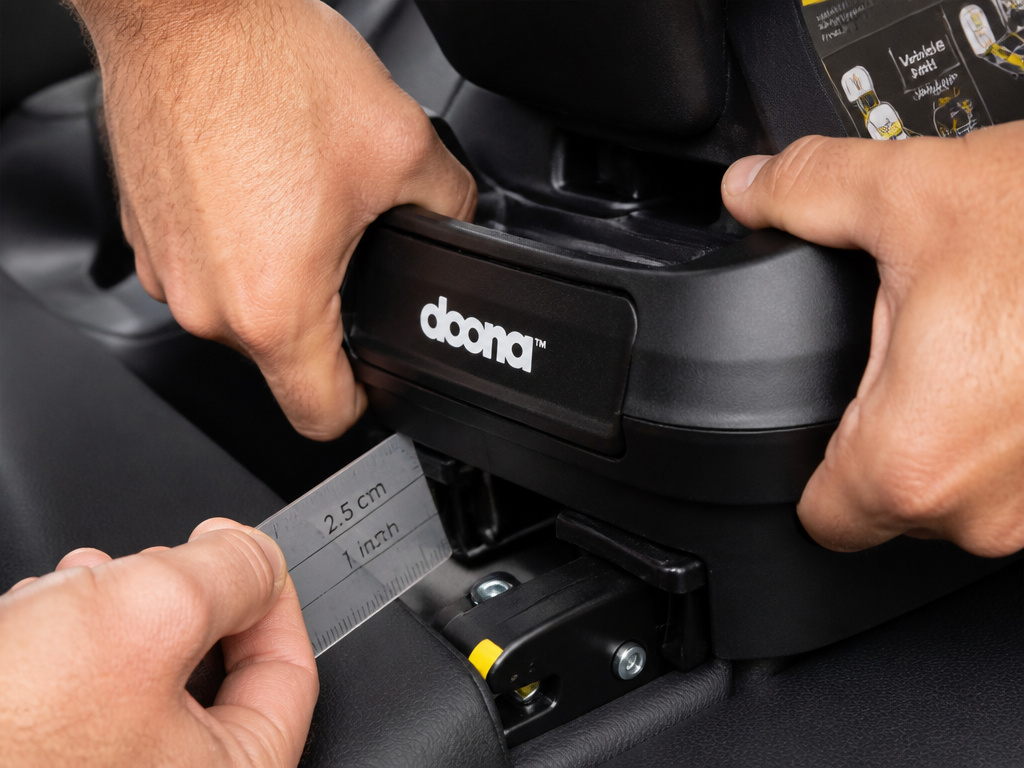
To install a Doona car seat base, you must first identify your base type: ISOFIX (with rigid connectors and a support leg) or LATCH (with webbing straps). For a LATCH base, level it using the recline knob until the white markers are inside the green zone on both sides. Tighten the LATCH straps over the vehicle’s metal anchor bars until the base moves less than 1 inch (2.5 cm) side-to-side or front-to-back. The seat locks onto the base with a distinct click, and the base’s indicator must turn from red to green.
That 2.5 cm movement ceiling is the manual’s hard line between secure and unsafe. It is not a suggestion. It is the measurable outcome of correct tension on the LATCH straps or proper engagement of the ISOFIX latches.
What follows is the breakdown of both base types, the step-by-step tension checks most videos skip, and the three vehicle scenarios where the Doona base will not install safely no matter how carefully you follow the steps.
Key Takeaways
- The Doona LATCH base secures with webbing straps and must be leveled so the white markers sit inside the green zone on the recline indicators before you tighten anything.
- The Doona ISOFIX base uses rigid metal connectors and a support leg that must press firmly into the vehicle floor until its indicator turns from red to green.
- A properly installed base moves less than 1 inch (2.5 cm) at the belt path when you tug it side-to-side or front-to-back, this is the manual’s stated test.
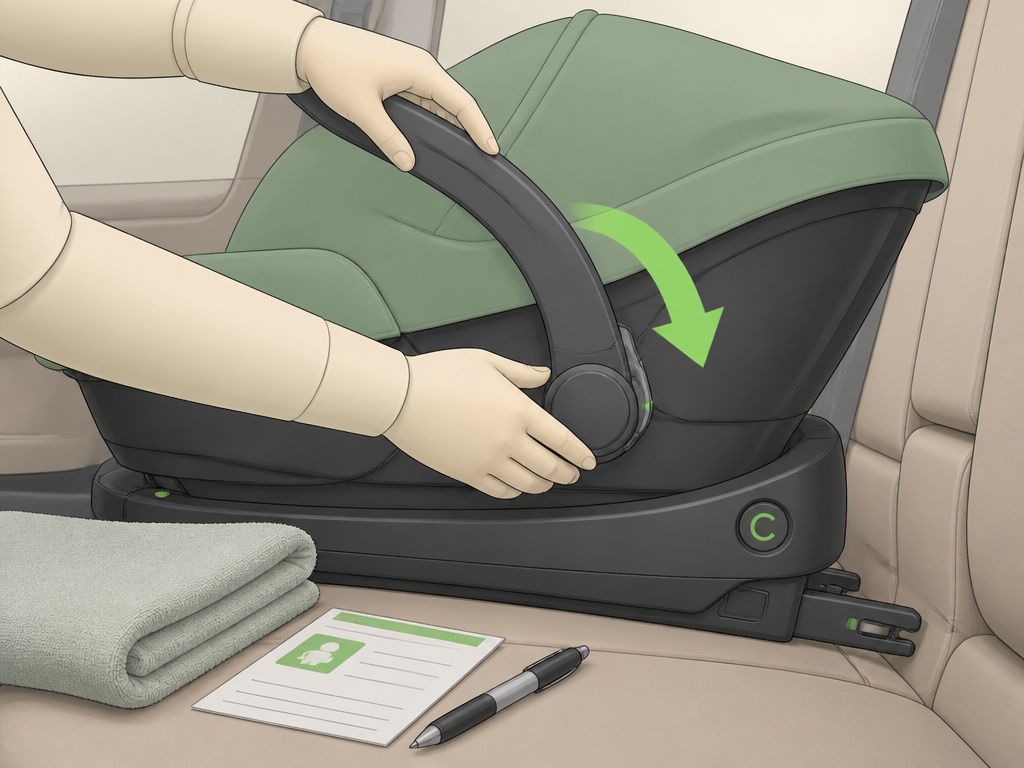
- After locking the car seat onto the base, you must rotate the handle to the anti-rebound position (marked “C”); leaving it upright forfeits a key safety feature.
- Never install the base in a seating position with an active frontal airbag, and check your vehicle manual against the manufacturer’s car fitting list for compatibility.
ISOFIX vs. LATCH: Which Doona Base Do You Have?
You cannot follow the right steps if you are looking at the wrong manual. The Doona sells two distinct base types, and they install differently.
The Doona ISOFIX Base (including the newer Doona i-Size ISOFIX Base, model 50646081) uses a rigid, semi-universal system. Two solid metal connectors latch directly into your vehicle’s ISOFIX anchor points, and a support leg extends to the vehicle floor. There are no webbing straps to tighten. You get a positive click when each connector engages, and the support leg has a color window that must show green.
The Doona LATCH Base uses the flexible Lower Anchors and Tethers for Children system common in the U.S. It has two connector hooks on webbing straps that you must route and tighten over your vehicle’s metal anchor bars. This base has a recline adjustment knob and level indicators on the sides. Your job is to level it first, then tighten the straps until the base is secure.
Common mistake: Trying to use the LATCH installation steps on an ISOFIX base, or vice versa. The ISOFIX base has no straps to tighten; the LATCH base has no support leg to extend. Confusing them leads to an insecure installation.
If you are in Europe or have a vehicle with the standardized ISOFIX/LATCH anchor points, you likely have the ISOFIX base. If you are in North America, you almost certainly have the LATCH base. Check the physical product: webbing straps mean LATCH; rigid arms mean ISOFIX.
Vehicle Prep: The Two Checks You Must Do First
The car seat is a system. Your vehicle is the other half. Skipping these checks is how you get a base that seems tight but fails in the first hard brake.
First, find your anchor points. For a LATCH installation, you are looking for the U-shaped metal bars in the crevice of your vehicle seat. They might be hidden behind a plastic cover. For an ISOFIX installation, you are looking for the metal loops or brackets between the seat back and cushion. Your vehicle manual has a diagram. If you cannot find them, you cannot use that base in that seat. You will need to use the seat belt installation method instead.
Second, rule out incompatible seat belts. The Doona LATCH base manual explicitly lists belts you cannot use. This includes motorized shoulder belts, inflatable seat belts, or any belt attached to the door. If your vehicle has these, the base cannot be installed safely in that position. Your only option is to try a different seating position in the car.
Where this goes sideways: Installing the base on a seat that folds down without locking the seatback. In a crash, the seat could collapse forward. The manual states rear seats that fold must be locked.
Step-by-Step: Installing a Doona LATCH Base
This is the most common base. The process is about sequence: level, connect, tighten, verify.
1. Level the Base. Place the base on the vehicle seat. Turn the recline knob at the front until the white markers on the level indicators on both sides are completely within the green zone. The base must sit flat; the front edge cannot be raised off the seat cushion.
2. Connect the LATCH Hooks. Press the red buttons on the connectors to release them from storage. Route the webbing straps cleanly over the vehicle seat’s metal anchor bars. Push each connector onto the bar until you hear a click. Do not twist the straps.
3. Tighten the Straps. Pull the free end of each LATCH strap firmly to remove all slack. The base should not shift easily. This is where most people stop too soon.
4. Perform the 2.5 cm Test. Grab the base at the belt path (where the straps go into the base). Tug side-to-side, then front-to-back. If it moves more than 1 inch (2.5 cm), the straps are not tight enough. Re-tighten. This test is not optional.
| Step | Goal | What Happens If You Skip It |
|---|---|---|
| Leveling | White markers in green zone | The car seat sits at an unsafe angle for the infant’s airway. |
| Connecting | Audible click on both anchors | One hook can detach in a collision, causing the base to rotate. |
| Tightening | No visible strap slack | The base has room to jerk forward on impact, increasing crash forces. |
| 2.5 cm Test | Movement < 1 inch (2.5 cm) | The base is not secure; it will amplify motion in a crash or sudden stop. |
5. Attach the Car Seat. Align the Doona car seat with the anchor points on the base and press down firmly until you hear a definitive click. The base’s release button should turn from red to green. Lift up on the seat’s handle; it should not detach.
6. Set the Anti-Rebound Bar. This is the step every third parent misses. Rotate the car seat’s handle all the way back until it clicks into position C, resting against the vehicle seatback. This creates an anti-rebound barrier. Leaving the handle upright does nothing.
Step-by-Step: Installing a Doona ISOFIX Base

The ISOFIX base is simpler mechanically but demands perfect engagement.
1. Extend the Connectors. Lift the body slider button on the base and push the support leg forward. This extends the two ISOFIX connectors to their maximum length.
2. Engage the Anchors. Push the base firmly into the vehicle seat until both metal connectors click onto the ISOFIX anchor points. You should hear and feel two distinct clicks.
3. Slide the Base Body. Once anchored, slide the main body of the base toward the back of the vehicle seat until it is firmly pressed against the seatback.
4. Deploy the Support Leg. Press the leg adjustment button and extend the support leg down until it rests firmly on the vehicle floor. The leg’s color indicator must change from red to green. This leg is critical, it prevents the base from rotating forward.
5. Lock the Car Seat. Align the Doona car seat with the base’s anchor points and press down. A loud click confirms it’s locked. The color indicator on the base should turn from red to green. Rotate the handle to position C for anti-rebound protection.
Easy to miss: The ISOFIX base is approved only for vehicles with specific anchor points listed in the manufacturer’s car fitting list. Universal does not mean every car. Check the list on the Simple Parenting website.
The 2.5 cm Rule: How to Know Your Doona Base is Secure
Your eyes can lie. Your hands tell the truth. After any installation. LATCH or seat belt, you must perform the manual’s prescribed security test.
Grip the base where it is secured (the belt path for LATCH, the central body for ISOFIX). Try to move it side-to-side with moderate force. Then try to move it front-to-back. The base is secure when it moves less than 1 inch (2.5 cm) in any direction.
This is not a gentle wiggle. Use a firm, deliberate tug. If it shifts more than that, the connection is not tight enough. For a LATCH base, pull the strap tails again. For a seat belt installation, kneel into the base and pull the belt tighter before re-locking it.
Why 2.5 cm? That threshold represents the point where slack in the system becomes dangerous kinetic energy in a crash. More movement means higher forces transferred to the car seat, and your child.
The Anti-Rebound Handle & Other Forgotten Steps
Installing the base is one job. Using the full safety system is another.
The Handle is Not Just a Carry Handle. After locking the car seat onto the base, you must rotate the handle all the way to the rear until it clicks into position C. This positions it as an anti-rebound bar. In a frontal crash, it presses against the vehicle seat to prevent the top of the car seat from whipping forward. It is a labeled, designed safety feature. Leaving the handle up is like driving with the parking brake on, it’s not doing its job.
Register Your Base. The manual includes a registration card. Fill it out. This is how the manufacturer contacts you if there is a safety recall. Child restraints are recalled more often than people realize.
Sun and Heat. Plastic and metal parts can become extremely hot if the car is parked in the sun. Cover the base with a blanket or towel when not in use to prevent burns.
When a Doona Base Will Not Install Safely
Sometimes, the answer is not to try harder. It is to stop. The manuals list specific, non-negotiable scenarios where the Doona base cannot be used.
- With an Active Frontal Airbag. Never install any rear-facing base or seat in front of an active airbag. The force of deployment can kill a child.
- On Incompatible Vehicle Seats. This includes seats that fold but cannot be locked upright, or seats made of slippery material that prevents the base from gripping.
- Using Both LATCH and Seat Belt Together. This is explicitly forbidden. The systems can interfere with each other, and neither will perform correctly in a crash. Pick one method.
If you encounter leveling issues with the LATCH base that cannot be resolved, the manual’s advice is blunt: “Try installing the Doona Base on a different seat.” Not all vehicle seats are flat enough. Move it to the other side of the back seat, or try the center position if it has LATCH anchors.
Frequently Asked Questions
Can you install the Doona base in the center seat?
You can, but only if that seating position has dedicated LATCH anchors or ISOFIX points. Most vehicles do not have LATCH anchors for the center seat, they are only for the outboard seats. In that case, you must use the vehicle’s seat belt to secure the base in the center. Always check your vehicle manual first.
Why won’t my Doona seat click into the base?
First, ensure the base itself is securely installed. A base that can move will prevent a clean lock. Second, check for obstructions. A twisted LATCH strap or a piece of debris can block the locking mechanism. Finally, align the seat perfectly over the anchor points and press down firmly. It requires a solid, confident push.
How do I know if my Doona ISOFIX base is compatible with my car?
The Doona ISOFIX base is semi-universal, meaning it fits many but not all cars with ISOFIX. You must check the official car fitting list provided by Simple Parenting, the manufacturer. This list is updated regularly and is available on their website. Do not assume compatibility.
Is it safe to use a second-hand Doona base?
Only if you are certain of its complete history. You must know it has never been in a moderate or severe crash (even a fender-bender over 10 km/h), all parts are present and functional, and it has not been recalled. If any of this is unknown, do not use it. The cost of a new base is lower than the risk.
Can I use the Doona base on an airplane?
No. The Doona car seat is certified for aircraft use, but the base is not. On a plane, you must install the Doona car seat directly onto the aircraft seat using the lap belt only, following the instructions for installing without the base.
Before You Go
Installing a Doona base correctly boils down to three things: identifying your base type, following its specific leveling and connection steps, and enforcing the 2.5 cm movement rule with a firm tug. The color indicators, green on the support leg, green on the lock, are your visual confirmation, but the physical test is your final proof.
Remember to rotate that handle to position C. It takes two seconds and completes the safety system. When in doubt, go back to the source: your vehicle’s owner manual and the Doona base user guide have the answers for your specific car and model. A secure base is the silent, essential partner to the car seat you see every day. Get it right once, and you can trust it for every trip after.
