
Installing Car Seat Base With Seat Belt: A Foolproof Guide
This post contains affiliate links. As an Amazon Associate, we earn from qualifying purchases.
To install a car seat base with a seat belt, you must route the belt through the correct path on the base, buckle it, and then lock the belt using your vehicle’s specific mechanism, either a switchable retractor, a locking latch plate, or the base’s own lock-off. The base should not move more than 1 inch (2.5 cm) side-to-side or front-to-back at the belt path. The single biggest mistake is failing to lock the belt properly, which lets the base shift over time.
That one-inch rule is the final test, but the lock is what makes it hold. Your vehicle manual dictates which of three locking systems you have. Getting that wrong means the base feels tight at first but works loose after a few drives. The base isn’t just sitting there; it’s holding a deceleration force many times your child’s weight in a crash. A belt that isn’t locked is a belt that will give.
What follows: how to find your belt’s locking type, the step-by-step path for lap-only versus lap/shoulder belts, why you must choose one installation method and stick with it, and the final check that catches 90% of errors.
Key Takeaways
- Never use both the seat belt and LATCH system together. Every manufacturer manual forbids it; the dual loads can overstress the vehicle seat frame.
- Identify your seat belt’s locking type before you start. It’s either a switchable retractor (pull the shoulder belt all the way out) or a locking latch plate (the buckle tongue has a small metal bar or flip lever).
- Tighten the belt completely before closing the base’s lock-off bar. If your base has a lock-off, closing it on a loose belt creates a false sense of security.
- The “1-inch rule” applies at the belt path, not the top of the base. Grab the base where the belt routes through it. More movement means it’s not tight enough.
- Bulky winter coats compress in a crash. Always buckle the harness snugly on your child first, then place blankets or a coat over the secured harness.
The 1-Inch Movement Test (And Why It Fails)
You press down on the base, pull the belt tight, and give it a shake. It feels solid. You drive for a week, hit a pothole, and suddenly there’s a noticeable wobble. The test didn’t fail; the lock did.
The 1-inch movement rule is the universal standard from the NHTSA car seat installation guide and every manufacturer. But that measurement only matters if the belt is locked. An unlocked belt, even a very tight one, will slowly pay out under the constant vibration and G-forces of normal driving. The base creeps, the slack accumulates, and by the time you notice it, the installation is compromised.
Grab the car seat base firmly at the belt path, not at the top or sides. Try to move it side-to-side and front-to-back. If it shifts more than 1 inch (2.5 cm) in any direction, the belt is not tight enough or, more likely, not locked.
Where does the 1-inch slack come from? Almost always from missing the locking step. People see a tight belt and assume it’s secure. They don’t pull the shoulder belt all the way out to engage the retractor’s lock, or they miss the flip lever on a locking latch plate. The base’s own lock-off bar is useless if the belt underneath it is loose.
Locking Latch Plates vs. Switchable Retractors
Your vehicle has one of two locking systems built into the seat belt itself. Your base might have a third. Using the wrong one, or not using one at all, is how a base comes loose.
Locking latch plates have a small, built-in mechanism on the metal tongue that clicks into the webbing. You’ll see a little metal bar or a flip lever. After buckling, you pull the lap portion of the belt tight, and the latch plate grips the belt, preventing it from loosening. This is common in older vehicles.
Switchable retractors are more common in vehicles made after the mid-1990s. You lock the belt by pulling the shoulder strap all the way out until it clicks, then slowly letting it retract. As it retracts, it ratchets tight and will not extend again until fully unbuckled and released. This is the system the Graco SnugRide manual specifically references.
| Belt Lock Type | How to Identify It | How to Lock It |
|---|---|---|
| Locking Latch Plate | A small metal bar or flip lever on the buckle tongue. | Buckle, pull the lap belt tight. The plate grips the webbing automatically. |
| Switchable Retractor | Pull the shoulder belt slowly; it retracts smoothly. | Pull the shoulder belt all the way out until it clicks. Let it retract while holding the base down. |
| Base Lock-Off Bar | A plastic clamp on the base itself (common on Joie, Nuna, Maxi-Cosi). | Route belt under it, tighten belt fully, then close the clamp over the webbing. |
Some bases, like the Joie Base-AR and Nuna PIPA, include a lock-off bar, a plastic clamp you close over the routed belt. Its job is to pinch the webbing and hold it tight. The Maxi-Cosi manual is explicit: “You must tighten the vehicle belt BEFORE closing the Lockoff.” Close it on a loose belt, and you’ve just built slack into the system permanently.
Common mistake: Assuming a tight belt is a locked belt. If you haven’t actively engaged your vehicle’s locking mechanism or the base’s lock-off, the belt will loosen. Check it again after your first 50 miles of driving.
Step-by-Step Seat Belt Installation
The physical steps are straightforward. The mental step, knowing which belt type you have, is what separates a secure install from a dangerous one.
1. Position the base. Place it on the vehicle seat, facing the correct direction (always rear-facing for an infant). Ensure at least 80% of the base is flat on the vehicle seat cushion. Use the base’s recline indicator to get the correct angle.
2. Find the correct belt path. This is not intuitive. For a lap/shoulder belt, the shoulder portion must route behind the back of the base, not over the top. The lap portion goes through the designated slots near the seat bight (where the seat back and cushion meet). For a lap-only belt, it goes through those same lower slots.
3. Thread and buckle. Feed the belt through the path, ensuring no twists. Buckle it. Listen for the click.
4. Lock the belt. This is the critical step. * If you have a locking latch plate, pull the lap belt tight until the base is compressed into the vehicle seat. * If you have a switchable retractor, pull the shoulder belt all the way out until it clicks. Then, while pressing down hard on the base with your knee or hand, let the belt retract slowly, feeding all slack back into the retractor. * If your base has a lock-off bar (like the Joie Base-AR), ensure the belt is routed under the open clamp. Tighten the belt using the method above, then close the lock-off bar firmly.
5. Perform the 1-inch test. Kneel in the base, using your weight to compress the vehicle seat. Grab the base at the belt path and try to move it vigorously. If it shifts more than 1 inch, re-lock and tighten again.
Why You Can’t Use LATCH and a Seat Belt Together
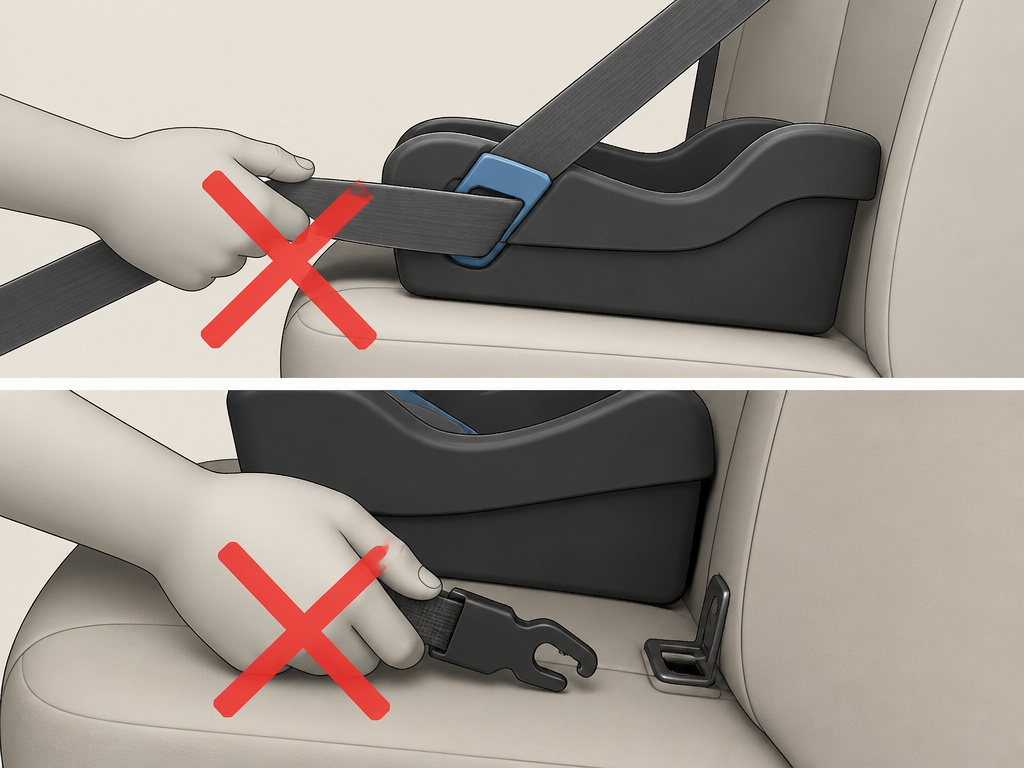
It seems logical: two anchors must be safer than one. The physics say otherwise, and every manufacturer, from Graco to Joie, explicitly forbids it.
The LATCH system and the seat belt are engineered to channel crash forces through different paths in the vehicle seat. Using both simultaneously creates conflicting load vectors. In a crash, this can overstress the seat frame or the car seat shell itself, leading to failure points that wouldn’t exist with a single, properly installed system. The Joie Base-AR manual states it in all caps: “INSTALL USING ONLY ONE METHOD. NEVER install using BOTH vehicle belt and lower anchor attachments.“
The rule is absolute. Pick one system, install it correctly, and trust it. If you’re unsure which is more secure in your specific vehicle, the NHTSA car seat installation guide states both are equally safe when used correctly.
Lap-Only Belts vs. Lap/Shoulder Belts

The belt type in your vehicle’s center seat often decides your installation method. Getting the routing wrong is a fast path to an insecure base.
A lap-only belt only has a lap portion. You thread it through the lower belt path on the base, buckle, and lock it (usually via a locking latch plate). The base’s recline is controlled by its own adjustor or a rolled towel at the vehicle seat bight.
A lap/shoulder belt has two jobs. The lap portion must go through the lower belt path. The shoulder portion must route behind the back of the base, through a rear-facing belt guide if one exists. Letting the shoulder belt lay across the top of the base or the child’s carrier is incorrect and dangerous; it won’t hold the base down properly in a crash.
Where this goes sideways: Letting the shoulder belt of a lap/shoulder belt drape over the front of the base. In a crash, that belt will tighten upward, lifting the top of the base instead of holding it down. Always route it behind.
Some vehicles, especially older models or pickup trucks, may only have lap belts in certain positions. This doesn’t make them unsafe for a base installation; it just means you must use the correct locking method for that belt type.
Checking Your Work: The 72-Hour Rule

A brand-new install feels tight. A real install stays tight after a week of daily use.
The day-after check: Before your first drive with the baby, re-test the 1-inch movement. Temperature changes and the base settling into the seat cushion can introduce slack.
The 72-hour rule: After three days of normal driving, check the installation again. This is when a poorly locked belt will reveal itself. If you find more than an inch of movement, you likely missed the locking step. Unbuckle, re-lock, and re-tighten.
This is also the best time to verify your choice of car seat in the middle seat. The center is statistically the safest position, but only if you can get a secure install there. If the seat contour or belt geometry prevents a rock-solid fit, a window seat is safer.
Frequently Asked Questions
Can I install a car seat base in the middle seat with a seat belt?
Yes, if your vehicle has a dedicated seat belt for that center seating position. You must use the belt specific to that seat, not borrow the buckle from an adjacent seat. Check your vehicle manual to confirm the center belt is approved for child restraint use.
Is it safer to use LATCH or a seat belt?
Neither is inherently safer. Both are equally safe when installed correctly per the manufacturer’s instructions. Choose the method that gives you the tightest, most straightforward install in your specific vehicle. For many, the seat belt is easier to achieve a solid fit with.
Why does my car seat base seem loose even when the belt is tight?
The most common cause is a seat belt that is tight but not locked. The belt webbing can slowly feed through a non-locking latch plate or a retractor that hasn’t been switched to locking mode. Revisit the locking step specific to your vehicle.
How do I know if my seat belt locks?
Consult your vehicle owner’s manual. As a quick test: buckle the seat belt without the base, pull the shoulder belt all the way out slowly, then let it retract. If it retracts smoothly and you can pull it out again easily, it’s an emergency locking retractor (ELR) that needs to be switched. If it retracts and then jams, refusing to extend again until fully unbuckled, it’s a switchable retractor.
What if my car doesn’t have lower anchors?
Then you must use the seat belt. All passenger vehicles manufactured after 1968 are required to have seat belts, and they are a perfectly safe, approved installation method. Your car seat base without LATCH relies entirely on the seat belt system, so following the locking steps is even more critical.
The Bottom Line
Installing a car seat base with a seat belt boils down to three things: routing the belt through the correct path, using your vehicle’s specific locking mechanism, and trusting the 1-inch movement test. The lock is not optional, it’s the entire system. Skip it, and the base will loosen. Combine it with LATCH, and you risk overloading the seat structure.
For a first-time install, give yourself a full 30 minutes in the driveway with both the car seat manual and your vehicle manual open. The five minutes you spend confirming your belt type and practicing the lock will save you from that sinking feeling of a wobbble a week later. Once it’s in, check it again after your first few drives. When it passes the 1-inch test on day seven, you can be confident it’s secure.
