
Guide to Installing Your Car Seat Base Using LATCH Anchors
This post contains affiliate links. As an Amazon Associate, we earn from qualifying purchases.
To install a car seat base with anchors, connect the LATCH connectors to the vehicle’s lower anchor bars, tighten the strap until the base moves less than 1 inch at the belt path, and adjust the recline until the level indicator is green. The process is straightforward, but three manufacturer-specific contradictions change everything.
The 1-inch movement test is the universal standard, but the force you apply determines whether you pass or fail a real crash. A gentle wiggle tells you nothing. You need to push and pull with the force of a firm handshake directly at the point where the strap or belt routes through the base.
What follows is the full procedure, the specs that matter, and the direct conflicts between major brands that most guides gloss over. You’ll know how to install a Graco base, a Nuna base, and an Evenflo base, and why following the wrong manual could void your seat’s warranty.
Key Takeaways
- The 1-inch rule is universal: a properly installed base must not move more than 1 inch (2.5 cm) side-to-side or front-to-back when you push and pull firmly at the belt path.
- Never use LATCH and a seat belt together on a Graco or Evenflo base, it’s prohibited. Nuna is the outlier that explicitly allows it.
- For center seat installations, your vehicle manual must allow it, and the lower anchors must be spaced at least 11 inches (28 cm) apart.
- The base’s recline angle is non-negotiable. The level indicator must be completely green; a towel under the front edge is the approved fix if your vehicle seat is too sloped.
- Always consult both your car seat manual and your vehicle owner’s manual. Vehicle-specific rules override general advice.
What You’re Actually Connecting: LATCH Anchors Explained
LATCH stands for Lower Anchors and Tethers for CHildren. It’s a standardized system built into vehicles manufactured after September 1, 2002. You’re not clipping to random metal. You’re connecting to two reinforced steel bars between the seat cushion and the seatback, designed specifically to hold a child restraint.
The lower anchors are usually marked by a small symbol, a child in a car seat. Run your fingers along the seat crease to find them. Your car seat base has two rigid or flexible LATCH connectors that hook or snap onto these bars. The goal is a direct, rigid connection between the base and the vehicle’s frame.
A properly secured base does not move more than 25 mm (1 inch) from side-to-side or front-to-back at the lower anchor connector assembly. This measurement is from the Evenflo Embrace manual and is the industry standard.
This is the target. Every check you do later comes back to this single, measurable fact.
The 7-Step LATCH Base Installation
This sequence works for nearly every infant car seat base on the market. The differences come in the locking mechanisms and final checks.
- Locate Your Vehicle’s Lower Anchors. Push the vehicle seat cushion aside if necessary. Identify both anchor bars before you place the base. If you can’t find them, check your vehicle owner’s manual, some SUVs have them in the second-row floor or on the seatback.
- Position the Base. Place the base flat on the vehicle seat. Push it firmly back into the seat crease. For most installations, the base should be centered between the two anchors.
- Connect the LATCH Connectors. Attach one connector to its lower anchor, then the other. For flexible straps, ensure the webbing is not twisted. For rigid connectors like those on the Nuna PIPA series, rotate the latch down onto the bar until it clicks.
- Tighten the Strap. Pull the adjustment strap tight. On many models, you pull a loop at the front of the base. You should see the base compress into the vehicle seat cushion. The strap should be taut enough that you cannot pinch a horizontal fold in the webbing.
- Lock the Mechanism. Ensure the LATCH connectors are fully locked. Tug on them directly. If they have a visual indicator, confirm it shows locked (often red to green).
- Perform the 1-Inch Test. Grab the base with both hands at the LATCH strap path, the point where the strap exits the base. Push and pull side-to-side, then front-to-back, using firm pressure. If the base shifts more than an inch, re-tighten. This is not a gentle wiggle.
- Check the Recline Angle. Look at the built-in level indicator on the side of the base. Adjust the base’s recline foot or lever until the bubble or indicator is in the green zone. If the vehicle seat is too sloped, you may place a tightly rolled towel under the front edge of the base only if your car seat manual permits it.
Skipping the firm tug at the belt path is the most common mistake. A base that feels tight with a gentle shake can still have several inches of slack under crash forces. Your test must simulate that force.
The 1-Inch Rule: How to Test Your Base
The rule sounds simple. The execution is where installations fail. The “belt path” is the critical point, it’s where the securing force is transferred. Testing at the top or front of the base is meaningless.
How to test correctly: Place one hand on either side of the base where the LATCH strap routes through the plastic shell. Apply 20-25 pounds of force, about the effort of a firm handshake, by pulling one hand toward you while pushing the other away. Then reverse. Do the same front-to-back. The entire base can pivot slightly on the vehicle seat cushion, but the point where the strap connects should not slide.
Where this goes sideways: Testing at the wrong spot. If you grab the top of the base where the carrier sits, you’re measuring the squish of the vehicle seat, not the security of the anchor connection. You’ll get a false pass every time.
If it moves too much, you likely have twisted webbing or a connector that isn’t fully engaged. Unhook, re-route, and tighten again. Some vehicle seats are so soft that a tight installation seems impossible. In those cases, check your manual for approved accessories like a pool noodle or a specific leveling wedge.
Getting the Angle Right
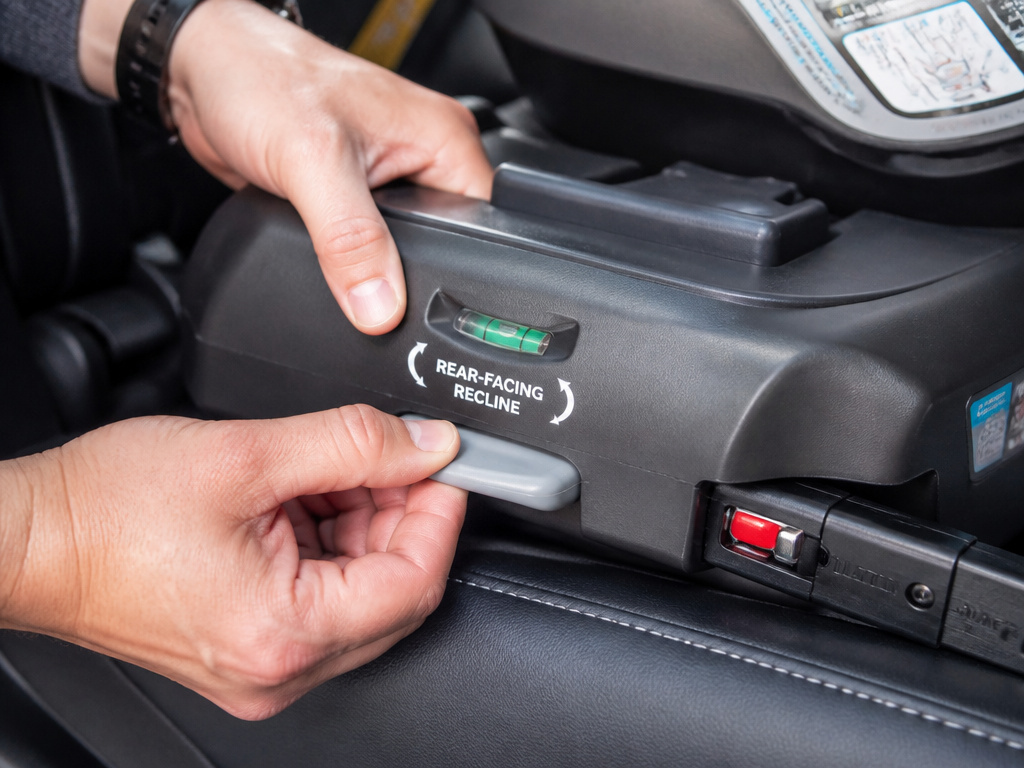
The recline angle is not about comfort. It’s a safety position that keeps an infant’s airway open. Too upright, and the child’s head can fall forward, restricting breathing. This is especially critical for premature infants.
Every base has a built-in level indicator. It might be a bubble level, a colored ball, or a line-and-window gauge. Your job is to adjust the base until the indicator shows the correct rear-facing angle, which is always marked in green.
To adjust: Most bases have a recline foot at the front. Extend it by pulling a lever or pushing a button until the indicator turns green. If the foot is fully extended and you’re still not level, your vehicle seat is too sloped.
The approved fix: If your car seat manual allows it, place a tightly rolled towel or a small, firm blanket under the front edge of the base only. Never place padding under the entire base or behind it. The Nuna PIPA manual explicitly warns against allowing the base to contact the vehicle seatback, as it can affect performance.
For premature infants, the stakes are higher. The American Academy of Pediatrics recommends a 90- to 120-minute observation period in the car seat before discharge for infants born before 37 weeks or under 5 pounds. This is to monitor for breathing or heart rate issues in the semi-reclined position.
Manufacturer Contradictions You Must Know
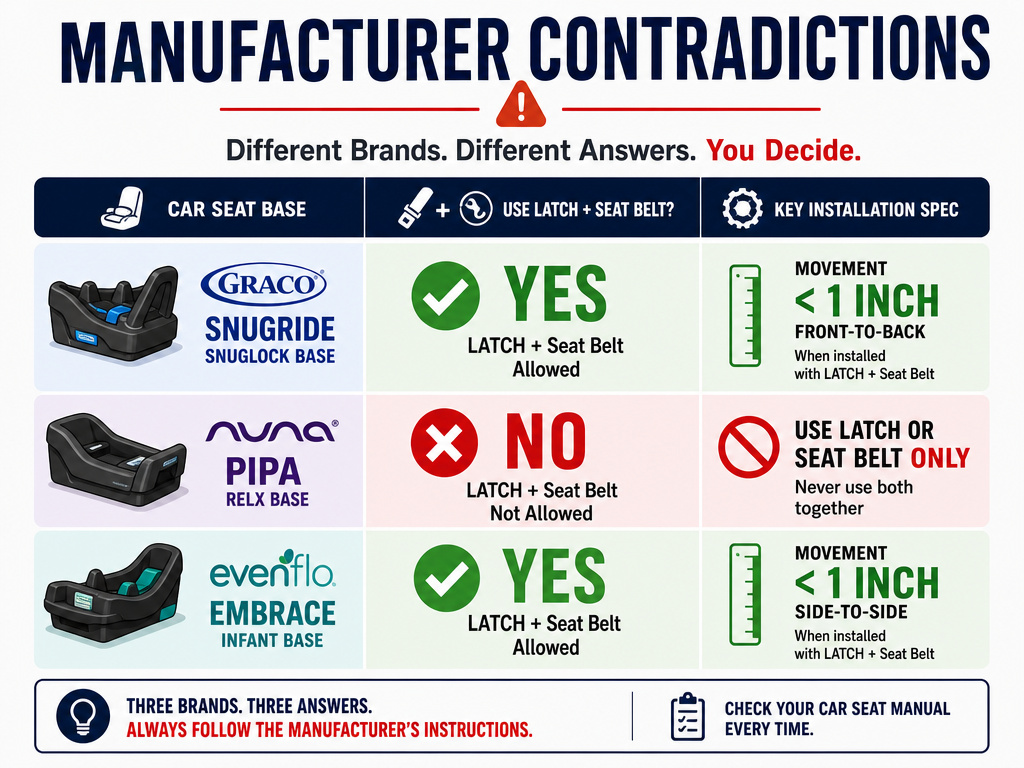
Here is where reading your specific manual is non-negotiable. General advice breaks down.
| Brand & Model | Can You Use LATCH + Seat Belt Together? | Center Seat LATCH Rule | Key Installation Spec |
|---|---|---|---|
| Graco SnugRide | NO. Manual states: “DO NOT USE BOTH AT THE SAME TIME.” | Yes, if vehicle manual allows and anchor spacing is 11 inches (28 cm) or greater. | Base must move less than 1 inch at the LATCH strap. |
| Nuna PIPA Series | YES. Manual states: “It is acceptable to install with both latch (lower anchors) and the vehicle belt.” | Consult vehicle manual. No specific spacing called out. | Rigid LATCH connectors rotate down. Green indicator must show. |
| Evenflo Embrace | NO. Implied by single-method instructions. | Consult vehicle manual. | Movement limit is 25 mm (1 inch). Level indicator must be “completely green.” |
The Graco vs. Nuna conflict on dual installation is the biggest. Using both on a Graco seat could stress the base in ways it wasn’t tested for, potentially voiding its crash certification. Nuna’s design explicitly accommodates the combined load. When in doubt, follow your seat’s manual, not a blog post.
Center Seat Installations: The 11-Inch Rule
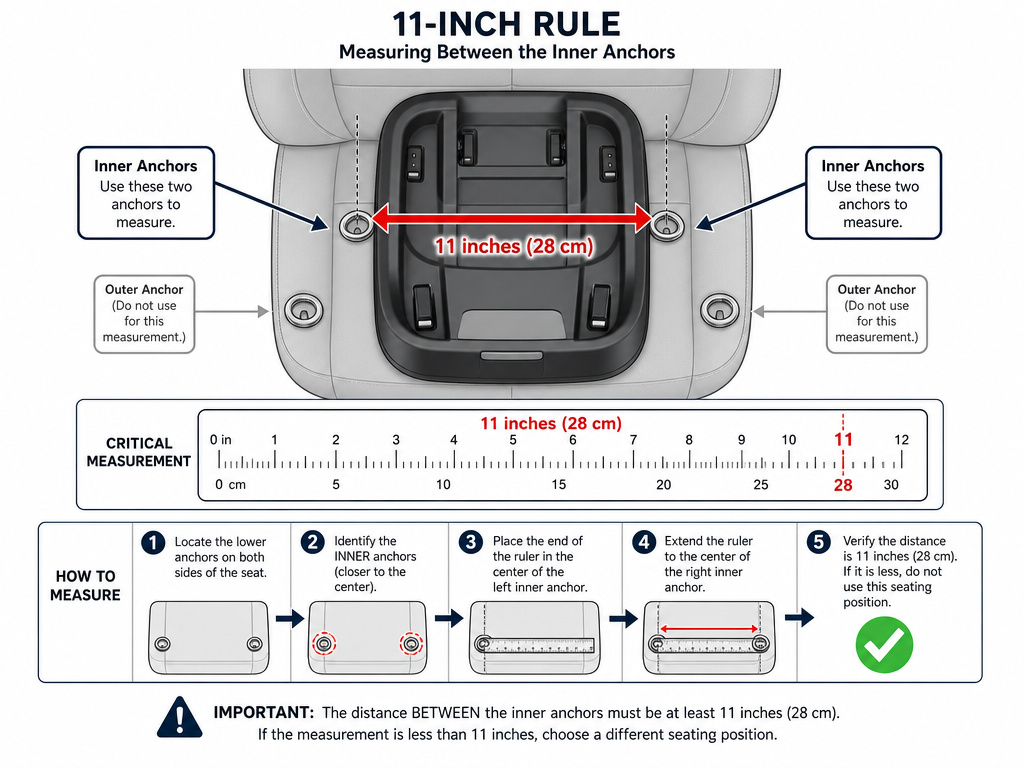
The center of the back seat is statistically the safest spot in a side-impact crash. But using LATCH there is not always allowed.
Your vehicle owner’s manual is the final authority. Many vehicles do not have dedicated lower anchors in the center seat. Instead, they permit “borrowing” the inner anchors from the outboard seats, but only if they are spaced a certain distance apart.
Graco sets this distance at 11 inches (28 cm). If the inner anchors are closer together than that, you cannot use LATCH in the center. You must use the seat belt instead. This rule exists because borrowing anchors that are too close together can create an asymmetrical load on the base.
How to check: Measure the distance between the inner anchors of the two outboard seating positions. If it’s 11 inches or more, and your vehicle manual says it’s okay, you can proceed with a center LATCH installation. If not, the seat belt is your only safe option.
Troubleshooting Common Problems
Even with the best instructions, things can go wrong. Here’s what to do.
- The base is still loose after tightening. Check for twists in the LATCH strap webbing. Even a single twist can prevent full tightening. Also, ensure the connector is fully snapped onto the anchor bar, not just hooked over the top.
- The level indicator won’t turn green. First, ensure the base is fully pushed back into the seat crease. If it’s still too upright, fully extend the recline foot. If that’s not enough, check if your manual permits a rolled towel under the front edge. Never force it.
- You can’t find the lower anchors. Some vehicles, especially pickups or older models, have anchors in non-standard locations (like the rear wall or floor). Your vehicle manual has a diagram. If your vehicle predates September 2002, it may not have LATCH at all, requiring seat belt installation.
- The connectors won’t latch. Debris like food or coins can jam the mechanism. Clean the connectors and the anchor bars. Ensure you’re pushing the connector straight on, not at an angle.
If you’re ever uncertain, seek help. Many fire stations, police stations, and hospitals offer free car seat checks by certified technicians. A five-minute verification is worth it.
Frequently Asked Questions
Can I install a car seat base with anchors in the middle seat?
You can only use LATCH in the middle seat if your vehicle owner’s manual permits it. Many vehicles allow you to use the inner anchors from the outboard seats, but brands like Graco require them to be at least 11 inches apart. If your vehicle doesn’t allow it or the spacing is wrong, you must use the seat belt.
How tight should a car seat base be with LATCH?
The base should be tight enough that it moves less than 1 inch side-to-side or front-to-back when you push and pull firmly at the LATCH belt path. The strap itself should be taut with no loose webbing you can pinch.
What if my car doesn’t have anchor points?
If your vehicle was manufactured before September 2002, it may not have LATCH anchors. In this case, you must install the base using the vehicle’s seat belt. The process is different but equally safe when done correctly. Our guide on installing a car seat base without LATCH walks you through it.
Is LATCH or seat belt safer for the base?
Both methods are equally safe when installed correctly. The LATCH vs seat belt safety comparison shows no advantage to one system over the other. LATCH is often easier to get a tight fit, but the seat belt is the only option for center seats in many vehicles or for older cars.
Why does the angle of the base matter so much?
The correct rear-facing recline angle (typically 30-45 degrees) is critical for infant airway safety. A seat that is too upright can allow a baby’s head to fall forward, chin-to-chest, which can restrict breathing. The level indicator ensures this angle is correct.
Can I use both LATCH and a seat belt for extra safety?
No, unless your specific car seat manual explicitly states it is acceptable. Most manufacturers, including Graco and Evenflo, prohibit it. Using both can put unexpected stress on the base. Only Nuna, among major brands, currently approves of dual installation for its PIPA series bases.
Before You Go
Installing a car seat base with anchors boils down to three things: a tight connection (less than 1 inch of movement), the correct angle (a green level indicator), and your specific manual (because the rules change by brand). The 11-inch rule for center seats and the outright ban on using LATCH with a seat belt for most models are the details that separate a good installation from a certified one.
When you’re done, get a second pair of eyes on it. Have another adult perform the 1-inch test. If anything feels off, start over. Your child’s safety is worth the ten extra minutes.
