
How to Set Up Car Seat Base | The 1-Inch Test & 80% Rule
This post contains affiliate links. As an Amazon Associate, we earn from qualifying purchases.
To set up a car seat base, you must choose between the LATCH system or the vehicle seat belt, secure the base with less than 1 inch of movement at the belt path, and ensure it sits at the correct angle for your child’s seat. The base must cover at least 80 percent of the vehicle seat. Missing any of these three checks is the most common cause of failed installations.
That 1-inch movement tolerance is the pass/fail line written into every major manufacturer’s manual, from Graco to Joie. Get it wrong, and the base can shift violently in a crash, multiplying the forces on your child.
What follows: the two installation paths (LATCH and belt), the specific tools you need to verify your work, and the three physical checks that matter more than any online tutorial.
Key Takeaways
- The 1-inch rule is absolute. If the base moves more than an inch side-to-side or front-to-back at the belt path, it’s not tight enough.
- Your base must sit flat with at least 80% of its bottom on the vehicle seat. Anything less creates a pivot point.
- Never use LATCH and a seat belt together. Pick one securement method.
- A load leg must contact the vehicle floor pan directly, not a storage compartment or mat.
- All car seat bases have an expiration date, typically 7 years from manufacture, and must be replaced after any moderate or severe crash.
Before You Start: Read the Manuals
You have two essential books. The first is your car seat base manual. The second is your vehicle’s owner’s manual. Skipping either is how good intentions turn into dangerous mistakes.
Your base manual contains the exact weight and height limits for your model, the specific path for threading your vehicle’s seat belt, and the location of the recline indicator. The vehicle manual tells you where your lower anchors are hidden, if your center seat is approved for LATCH use, and how to lock your specific seat belt.
Common mistake: Assuming all LATCH anchors are in the same spot. In some SUVs and trucks, they’re buried deep in the seat crack. Your vehicle manual has the map.
Put the base on the vehicle seat without attaching it yet. Push it firmly back into the seat crease. This is your starting position.
LATCH Installation: The Two-Click Rule
LATCH stands for Lower Anchors and Tethers for Children. In practice, you’re looking for two rigid metal bars between the vehicle seat’s back and bottom cushion. This system is designed to be foolproof, but it has a tight margin for error.
First, find your anchors. Run your fingers along the seat crease until you feel the hard bar. Many vehicles have plastic covers over them; pop these off. If you cannot find both anchors, check your vehicle manual. Some center seats are not LATCH-equipped.
Attach the ISOFIX connectors on your base to these anchors. On a Joie i-Base 2, you’ll rotate the connectors 180 degrees before pushing them onto the guides.
The technical step: “Line up the ISOFIX connectors with the ISOFIX guides, and then click both ISOFIX connectors into the ISOFIX anchor points. Make sure that both ISOFIX connectors are securely attached. There should be two audible clicks and the colors of the indicators on both ISOFIX connectors should be completely green.” – Joie i-Base 2 Manual
Listen for two distinct clicks. Look for two completely green indicators. No green, no go. Pull hard on the base where the connectors attach, not on the shell, to confirm they are locked.
| LATCH Checkpoint | What to Look For | Why It Matters |
|---|---|---|
| Anchor Spacing | Must be 11 inches (28 cm) apart for center seat use. | Using non-standard spacing can overload one anchor. |
| Indicator Color | Connector windows must show solid green. | Red or partial green means the connector isn’t fully latched. |
| Audible Click | Two distinct clicks per connector. | A single click often means the connector is only partially engaged on the bar. |
If your vehicle’s center seat has anchors spaced at least 11 inches apart, you can use it. The Graco SnugRide RAPIDLOCK base manual explicitly allows this. Otherwise, stick with the outboard seats.
Seat Belt Installation: Locking the Belt is Everything
When LATCH isn’t an option, the vehicle seat belt is your primary seat belt installation method. The challenge isn’t strength; it’s understanding your belt’s locking mechanism. There are three main types, and using the wrong one will leave the base loose.
- Switchable Retractor (ALR): This is the most common in modern cars. Pull the shoulder belt all the way out until it ratchets. As it retracts, it will lock automatically. This is how you achieve a tight fit.
- Locking Latchplate: The latchplate itself has a movable piece that pinches the belt webbing when fastened. To lock it, you simply pull the lap portion tight after buckling.
- Emergency Locking Retractor (ELR) with Sliding Latchplate: This older style requires a locking clip. You’ll need to call the manufacturer to obtain one.
Thread the belt through the correct path on your base, there will be a specific channel marked in blue or red. Buckle it. Now, use your full body weight. Press down into the base with your knee or hand while pulling the seat belt tight. You are compressing the vehicle seat cushion to eliminate slack.
Where this goes sideways: Not compressing the seat cushion. You’ll get the belt tight against the base, but the whole assembly will still squish and shift in a crash because the cushion underneath wasn’t flattened first. Put your weight into it.
The 1-Inch Test You Can’t Skip
 Whether you used LATCH or a seat belt, the final test is identical. This is the single most important verification of your correct installation.
Grab the base with both hands at the belt path, the point where the LATCH strap or seat belt goes through the base’s shell. Now, try to move it.
Pull side-to-side. Then pull front-to-back. You are not testing the flexibility of the vehicle seat. You are testing the connection between the base and the vehicle’s frame.
The base should not move more than 1 inch (2.5 cm) in any direction. Use a ruler if you have to. This tolerance is the certification standard cited in manuals like the Graco SnugRide 35 Lite LX.amazon.com/dp/B07Y5QYR1Q?linkCode=osi&th=1&psc=1&tag=test-20).
If it moves more, the installation has failed. For a LATCH install, unbuckle and re-attach, ensuring those two clicks. For a seat belt, re-thread, compress the seat harder, and pull the belt tighter. This is the difference between a base that stays put and one that becomes a projectile.
Load Legs and Bubble Levels
 Many modern bases, like the Joie i-Base 2 and Nuna PIPA series, include a load leg. This is a telescoping pole that extends from the front of the base down to the vehicle floor. Its job is to prevent the base from rotating forward in a frontal crash.
The rule is simple: the load leg must have direct, firm contact with the vehicle floor pan. Not on top of a floor mat. Not resting on a storage compartment lid. The solid metal floor.
Extend the leg until its foot touches the floor, then lock it. The indicator should turn green. A red indicator means it’s either not long enough, not locked, or on an unstable surface. A load leg that doesn’t reach the floor should not be used.
The bubble level, or angle indicator, ensures your child’s head is positioned safely. For a newborn, the seat must be reclined enough so their head doesn’t flop forward. This is adjusted via a knob or foot at the base of the unit.
Place the base in the car. Adjust the recline until the bubble sits between the lines. This might require a rolled towel or pool noodle under the base’s front edge in some vehicles, check your manual to see if this is allowed.
Attaching the Car Seat and Final Checks
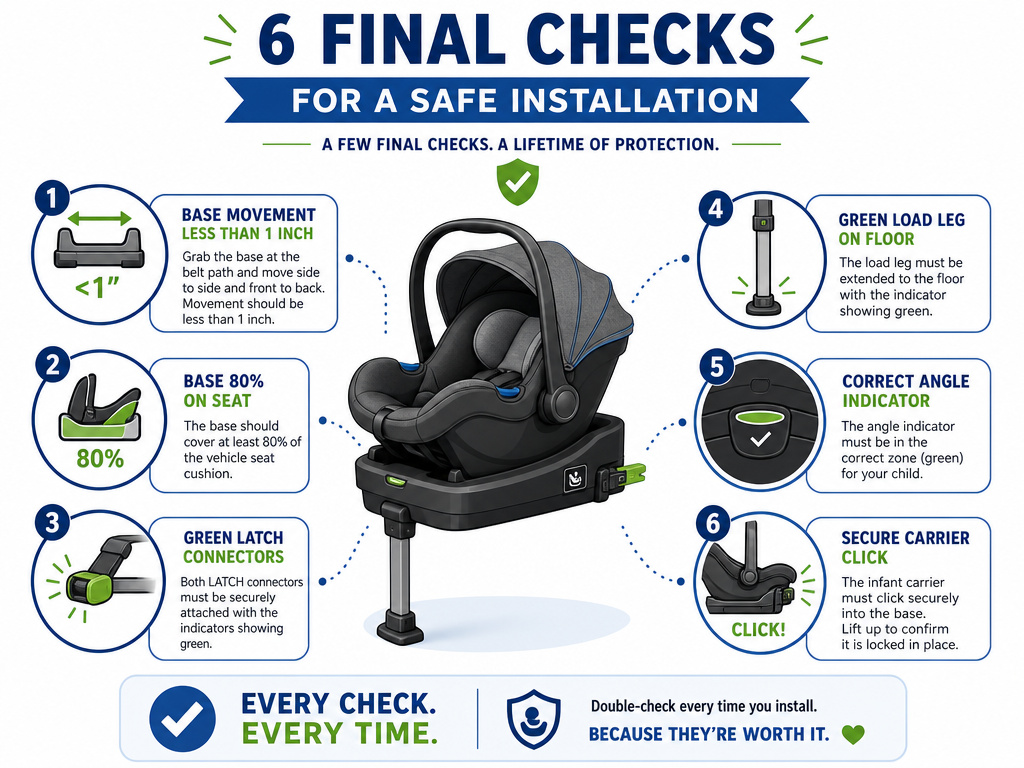 With the base secured and angled, you can click the infant carrier into place. Align the carrier with the guides on the base and push down firmly until you hear a click. Then, pull up on the handle. It should not release.
This is your last installation check. Walk through this list: * Base movement is less than 1 inch at the belt path. * Base is at least 80% on the vehicle seat. * LATCH connectors are green and double-clicked, OR the seat belt is locked and tight. * Load leg (if present) is green and on the solid floor. * Angle indicator shows correct recline. * Infant carrier is clicked securely into the base.
A loose base is the number one reason parents fail safety check events. It’s also the easiest thing to fix if you know the 1-inch rule.
When to Start Over: Expiration and Crash Replacement
A car seat base is not a permanent fixture. It has a lifespan. Most, like Graco and Baby Jogger models, expire 7 years after the date of manufacture. The plastic degrades, and safety standards evolve. You can find the date on a label on the base itself.
More urgently, a base must be replaced after a moderate or severe crash. The NHTSA’s definition of a minor crash, the only kind where reuse is considered, is strict. All of these must be true: * The vehicle could be driven from the crash. * The door nearest the car seat was not damaged. * No one in the vehicle was injured. * No airbags deployed. * There is no visible damage to the car seat.
If any of those points are not met, the base is compromised. The internal structure may have cracked. This is the car seat base lifespan policy from every manufacturer we cited.When in doubt, replace it.
Frequently Asked Questions
Can I install the base in the center seat?
You can, but you must use the correct method. If your vehicle manual approves center seat LATCH use and the anchors are 11 inches apart, you may use LATCH. Otherwise, you must use the seat belt. The center seat is often the safest position, but only if the base is installed correctly.
Is LATCH or seat belt safer?
When installed perfectly, both methods are equally safe. The LATCH vs seatbelt debate often comes down to convenience. LATCH is easier to get tight consistently. The seat belt might allow for a more centered installation. Use whichever you can install more securely.
Why does my base still feel loose after tightening?
You’re probably grabbing the wrong part. Test movement at the belt path, not the top of the base. The vehicle seat cushion will flex, but the base’s connection to the car’s frame should be rock-solid. If it still moves more than an inch at the belt path, uninstall and try again, using more weight to compress the seat.
Do I need a locking clip?
You only need a locking clip if your vehicle has an older seat belt system: an Emergency Locking Retractor (ELR) with a sliding latchplate. Most cars made after 1996 have switchable retractors that lock automatically. Check your vehicle owner’s manual to be sure.
Can I use both LATCH and the seat belt?
No. Never use both systems together. This can create conflicting force paths in a crash and overstress the anchors. It is dangerous. Choose one securement method.LATCH or seat belt, and install it correctly.
The Bottom Line
Setting up a car seat base is a mechanical task with a binary outcome: it’s either secure or it’s not. The 1-inch movement test is your final exam. The base manual and your vehicle manual are your textbooks. Ignore the green indicators, miss the click, or skip the angle check, and you’ve built a system that will fail when it’s needed most.
Your job is to remove every fraction of an inch of slack. Use your knee, your weight, and both hands. Then check it again. The difference between a proper base installation and a dangerous one isn’t visible until a crash. Make sure yours passes.
