
How to Convert Your Car Seat into a Booster | Key Steps
This post contains affiliate links. As an Amazon Associate, we earn from qualifying purchases.
To convert a car seat into a booster seat, your child must first meet the manufacturer’s specific size and age requirements for booster mode, typically at least 40 pounds, 43 inches tall, and 5 years old. Then, you physically remove the internal 5-point harness system, including the harness straps, chest clip, and buckle strap, according to your seat’s manual. Finally, you install the seat using the vehicle’s lap and shoulder belt, ensuring proper belt routing over the child’s shoulder and low across the hips.
This conversion involves establishing a safety threshold by removing parts. The seat’s structure changes from a harnessed cocoon to a positioning guide for the adult seat belt.Get the fit wrong, and the belt can ride up on the soft abdomen or slip off the shoulder, turning a lifesaving restraint into a injury risk in a crash.
What follows is the full breakdown: the non-negotiable readiness checklist, a model-specific walkthrough using a common seat, the precise belt-fit rules that manuals bury on page 38, and what to do with the leftover LATCH straps.
Key Takeaways
- The hard stop for converting is your child exceeding any harness-mode limit, weight, height, or shoulder height, as printed in your manual. Age is a separate, mandatory floor.
- Maturity matters as much as size. A child must sit still and keep the seat belt properly positioned; fidgeting that puts the belt behind the back or under the arm voids all protection.
- Shoulder belt routing has an edge case. If routing the belt under the headrest pulls it down the child’s back, the Chase Select manual instructs routing it over the headrest instead, a specific fix most parents never see.
- You can often continue using the LATCH system to secure the booster seat itself, as long as it doesn’t interfere with the vehicle belt’s path over your child.
- Canadian models have unique rules, like leveling the booster seat and threading belts under a red lap belt guide, ignoring these is a compliance failure.
The 3-Step Check Most Parents Miss Before Converting
You don’t convert on a birthday. You convert when the numbers and the behavior line up. Missing one of these three checks is how kids end up in the wrong restraint.
First, the hard numbers from your manual. For a typical combination seat like the Evenflo Chase Select LX, booster mode requires a child to be at least 40 pounds (18.1 kg), 43 inches (110 cm) tall, and 5 years old. The Graco 3-in-1 manual lists a minimum of 40 pounds and 4 years old. These are floors. The ceiling is just as critical: the Chase Select’s booster mode tops out at 100 pounds and 57 inches. Exceed any upper limit, and the seat is done.
Second, the physical fit. The tops of your child’s ears must be at or below the top of the booster’s headrest. This concerns head containment in a side-impact collision. The headrest is a structural shell.
Where this goes sideways: Converting a child who is tall enough by the tape measure but whose shoulders are above the harness’s top slots. If the shoulders are above the highest harness setting while in harness mode, you’ve already missed the conversion window. The seat should have been converted sooner.
Third, and the most subjective: maturity. The NHTSA car seat safety guidelines stress that a child must be mature enough to sit properly for the entire trip. That means no slouching, no tucking the shoulder belt behind their back, and no leaning out of position to grab a dropped toy. If they can’t manage that in a harness, they aren’t ready for the responsibility of a seat belt.
| Requirement | Typical Minimum (Chase Select LX) | Consequence if Ignored |
|---|---|---|
| Weight | 40 lbs (18.1 kg) | Seat belt won’t fit low on hips; risk of abdominal injuries. |
| Height / Ears | 43 in (110 cm) / ears below headrest | Head is unsupported in a crash; neck injury risk. |
| Age | 5 years old | Skeletal development may not withstand belt forces. |
| Maturity | Sits still, keeps belt positioned | Belt migrates to neck or stomach, offering zero crash protection. |
This checklist is your gate. Pass it, then move to the physical conversion.
Converting a Chase Select LX: A Step-by-Step Walkthrough
Every seat is different. Using the Evenflo Chase Select LX as our example covers the common steps you’ll see in many convertible seats. Always, always start with your own manual.
Before you start: Disconnect the seat from the vehicle. Work on a clean floor. Have a bag or box handy for the harness parts you’ll remove, you must keep them with the seat.
- Loosen and Remove the Harness. Press the harness release button on the front of the seat and pull both shoulder straps out to their full length. Disconnect the chest clip.
- Detach the Straps from the Splitter Plate. On the back of the seat, you’ll find a metal or plastic splitter plate where the shoulder and lap belt portions of the harness converge. Thread both harness straps out of this plate and pull them through to the front of the seat shell.
- Remove the Seat Pad. Unhook any J-clips or fabric retaining strips that secure the seat pad to the shell. Lift the pad off. This exposes the buckle strap anchor.
- Remove the Buckle Strap. This is the step everyone fumbles. Locate the buckle strap anchor on the bottom of the seat shell. You don’t unthread webbing, you turn the anchor sideways and push it through the seat shell. It will pop out.
- Reinstall the Buckle Strap (for storage). The manual instructs you to re-insert this anchor from the bottom so the buckle strap lies flat against the seat. This prevents it from dangling and keeps the parts together.
I prefer to label a gallon bag with “HARNESS PARTS – DO NOT DISCARD” and stash everything there. Lose these, and you cannot legally or safely revert the seat to harness mode for a younger sibling.
The seat is now physically a booster. The shell, headrest, and belt guides are ready to do their new job.
The Booster’s New Job: Perfect Seat Belt Fit
A booster seat has one function: to position the vehicle’s lap and shoulder belt correctly on a child’s body. The lap belt must lie low and snug across the hips, touching the thighs. The shoulder belt should cross the middle of the shoulder and chest, not the neck or slipping off the arm.
This is where most installations fail post-conversion. The belt path is not intuitive.
Shoulder belt routing while in booster mode: Route the shoulder belt under the headrest, between the headrest and the seat back. This uses the seat’s built-in belt guide. For the Chase Select, there’s a specific exception: if your child’s shoulders are so high that routing under the headrest pulls the belt down the back of their shoulder, route it over the top of the headrest instead. This is a manufacturer-prescribed fix for a poor fit.
For the lap belt, ensure it’s routed through the seat’s lap belt guides, usually red plastic channels on either side of the seat bottom. These hold the belt low.
Can you use LATCH with a booster? Often, yes. The Chase Select manual states you may use the tether strap and lower anchors to secure the booster seat itself, provided it doesn’t affect the booster’s position or the vehicle belt fit over the child. This is a stability bonus, not a requirement. The booster seat installation process primarily relies on the vehicle belt restraining both the child and the seat.
| Belt Fit Issue | Visual Check | Immediate Fix |
|---|---|---|
| Lap belt on stomach | Belt rides above hip bones. | Re-route through lap guides; ensure child is sitting fully back. |
| Shoulder belt on neck | Belt touches neck or chin. | Adjust vehicle seat height or booster’s headrest height. |
| Shoulder belt off shoulder | Belt falls behind child’s back or arm. | Use booster’s belt guide; check if routing over headrest is needed. |
| Seat wobbles | Booster shifts easily side-to-side. | Use LATCH anchors to secure the booster if permitted by both manuals. |
Special Cases and Regional Rules You Can’t Ignore
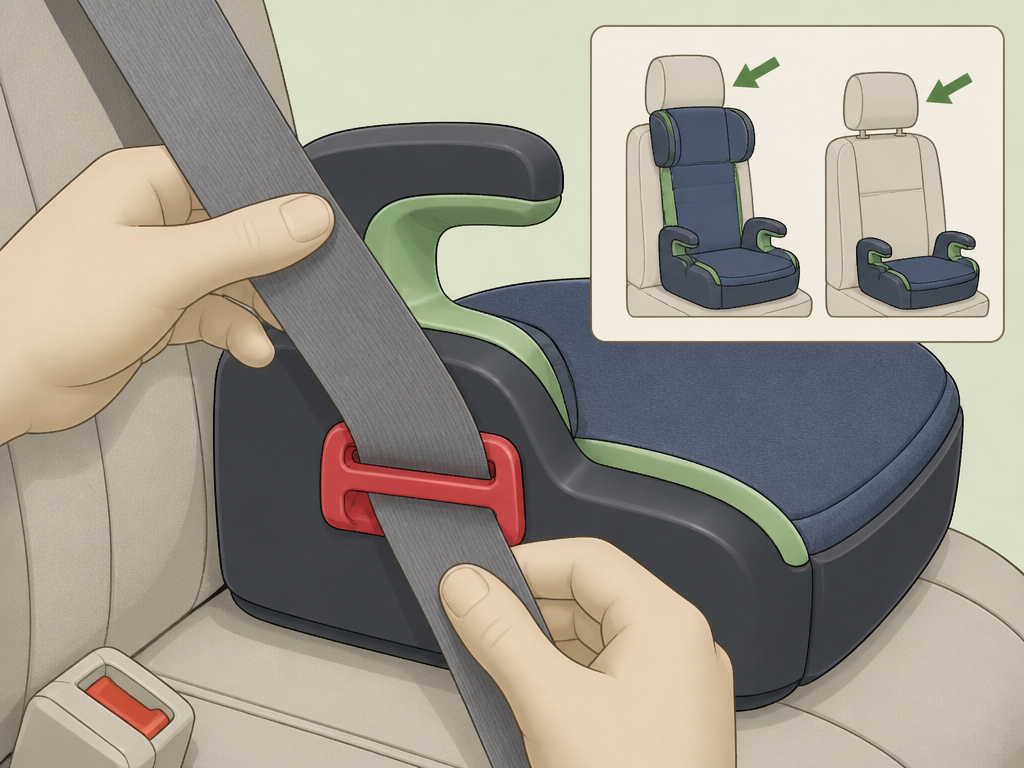
The instructions aren’t universal. Two scenarios trip up attentive parents.
Canadian Models. If your seat is certified for use in Canada, the rules change. The Chase Select manual for Canadian models requires leveling the booster seat using an integrated foot or adjuster. It also mandates threading both the lap and shoulder belt under a specific red lap belt guide on the seat. These are certification requirements for how the seat was tested.
High-Back vs. Backless Mode. Some seats, like the Chicco KidFit, offer both modes. High-back mode (30-100 lbs) provides head and side support. Backless mode (40-110 lbs) relies on the vehicle’s seat back. The transition depends on whether your vehicle seat provides adequate head support. If the vehicle seat headrest is low or absent, stay in high-back mode.The safety criteria for high-back boosters are stricter for a reason.
What about a seat that doesn’t convert? Not all forward-facing seats are designed to become boosters. If your manual has no “booster mode” section, you cannot convert it. You must purchase a dedicated belt-positioning booster when your child outgrows the harness. Understanding this difference between car seat and booster is a fundamental safety lesson.
Frequently Asked Questions
Can I convert any forward-facing car seat to a booster?
No. Only combination seats (often called “3-in-1” or “all-in-one” seats) or convertible seats specifically designed with a booster mode can be converted. If your seat’s instruction manual does not have a section titled “Booster Mode” or “Using as a Booster Seat,” it is not designed for this conversion. You will need a separate booster seat.
My child meets the weight requirement but not the age. Can I convert?
Absolutely not. The age requirement (typically 4, 5, or 6 years old depending on the seat) is a mandatory minimum based on skeletal maturity. A younger child’s pelvis is not developed enough to properly anchor the lap belt, greatly increasing the risk of internal injuries. Follow the harness to booster guidelines in your manual exactly.
What do I do with the harness and straps after removing them?
Store all removed parts, harness straps, chest clip, buckle strap, together with the instruction manual. Place them in a bag attached to the seat or in a known storage location. You may need them if you revert the seat to harness mode for another child, or if you sell or donate the seat. An incomplete seat is not legally transferable.
Is a converted booster as safe as a dedicated booster seat?
When used correctly with a child who meets all requirements, a converted booster from a reputable brand like Evenflo or Graco is just as safe. It has passed the same federal crash testing standards (FMVSS 213) in booster mode. The safety comparison hinges entirely on correct use, not the seat’s origin.
Can I use the LATCH system to secure the booster seat?
Often, yes. Many booster modes allow you to use the lower anchors and/or tether to secure the booster seat to the vehicle, which prevents it from becoming a projectile in a crash when unoccupied and can minimize wobble. However, this is secondary to the primary restraint: the vehicle seat belt must still be correctly positioned on the child. Always check your specific manual.
How do I know when to stop using the booster seat entirely?
Your child is ready for the vehicle seat alone when they pass the 5-step test: their back is against the seat back, knees bend at the seat edge, lap belt sits low on hips, shoulder belt crosses the mid-shoulder/chest, and they can sit like this for the entire trip. This usually happens around 4 feet 9 inches tall and 8-12 years old. The seat belt must fit them, not the other way around.
The Bottom Line
Converting a car seat is a milestone, not a mystery. It’s governed by the numbers in your manual, weight, height, age, and the behavioral readiness of your child. The physical act of removing the harness is straightforward once you find the buckle strap anchor. The real work is in the aftermath: achieving that perfect belt fit, routing the shoulder belt correctly (over the headrest if needed), and knowing when to use LATCH for stability.
Don’t rush it. The protection of a five-point harness is unparalleled for younger children. When the time is right, follow the steps for your specific model, store the harness parts, and double-check that belt fit every single trip. That’s how you move from one stage of safety to the next without dropping the guard.
