
Guide: How to Properly Install a Cosco Infant Car Seat Base
This post contains affiliate links. As an Amazon Associate, we earn from qualifying purchases.
To install a Cosco infant car seat base, you must use either the vehicle’s LATCH lower anchors OR the seat belt, never both. Align the base on the vehicle seat, thread the belt or LATCH straps through the correct belt path, and tighten until the base moves less than 1 inch (2.5 cm) when pushed side-to-side. You will hear a click when the car seat locks onto the base.
That 2.5 cm movement limit is the single non-negotiable spec. It comes straight from the Cosco manual, and it’s the line between an installation that holds in a crash and one that shifts on impact. Most parents stop tightening when the base “feels” tight, but the manual’s test is objective: hold the base at the belt path with your weaker hand and shove.
What follows is the breakdown of that rule, why it exists, how to meet it with LATCH or a seat belt, and the one compatibility warning that overrides everything else. By the end, you’ll know how to test your own install and what to do when it fails the 2.5 cm check.
Key Takeaways
- Use only a Cosco-branded base compatible with your specific infant car seat model. Mixing brands or models voids all safety certifications.
- The installed base must not move more than 1 inch (2.5 cm) when you push and pull it side-to-side at the belt path. This is the definitive pass/fail test.
- Install the base using EITHER the vehicle’s LATCH lower anchors OR the vehicle’s seat belt. Never use both systems simultaneously.
- Always ensure the carry handle is in the upright and locked position when the car seat is installed in the vehicle.
- If your vehicle seat is deeply contoured or sloped, you may need a rolled towel or pool noodle under the front edge of the base to get the level indicator parallel to the ground.
Before You Start: The Two Non-Negotiables
Before you start: A car seat base is a load-bearing anchor in a crash. Using an incompatible base or installing it with more than 2.5 cm of movement can cause the entire restraint system to fail. The consequences are not hypothetical, they are the difference between a secured child and a projectile.
First, match the base to the seat. Your Cosco infant seat will only work with its specific Cosco base, a Light ‘N Comfy 35 seat needs a Light ‘N Comfy 35 base. The lock bars and alignment slots are precision parts. A base from a Safety 1st seat or another brand will not engage correctly, even if it seems to fit.
Second, choose your anchor method. Your vehicle offers two ways to secure the base: the LATCH system (Lower Anchors and Tethers for Children) or the vehicle’s seat belt. The NHTSA car seat safety guidelines state you must pick one. Threading both the LATCH strap and the seat belt through the base creates conflicting force paths and can damage both systems.
LATCH Installation: Step-by-Step
LATCH is often the simpler method. It uses dedicated metal anchor bars hidden in the vehicle seat crack.
- Locate Your Vehicle’s Lower Anchors. Push apart the seat cushion bight (where the back and bottom meet) to find the two metal U-shaped bars. They are typically spaced about 11 inches apart. Consult your vehicle manual if you cannot find them.
- Position the Base. Place the base on the vehicle seat. For rear-facing installation, the base should be flush against the vehicle seatback. The foot of the base should be on the seat cushion.
- Connect the LATCH Straps. Attach the connectors on the base’s LATCH strap to each lower anchor bar. You should hear and feel a solid click or snap. Tug on each connector to confirm it is locked.
- Tighten the Strap. Pull the adjustment strap tail firmly to remove all slack from the LATCH webbing. The base should sink down into the vehicle seat cushion as you tighten.
- Perform the 2.5 cm Test. Hold the base at the rear-facing belt path with one hand. Push and pull it side-to-side and front-to-back. If movement exceeds 1 inch (2.5 cm), re-tighten the strap. Press your knee into the base while pulling the strap tail for maximum leverage.
This method is direct, but it has a weight limit. Once your child’s weight combined with the weight of the car seat exceeds 65 pounds, you must switch to a seat belt installation. For a typical Cosco infant seat, that means you’ll transition to the seat belt method long before your child outgrows the seat itself.
Seat Belt Installation: The Universal Method
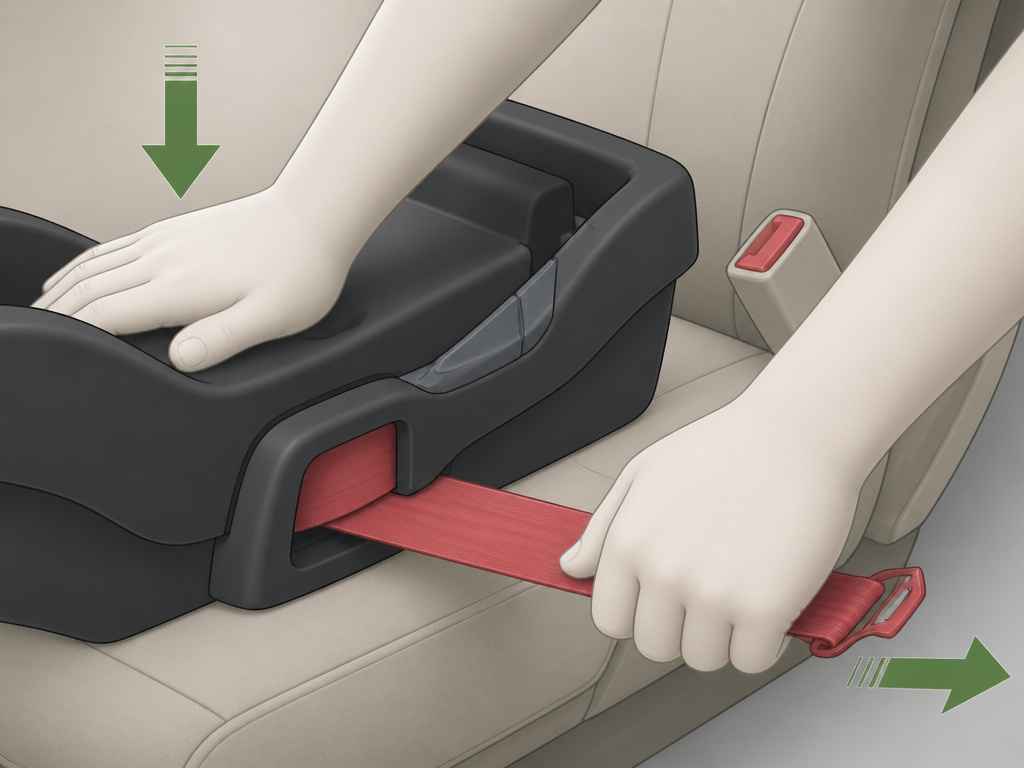
When LATCH isn’t available or you’ve reached the weight limit, the seat belt is your go-to. It works in every seating position.
- Position the Base. Place the base on the vehicle seat, flush against the seatback.
- Thread the Seat Belt. Route the vehicle’s lap and shoulder belt through the correct belt path on the base. For rear-facing, this is usually the path marked near the foot of the base. Ensure the belt is not twisted.
- Buckle and Lock. Buckle the seat belt. Now, you must lock it. For switchable retractors, pull the shoulder belt all the way out until it ratchets back. For locking latchplates, the latchplate itself locks when the belt is tight. Consult your vehicle manual to confirm your belt type.
- Remove Slack. Kneel into the base, press down hard, and pull the seat belt tail to tighten. All slack must come out of the lap portion across the belt path.
- Perform the 2.5 cm Test. Again, hold the base at the belt path and test for movement. If it fails, unbuckle, press down harder, and re-tighten. A locking clip may be necessary for certain older seat belt systems.
Common mistake: Tightening only the shoulder belt. The critical section is the lap belt across the base’s belt path. If that section is loose, the shoulder belt tightness is irrelevant.
How Tight Should the Base Be?
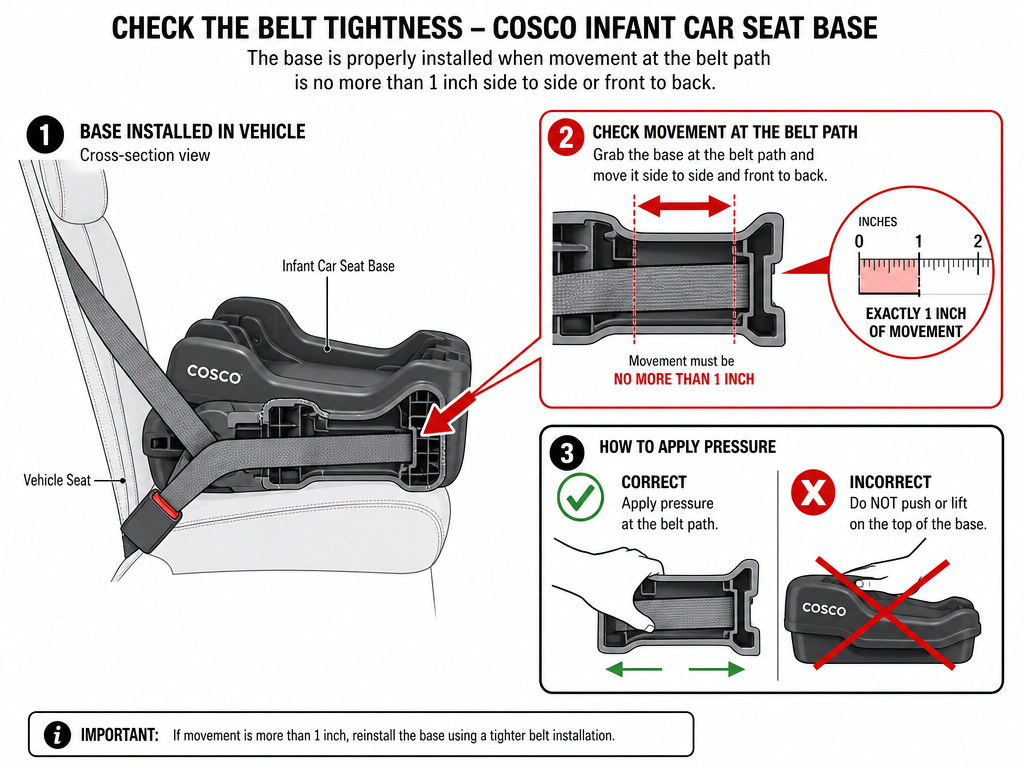
The Cosco manual gives you the exact metric: less than 1 inch (2.5 cm) of movement at the belt path. This isn’t a suggestion. It’s the engineering threshold for crash performance.
Why that specific spot? The belt path is the load point, where crash forces transfer from the base to the vehicle. Testing movement anywhere else, like the top or sides, gives a false reading. Use your weaker hand to isolate the force. A strong shove with your dominant hand can mask a loose install.
If your base fails this test after multiple attempts, the problem is usually one of four things. The table below diagnoses the most likely cause.
| Symptom | Likely Cause | Fix |
|---|---|---|
| Base rocks side-to-side | Latch strap or seat belt loose | Re-tighten with knee pressure; check belt is locked. |
| Base tips forward easily | Seat cushion slope | Place a rolled towel or pool noodle under the front edge of the base. |
| One side is tighter than other | Twisted LATCH/seat belt webbing | Unhook, straighten all webbing, and reattach. |
| Belt locks but still has slack | Wrong belt path used | Confirm you’re using the rear-facing belt path, not the storage path. |
Attaching the Car Seat to the Base
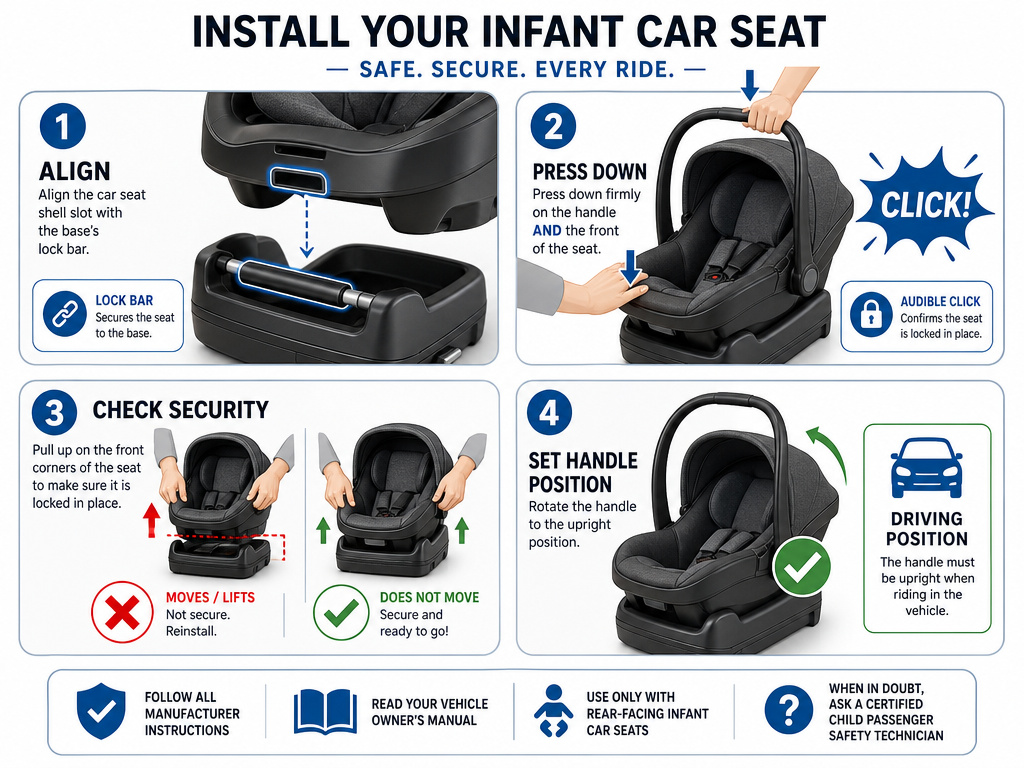
With the base secured, locking the car seat onto it is the final mechanical step. This is where that audible click matters.
- Align the Slots. Hold the car seat over the base. The slots on the sides of the car seat shell must align directly with the lock bars on the base.
- Push Down Firmly. Press down firmly on the carry handle and the front of the car seat, near the infant’s feet. You will hear a distinct click from both sides when the locking mechanism engages.
- Verify the Lock. Grab the front two corners of the car seat (by the infant’s feet) and pull up firmly. The seat should not dislodge from the base. If it lifts off, repeat step 2 with more force.
- Position the Handle. The carry handle must be in the upright and locked position when driving. It is not a grab bar for the child; it’s a structural part of the shell.
This process is nearly identical for a Cosco Light ‘N Comfy base or a Safety First car seat. The principle is universal: alignment, a positive click, and a verification tug. The same mechanical logic applies when you learn how to install a Doona base or an Aria car seat base.
Angle and Level: Why It Matters for Infants
Infants lack head and neck control. A properly angled base positions the car seat so the baby’s head does not flop forward, which can restrict their airway. Cosco bases have a built-in level line or indicator.
After installation, check that this line is parallel to the ground. If it’s not, use the base’s recline foot adjustment (if equipped). For bases without this, the manual instructs you to place a firm, rolled towel or a pool noodle under the front edge of the base on the vehicle seat. This is not a cheat, it’s an approved method to achieve the correct angle on a sloped seat.
Check this angle every few weeks. Vehicle seat cushions compress, and the towel or noodle can shift, altering the recline.
Troubleshooting a Failed Installation
Sometimes, despite your best efforts, the base won’t pass the 2.5 cm test. Before you give up, run through this checklist.
- Try a Different Seating Position. Vehicle seats are not uniform. Move the base to the center or opposite outboard seat and try again. The seat geometry may be better.
- Switch Anchor Methods. If LATCH isn’t working, switch to the seat belt. Sometimes one system simply gets a better purchase on a particular vehicle seat.
- Check for Obstructions. Ensure the LATCH strap or seat belt isn’t caught on the base’s adjuster lever or a piece of the vehicle seat.
- Consult a Pro. If you’re stuck, seek a certified Child Passenger Safety Technician (CPST). They can spot issues you might miss and help you achieve a rock-solid install. This is a free service offered at many police stations, firehouses, and hospitals.
Remember, a proper Cosco car seat installation is the foundation. The steps for a Cosco LATCH installation or later for a forward-facing Cosco seat all build on this same principle of eliminating movement at the belt path.
Frequently Asked Questions
Can I use any Cosco base with my Cosco car seat?
No. You must use the specific base designed for your exact car seat model. A Cosco Light ‘N Comfy 35 seat requires a Light ‘N Comfy 35 base. Using an incompatible base, even from the same brand, can result in an insecure connection and is explicitly warned against in the manual.
What if my car doesn’t have LATCH anchors?
Most vehicles manufactured after September 2002 have LATCH. If yours does not, or if the seating position you want to use lacks them, you must use the vehicle’s seat belt to install the base. The seat belt method is equally safe when done correctly.
How do I know if my seat belt is locked?
Refer to your vehicle owner’s manual. Generally, switchable retractors lock when you pull the shoulder belt all the way out and let it retract. Locking latchplates have a mechanism that grips the belt webbing when the belt is tightened. If the belt still seems to slip, you may need a locking clip, which often comes with the car seat.
Why does the carry handle need to be up?
The carry handle is part of the car seat’s structural frame when in the upright and locked position. In a crash, it helps manage and distribute forces. When it’s down or not locked, it becomes a potential pivot point or failure point, compromising safety.
The Bottom Line
Installing a Cosco infant car seat base boils down to three actions: choosing the right anchor (LATCH or seat belt), tightening until movement is under 2.5 cm, and verifying the car seat clicks onto the lock bars. The manual’s tolerance isn’t arbitrary, it’s the measurable standard for a safe install. If your base shifts more than an inch at the belt path, it’s not ready for the road. Take the ten minutes to get it right. That’s the one task where “good enough” isn’t.
