
How to Install a Safety First Infant Car Seat: LATCH vs Belt
This post contains affiliate links. As an Amazon Associate, we earn from qualifying purchases.
To install a Safety First infant car seat, you must choose one method, the vehicle’s LATCH lower anchors or the seat belt, and never use both. Thread the seat belt or connect the lower anchor straps through the designated rear-facing belt path on the seat or base, tighten until there is less than one inch of movement at the belt path, and ensure the carrier clicks securely into the installed base. The child must fit the seat’s specific rear-facing limits, which for many Safety 1st models is 40 pounds and 40 inches, with the harness straps at or just below the shoulders.
That “less than one inch” rule is the part most people miss by a quarter-inch. The seat can feel rock-solid in your hands, but the official test uses a specific pull at the belt path. If it shifts more than an inch side-to-side or front-to-back, the crash forces multiply where you can’t see them, inside the plastic shell.
What follows: the mechanical difference between LATCH and seat belt that decides which is actually tighter in your car, the premature-infant hospital observation that isn’t optional, and the three physical checks that replace guesswork.
Key Takeaways
- Never install a rear-facing car seat in the front seat if there is an active airbag. The Joie manual states this can cause death or serious injury.
- The combined weight of your child and the car seat must not exceed 65 pounds to use the lower anchors (LATCH). After that, you must switch to the vehicle seat belt.
- For infants born earlier than 37 weeks or under 5 pounds, the American Academy of Pediatrics mandates a 90–120 minute hospital observation before the first car trip to monitor for breathing issues.
- A proper installation has less than one inch of movement at the belt path when tested with a firm hand pull. The carrier or seat should not move independently from the vehicle seat.
- Always register your car seat with the manufacturer to receive direct recall notices. The NHTSA vehicle safety hotline is 1-888-327-4236 for assistance.
The LATCH vs Seat Belt Choice (And When You Must Switch)
You have two locking systems, but they do the same job through different mechanics. The LATCH (Lower Anchors and Tethers for Children) system uses dedicated metal bars built into your vehicle’s seat crack. The seat belt uses the same locking mechanism that holds an adult in place. Your car’s manual dictates which seating positions have lower anchors; not all do, especially center seats.
The choice isn’t about which is universally safer. It’s about which one you can get tighter in your specific vehicle seat. A loose installation is the single biggest point of failure.
Common mistake: Using both the LATCH lower anchors and the seat belt together. This creates conflicting force paths in a crash. The seat is designed to manage energy through one system only; doubling up can cause the seat or base to fail. Pick one.
Here is the decision matrix. Use it.
| Installation Method | Best For | Stop Using When |
|---|---|---|
| LATCH Lower Anchors | New installations, most modern vehicles, seats where the belt path is hard to access. | The combined weight of child + car seat exceeds 65 lbs. |
| Vehicle Seat Belt | Older vehicles, center seat positions, or when the child+seat weight exceeds the LATCH limit. | The seat belt latch plate will not lock, or the belt webbing is damaged. |
| European Belt Path (No Base) | Travel, taxis, airplanes, or vehicles where a base won’t fit. | The child outgrows the infant carrier’s height or weight limit. |
The 65-pound LATCH weight limit is a federal safety standard. It’s not a suggestion. Once your child and the seat together weigh more than that, the lower anchors are not certified to hold. You must unclip them and reinstall using the vehicle seat belt. Most parents hit this limit long before the child outgrows the rear-facing seat.
For a secure car seat base, press your knee into the seat or base and use your body weight to compress the vehicle seat cushion while you pull the lower anchor strap or seat belt tight. You should not be able to pinch any slack in the strap webbing.
Reading the Manuals: Your Car and Your Car Seat
Your vehicle owner’s manual is law inside your car. It tells you which seating positions have lower anchors, if the center seat can be used, and how to lock the seat belt. Some vehicles, especially older ones, require a locking clip to secure a seat belt installation. The manual has the page number.
The Safety 1st manual is just as critical. It holds the specific height and weight limits for your model, the exact belt path diagram, and warnings you will not find anywhere else. For example, the Safety 1st Grow and Go manual explicitly states to keep the child rear-facing until 40 pounds and 40 inches. Missing the “and” means turning your child forward-facing too soon.
The top of the child’s head must be at least 1 inch (25 mm) below the top of the child restraint seat back. – Evenflo SafeMax Owner’s Manual
That headroom rule is non-negotiable. It ensures the child’s head is contained within the protective shell during a rear-impact crash. Measure it. If the child’s head is less than an inch from the top, the seat is outgrown, even if they are under the weight limit.
Step-by-Step: Installing the Base with LATCH
This is the preferred method for most families. It often yields a tighter fit and is easier to adjust.
- Locate the lower anchors in your vehicle. They are usually marked by a small symbol of a child in a car seat. Push aside the seat upholstery to expose the metal bars.
- Remove the lower anchor connectors from storage on the back of the base. Extend the straps fully.
- Press the base firmly into the vehicle seat. You want to compress the cushion.
- Hook the connectors onto the metal bars. You should hear and feel a distinct click. A common failure is hooking onto the seat frame or a wire instead of the anchor bar. Tug hard on the strap to confirm it’s locked.
- Tighten the anchor straps. Pull the adjustment strap while keeping pressure on the base. The base should not move front-to-back or side-to-side more than one inch at the belt path.
- Attach the carrier. Place the infant carrier onto the base and push down until you hear a click. Pull up on the handle to confirm it’s locked.
If your base has a load leg, a support leg that extends to the vehicle floor, you must use it. Brands like Cybex and Joie require it for proper anti-rebound protection. The leg must be adjusted so its indicator shows green, confirming firm contact with the floor pan. Some vehicle manufacturers prohibit load legs in certain seats; check your car manual first.
For a middle seat installation, you can only use LATCH if your vehicle manual shows dedicated lower anchors for that center position. Most do not. The seat belt is your only option.
Step-by-Step: Installing the Base with a Seat Belt

When LATCH isn’t available or you’ve exceeded the weight limit, the seat belt is your system.
- Place the base on the vehicle seat. Ensure it’s flush and not hanging over the edge.
- Thread the seat belt through the rear-facing belt path on the base. This path is always marked in red. The lap portion of the belt must go through this path.
- Buckle the seat belt.
- Lock the seat belt. For switchable retractors, pull the belt all the way out until it clicks and retracts tightly. For locking latch plates, you may need to consult your vehicle manual.
- Remove all slack. Get your weight into the base and pull the shoulder portion of the belt tight. The base should not shift.
- Test for movement. Grasp the base at the belt path and try to move it. If it shifts more than an inch, re-tighten.
A key difference between LATCH and seat belt installation is the center of gravity. A seat belt installation can sometimes allow more rotation at the top of the seat. This is why the “less than one inch” test at the belt path is critical, it’s the pivot point.
Securing Your Child: The Five-Point Harness
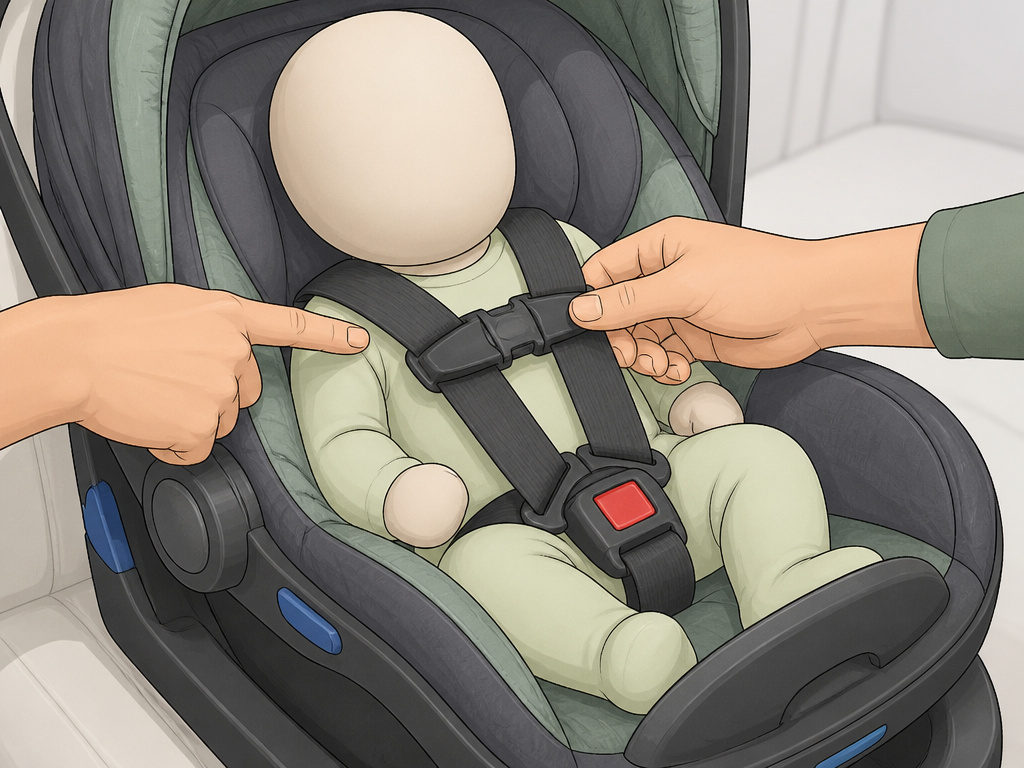
A perfectly installed base is useless if the child is not properly restrained in the seat. This is a three-point check.
Harness Height: The harness straps must be at or just below the child’s shoulders for rear-facing. You adjust this by rethreading the straps through the back of the shell at the correct slot. Never use a slot above the shoulders for rear-facing.
Chest Clip: Position the chest clip at armpit level. A clip placed too low on the belly offers no upper-body restraint in a crash.
Harness Tightness: Perform the pinch test. After buckling and tightening the harness, try to pinch the strap vertically at the child’s shoulder. If you can pinch any excess webbing, it’s too loose. The straps should be snug against the body with no slack.
You’ll need to adjust the straps every few weeks as your baby grows. An over-bundled child in a thick winter coat can create dangerous slack. Place blankets over the tightened harness, not under it.
Edge Cases and Non-Negotiable Warnings

The manuals contain specific warnings that override general advice. These are the scenarios where the standard procedure breaks.
Premature or Low Birth Weight Infants: If your baby was born earlier than 37 weeks or weighed less than 5 pounds, you cannot just drive home. The AAP guidelines, cited by Evenflo and Cybex, require a 90–120 minute hospital observation with the infant in the car seat before the first trip. Hospital staff monitor for apnea (breathing stoppage) or bradycardia (slow heart rate), which are real risks for these infants in a semi-reclined position.
Front Seat & Airbags: The Joie i-Gemm manual is absolute: “DO NOT place rear-facing enhanced infant restraint on front seat with air[bags], because death or serious injury may occur.” An deploying airbag will strike the back of the rear-facing seat with tremendous force, crushing it toward the vehicle seat. The back seat is the only safe location.
After a Crash: The NHTSA states you may not need to replace a seat after a minor crash where the vehicle could be driven away, the door nearest the seat was undamaged, no one was injured, airbags did not deploy, and there is no visible damage to the car seat. If any one of those criteria is not met, you must replace the seat. Damage to the energy-absorbing foam is not always visible.
Expiration: Plastic degrades over time. Most Safety 1st seats, like the Grow and Go, expire 10 years from the date of manufacture. Find the sticker on the side of the seat shell and mark your calendar.
Frequently Asked Questions
Can I use both LATCH and the seat belt for extra safety?
No. Never use both systems together. The car seat is tested and certified to manage crash forces through one load path at a time. Using both can create stress concentrations that could cause the seat or base to fail. It does not make the installation safer.
How do I know if my car seat is installed tightly enough?
Perform the one-inch test. Grasp the car seat or base at the belt path, the spot where the seat belt or LATCH strap routes through it. Try to move it side-to-side and front-to-back. If it moves more than one inch in any direction, it is not tight enough. Re-tighten the strap or belt.
My car doesn’t have lower anchors in the middle seat. What should I do?
The safest car seat position is the one where you can achieve the most secure installation. If the center seat lacks lower anchors, install the seat using the seat belt in that position, or use the LATCH system in an outboard seat where you can get a rock-solid fit. A proper seat belt installation in the center is safer than a mediocre LATCH installation on the side.
Are Safety 1st infant car seat bases universal?
No. While many car seat bases are brand-specific, Safety 1st bases are generally only compatible with Safety 1st infant carriers of the same model line. You cannot use a Graco SnugRide seat on a Safety 1st base, or vice versa. Always check the compatibility listing in your manual.
Where can I get my car seat installation checked for free?
Many local fire stations, police stations, and hospitals offer free car seat checks by certified Child Passenger Safety Technicians (CPSTs). You can find a permanent inspection station near you through the NHTSA car seat safety guide. They will check your installation and your child’s fit without charge.
Before You Go
Installing a Safety First infant car seat comes down to three things: picking the right system (LATCH or belt) for your vehicle’s specific seat, pulling it tight until it doesn’t move, and securing the child with a snug harness at the right height. The 65-pound LATCH limit is your switch signal. The one-inch movement test is your final exam.
Register your seat. Read both manuals, the one for your car and the one for your seat. If your baby was early or small, the hospital observation isn’t a formality; it’s a required safety check. The back seat is the only seat for a rear-facing child. Now you know what the manuals actually say, and what happens if you skip a step. Go tighten it.
