
Master Car Seat Installation: How to Use a Seatbelt Safely
This post contains affiliate links. As an Amazon Associate, we earn from qualifying purchases.
To install a car seat with a seatbelt, you must route the belt through the correct belt path, ensure the seatbelt is locked (not just buckled), and tighten it until the seat moves less than one inch side-to-side at the belt path. The most common failure is a seatbelt that slips because it wasn’t switched into its automatic locking retractor (ALR) mode.
That one-inch limit isn’t a suggestion. It’s the pass/fail line defined in manuals from Peg Perego, Evenflo, and Graco. A seat that moves more than that at the belt path has slack the crash forces will exploit. The entire process hinges on one thing: making your vehicle’s seatbelt behave like a fixed strap instead of a flexible one.
What follows is the breakdown most guides skip—how to identify your seatbelt’s locking type, the physical trick to getting it truly tight, and what to do when the belt seems to lock but the seat still feels loose at the far end. We’ll cover rear-facing and forward-facing, bases and seat-only installs.
Key Takeaways
- The seatbelt must be locked, not just buckled. For most cars, this means pulling the shoulder belt all the way out until it clicks, then letting it retract over the car seat.
- Test for tightness at the belt path, not the top of the seat. Movement over one inch means you need to re-tighten or re-install.
- Never use both the seatbelt and the LATCH lower anchors simultaneously. Pick one installation method.
- Some older vehicle seatbelts require a locking clip to secure the car seat. You’ll know you need one if the latch plate slides freely along the webbing.
- For forward-facing seats, always use the top tether strap in addition to the locked seatbelt. This reduces head excursion in a crash by up to 6 inches.
The 1-Inch Test and How to Lock Your Seatbelt
The wiggle test is the only objective measure you have. But you’re checking the wrong spot if you grab the top of the seat and shake it. Car seats are designed to flex at the shell. You must grip the seat at the belt path—the slot or tunnel where the seatbelt passes through the car seat or its base.
Hold the car seat at the belt path with your non-dominant hand and push/pull side-to-side and front-to-back. The seat should not move more than 1 inch (2.5 cm) in any direction. If it does, the belt isn’t tight enough or isn’t locked.
This standard comes straight from manufacturer manuals. The Evenflo SafeMax manual states the restraint should not be used if it moves more than 25 mm (1 in.). The Peg Perego manual echoes this. It’s a non-negotiable threshold.
Why does the seatbelt loosen?
The Reddit parent with the Volkswagen Atlas had this exact problem: the shoulder belt loosened throughout the day. This happens when the seatbelt is buckled but not locked. Most modern seatbelts have an Emergency Locking Retractor (ELR) for adults, which only locks in a sudden stop or crash. For car seat installation, you need it to act as an Automatic Locking Retractor (ALR).
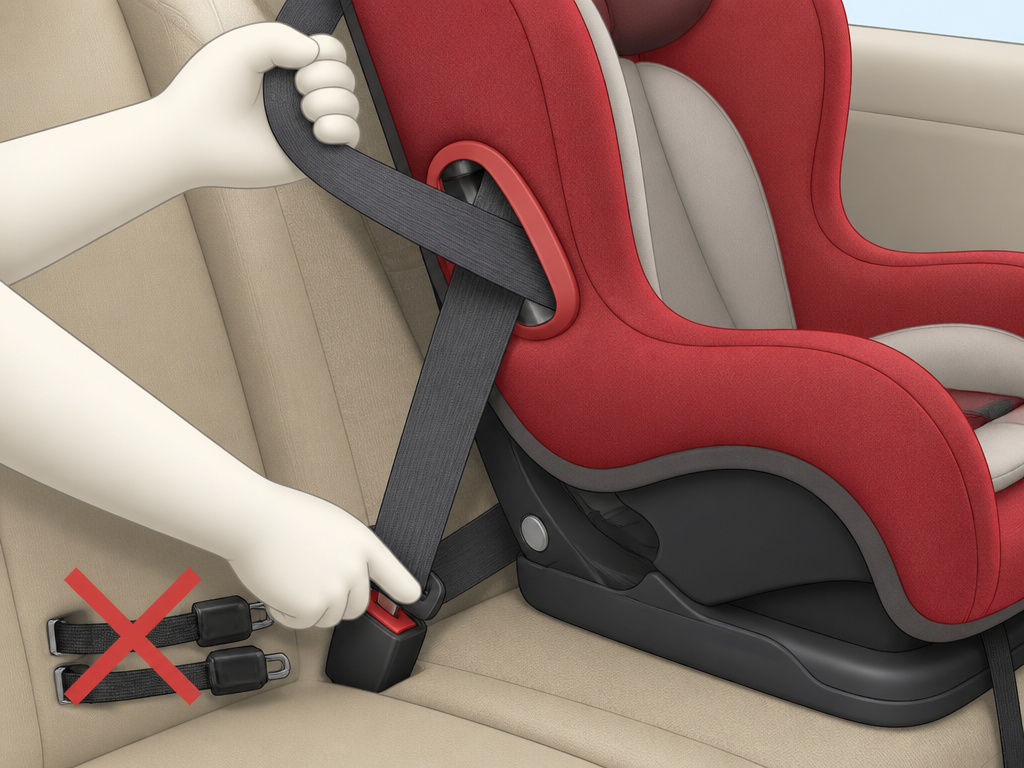
Here’s how to lock it: For nearly all vehicles made after 1996, pull the shoulder belt all the way out until you hear a clicking sound. Slowly let it retract. It is now in ALR mode and will not extend again until fully retracted and unbuckled. You must do this after you’ve threaded the belt through the car seat but before you buckle and tighten.
| Seatbelt Type | How to Lock It | If It Doesn’t Lock |
|---|---|---|
| ELR (Emergency Locking Retractor) | Pull shoulder belt all the way out until it clicks, then let it retract over car seat. | You may need a locking clip (see below). |
| ALR (Automatic Locking Retractor) | Belt locks as you pull it out; no special action needed beyond tightening. | Ensure latch plate is flipped to lock position if it’s a switchable plate. |
| Free-Sliding Latch Plate (older cars) | The latch plate slides freely; it cannot lock the belt. | You must use a locking clip. |
Where this goes sideways: Testing tightness at the top of the seat. The shell can flex several inches, making a correct install feel loose. Always put your hand directly on the plastic where the seatbelt passes through.
The Step-by-Step Process
This isn’t about strength. It’s about technique and sequence. Skipping the order is how you end up with a seat that feels tight initially but works loose after a few drives.
Before you start: Park on level ground. Have your car seat manual and vehicle owner’s manual handy. Clear the seat of toys and crumbs.
1. Find the Correct Belt Path.
For a rear-facing seat, the belt path is usually low on the back of the car seat shell or base. Look for a blue label or icon. For a forward-facing seat, it’s higher up. The Graco 4Ever manual specifies using the path marked with a blue label for rear-facing. Thread the seatbelt through, ensuring the webbing is not twisted.
2. Buckle the Seatbelt.
Push the car seat or base firmly down into the vehicle seat cushion while you buckle the belt. You want to compress the vehicle seat’s padding.
3. Engage the Locking Mechanism.
This is the critical step most people miss. If your belt uses the pull-all-the-way-out method, do it now. Pull the shoulder strap slowly until it stops and clicks. Then, while keeping your weight on the car seat, let the belt retract back onto the spool. You should feel it cinch down.
4. Tighten.
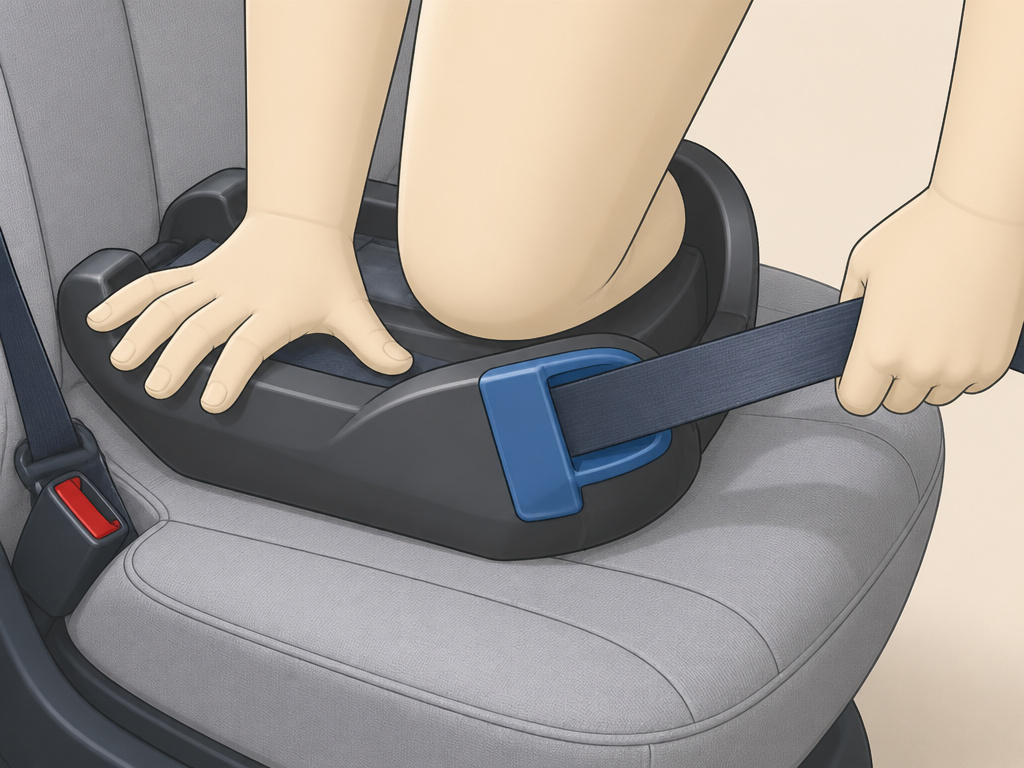
Place your dominant hand in the footwell or seat area of the car seat. Use your knee and full body weight to press the seat down and back into the vehicle seat. With your other hand, pull the loose tail of the seatbelt tight. You may need to feed slack through the latch plate. The Peg Perego manual suggests pulling the belt “parallel to the belt path.”
5. Perform the 1-Inch Test.
Grip the seat at the belt path. Push and pull. If it moves more than an inch, you need more tightening. Sometimes, unbuckling and restarting from step 3 is faster than fighting slack.
6. Final Checks.
Ensure the car seat is at the correct recline angle (use the built-in level indicator). For forward-facing seats, attach the top tether strap to the designated anchor in your vehicle and tighten it until snug.
When You Need a Locking Clip
If your vehicle is older (pre-1996 is a good rule of thumb) or has a specific type of seatbelt, the pull-and-click method won’t work. You’ll have a seatbelt with a free-sliding latch plate. The latch plate slides effortlessly along the webbing, so no amount of pulling will keep it tight.
The part nobody mentions: A locking clip is a small, H-shaped metal bar. It’s not included with all car seats, but manufacturers like Evenflo will send you one if you call. It’s mandatory for a safe install with this belt type.
You need a locking clip if, after buckling and pulling the belt tight, the latch plate still slides when you let go. The clip is installed within 13 mm (0.5 inches) of the latch plate on the free webbing, effectively creating a fixed loop that cannot loosen.
Installing one is a precise task. Our dedicated guide on using a locking clip walks through the placement and pinching technique. It’s a skill worth learning if your family car is an older model.
Seatbelt vs. LATCH: Which Method Should You Use?
Both the seatbelt and the LATCH system are equally safe when used correctly. The LATCH vs seat belt debate often misses the practical deciding factors: weight limits and convenience.
LATCH has lower anchor weight limits, typically 65 pounds combined weight of child and seat. The federal NHTSA child passenger safety standards state you must stop using lower anchors once the child exceeds the vehicle or car seat manufacturer’s limit. After that, you must switch to the seatbelt.
The seatbelt installation has no weight limit—it’s rated for the full capacity of the car seat itself. This makes it the only option for heavier children in convertible seats. It’s also the required method for installing a car seat in the middle seat of many vehicles, as not all center positions have lower anchors.
Common mistake: Using both the seatbelt and LATCH together. This is explicitly warned against by NHTSA and every car seat manual. The systems can interfere with each other, creating unequal force distribution in a crash. Choose one.
| Installation Method | Best For | Limitation |
|---|---|---|
| LATCH Lower Anchors | Quick, consistent installs. Easier to get tight. | Weight limit (~65 lbs combined). Not always available in center seat. |
| Vehicle Seat Belt | No weight limit. Universal—works in any seating position. | Can be trickier to lock and tighten properly. |
Troubleshooting a Loose Installation
You followed the steps, but the seat still shifts. Here are the three most likely culprits.
Problem: The seat is tight at the belt path but the front edge (far end) wobbles.
This is the complaint from the Chicco KeyFit owner. The shell is flexing, which is normal. The fix is to ensure the recline angle is correct. An over-reclined seat will pivot more at the front. Use the built-in level indicator and adjust the base or foot. If installing without a base, use a rolled towel or pool noodle at the vehicle seat bight only if your manual permits it.
Problem: The seatbelt locks but still seems to have slack.
You may not be compressing the vehicle seat enough. That foam is thick. Use more of your body weight. Get your knee into the seat and really lean in as you pull the belt tail. For a base installation, press down on the base, not the carrier.
Problem: The seat is rock-solid one day and loose the next.
The seatbelt likely slipped out of ALR mode. This happens if you accidentally release the belt all the way after installation. Every time you unbuckle to remove the seat, you must re-engage the locking mechanism when you re-install. It’s not a set-and-forget system like LATCH.
If you’re ever in doubt, seek a professional inspection. The AAP car seat safety guide recommends having your installation checked by a certified Child Passenger Safety Technician (CPST). Many fire stations and hospitals offer this service for free.
Frequently Asked Questions
Can I install a car seat in the front seat with a seatbelt?
You can, but you should not. The American Academy of Pediatrics states all children under 13 should ride in the back seat. If you absolutely must use the front seat (e.g., in a single-cab truck), ensure the passenger airbag is deactivated. Refer to your vehicle manual.
My car seat has a built-in lock-off clip. Do I still need to lock the seatbelt?
Yes. The lock-off clip (like the “Right Tight” clip on the Peg Perego) is a secondary device to clamp the seatbelt and prevent slippage. Your vehicle seatbelt still needs to be locked via the ALR method first. The lock-off is a backup, not a replacement.
Is it harder to install a convertible seat with a seatbelt versus an infant seat?
It can be. Convertible seats are bulkier, and getting the right angle while tightening can be awkward. The principles are identical: correct belt path, locked belt, one-inch movement. For a forward-facing seat, the top tether is non-negotiable and makes a significant difference in stability.
How do I know if my seatbelt is long enough?
If you cannot buckle it after routing through the belt path, your belt may be too short. Some manuals, like the Peg Perego’s, have a workaround: you may thread only the lap portion through certain slots. Check your specific car seat manual. Do not use a seatbelt extender.
Can I use the seatbelt if I already used LATCH?
No. This is a critical safety error. You must completely unhook the lower anchor connectors and store them before using the seatbelt. Using both systems simultaneously is explicitly warned against in every manual and by the NHTSA car seat safety guidelines.
The Bottom Line
Installing a car seat with a seatbelt is a mechanical skill, not a mystery. The goal is to turn a dynamic, forgiving seatbelt into a static, unyielding anchor. That transformation happens when you activate the belt’s locking feature and pull until you pass the one-inch test at the belt path.
Forget how the seat feels at the top. Ignore the shell flex. Your hands go on the belt path, and your eyes measure that single inch. When in doubt, your car seat manual and vehicle owner’s manual are the final authorities—not a well-meaning friend or a generic video. A proper car seat installation is the single most effective thing you can do to protect your child on the road. Take the five minutes to get it right.
