
The Right Way: How to Properly Install an Infant Car Seat
This post contains affiliate links. As an Amazon Associate, we earn from qualifying purchases.
To properly install an infant car seat, you must choose one secure method, either the vehicle’s LATCH system or its seat belt, and achieve a tight fit where the base moves less than one inch at the belt path. The seat must be rear-facing, on a correct recline angle for the child’s weight, and never in front of an active airbag. Always consult both your car seat manual and your vehicle’s owner manual; they are the final authority.
That “less than one inch” rule is the physical benchmark for a crash-ready installation. It means the seat’s base is coupled tightly enough with the vehicle’s seat to move as a single unit under impact forces. The difference between a seat that shifts two inches and one that shifts half an inch determines controlled deceleration versus a violent whiplash effect on an infant’s spine.
What follows is a breakdown of the two installation systems, the non-negotiable tests you must perform, and the specific, often-missed details that turn a guess into a guarantee.
Key Takeaways
- Never use LATCH and a seat belt together. This creates conflicting force paths in a crash and can overload the vehicle’s anchorage points, risking catastrophic failure.
- The 65-pound LATCH limit includes the child AND the seat. You must calculate this limit if your seat’s label doesn’t state it. Once exceeded, you must switch to a seat belt installation.
- The middle seat is not always the safest. If your vehicle’s manual prohibits LATCH use in the center or the seat doesn’t fit snugly there, a window seat with a proper installation is safer.
- A load leg or anti-rebound bar isn’t optional if your base has one. These devices directly channel crash forces into the vehicle floor, reducing rotational movement by up to 40% in frontal collisions.
- Your car’s fold-down center armrest can be a hazard for a rear-facing seat. Consult your vehicle manual before installing in front of one.
The LATCH vs Seat Belt Decision
You have two equally safe, approved paths, and the choice depends on which is easier and more foolproof in your specific car and with your specific seat.
The LATCH system (Lower Anchors and Tethers for Children) uses standardized metal bars hidden in your vehicle’s seat crease. You connect the car seat base’s built-in hooks or straps directly to them. For many people, this is simpler than threading a seat belt.
The seat belt method uses your vehicle’s existing lap or lap/shoulder belt, routed through a specific path on the car seat base and locked. This is your only option if your vehicle lacks LATCH (older than 2003), if you’re using the center seating position where LATCH often isn’t permitted, or if you’ve exceeded the LATCH weight limit.
Common mistake: Assuming LATCH is always better. In many SUVs and trucks, the lower anchor bars are buried so deep in the seat bight that you cannot get a truly tight, straight connection. A seat belt pulled tight across the top of the base often gets a better fit.
The federal NHTSA car seat safety guidelines state both systems are equally effective. Your goal is the tightest fit, period.
| Installation Method | Best For | When to Stop Using It |
|---|---|---|
| LATCH System | Side seating positions, newer vehicles, achieving a straight pull. | When child + car seat weight exceeds 65 lbs (check seat label). |
| Seat Belt | Center seat positions, older vehicles, achieving a downward clamping force. | When the seat belt itself is damaged or cannot be locked per the vehicle manual. |
| European Belt Path (for seats like Cybex) | Specific models designed for a three-point belt through the carrier. | When the child outgrows the carrier’s height or weight limit. |
For a deep dive on the mechanics, see our guide on installing with LATCH. If your car lacks those anchors, our seat belt only installation guide has the steps.
The Non-Negotiable 1-Inch Test
After you’ve tightened the LATCH strap or seat belt, you must perform the “incline test.” This isn’t a gentle check. You grip the car seat base at the belt path, the exact spot where the seat belt or LATCH strap passes through it, and pull hard side-to-side and front-to-back.
The base should not move more than one inch in any direction. If it slides more, the installation is not tight enough to manage crash forces.
If your seat moves too much, you likely didn’t use your body weight. Kneel into the seat base, pressing down with your full torso weight while you tighten the strap or pull the seat belt. This compresses the vehicle seat cushion and removes slack. You need that compression.
Why the one-inch limit? In a crash, a loosely installed seat will jerk forward before the child’s harness begins to restrain them. This “ramp-up” effect dramatically increases the forces on the child’s neck and chest. A tight installation ensures the seat and child decelerate together.
Sourced Specifications: When Your Child Outgrows the Seat
This is not a guessing game. Manufacturers set precise limits based on crash testing. Ignoring them voids all safety engineering.
- Cybex Cloud G Pro: Child weight 4-30 lb (1.8-13.6 kg), height less than 32 in (81 cm). The top of the child’s head must be at least 1 inch below the top of the shell or headrest.
- Joie i-Snug 2: Child weight up to 13 kg (approx. 29 lb), height 40-75 cm (approx. 16-30 inches). This is an i-Size seat, meaning it’s approved under stricter European regulation UN R129.
- General LATCH Limit: The combined weight of your child and the car seat must not exceed 65 pounds unless your car seat label states a higher limit. You can find the seat’s weight in its manual.
The nonprofit Safe Kids car seat installation tips emphasize checking these labels every time you place your child in the seat. Growth spurts happen fast.
Step-by-Step: Installing a Base with LATCH

This sequence assumes you’re using the lower anchors. The tether is for forward-facing seats only.
- Locate the lower anchor bars. Dig into the crease of your vehicle’s seat cushion. They are usually marked by a small symbol. Your vehicle manual confirms their location.
- Attach the LATCH connectors. Press the base’s rigid or strap-connected hooks directly onto the bars until you hear and feel a solid “click.” A soft click or no click means it’s not engaged.
- Apply weight and tighten. Place one knee firmly in the center of the base and press down with most of your weight. While holding this pressure, pull the LATCH adjustment strap tight. The base should sink into the vehicle seat.
- Perform the 1-inch test. Grab the base at the belt path and pull. If it fails, release the tension, apply more body weight, and tighten again. You may need to “walk” the base back into the seat crease with your hands as you tighten.
Where this goes sideways: Not checking for a twisted LATCH strap. A single twist in the strap weakens its strength by up to 20%. The strap must lie flat from the base to the connector.
Step-by-Step: Installing a Base with a Seat Belt

When using the seat belt method, locking the belt is the critical step most people miss.
- Route the belt through the correct path. Your car seat base has a specific guide, often marked in blue, for seat belt use. Do not use the LATCH path.
- Buckle the seat belt.
- Lock the seat belt. For most modern vehicles, pull the shoulder belt all the way out until it retracts slowly. You will hear a ratcheting sound, this is the automatic locking retractor (ALR) engaging. For older belts, you may need a locking clip supplied with your seat.
- Apply weight and remove slack. Kneel into the base. Pull hard on the shoulder belt to tighten it, feeding any excess back into the retractor. The belt should be taut with no loose webbing.
- Perform the 1-inch test.
Why you should not use LATCH and seat belt together. This is a critical warning. Using both systems simultaneously, known as “double buckling,” seems like overkill. In reality, it prevents either system from working as designed. In a crash, the two systems will not stretch or load evenly. This can cause one to fail prematurely or place immense stress on the vehicle’s anchorage points, potentially tearing them free. Our article on LATCH versus seat belt explains the physics in detail.
Critical Warnings and Edge Cases
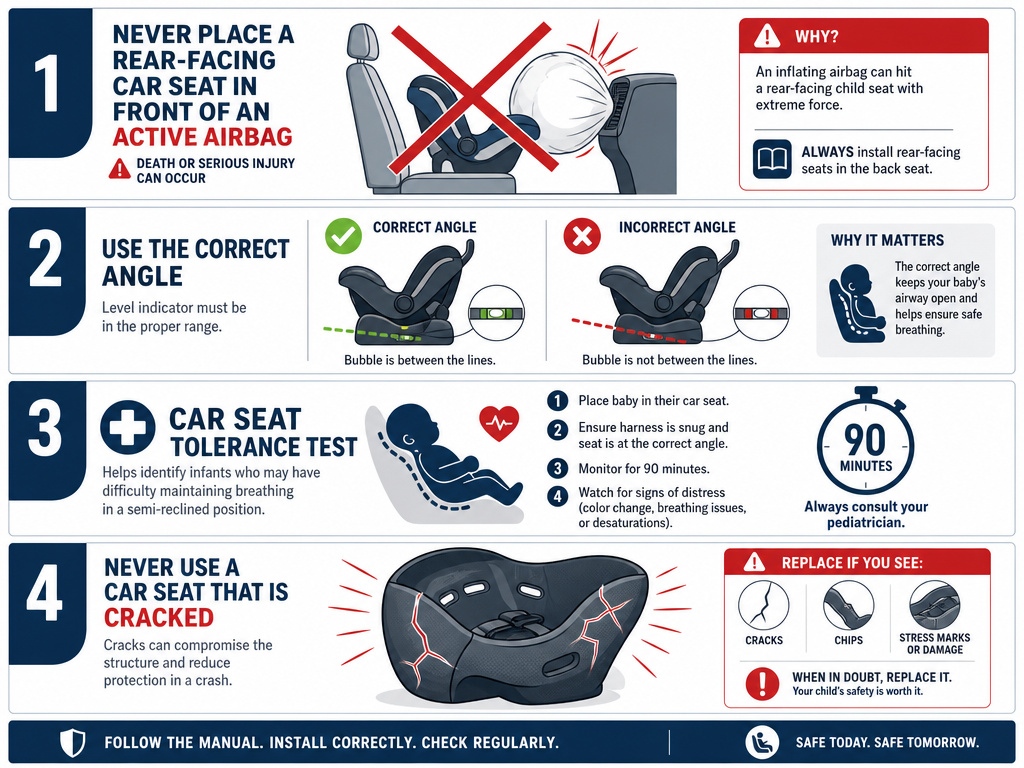
The manual has fine print for a reason. These scenarios break the standard rules.
- Active Frontal Airbags: Never place a rear-facing seat in any seating position with an active frontal airbag. The force of the airbag deployment can strike the back of the car seat with enough force to cause fatal injuries. This is explicitly stated in the Joie i-Snug 2 manual.
- Vehicle Fit is Not Guaranteed: Not every car seat fits in every vehicle. A seat might pass the 1-inch test but be too reclined or too upright. The angle is crucial for an infant’s airway. Test the fit before you buy.
- Preterm and Low Birth Weight Infants: The American Academy of Pediatrics recommends a car seat tolerance test for infants born before 37 weeks or under 5 lbs before their first trip. Their underdeveloped airways are at risk in a semi-reclined position.
- After Any Crash, Replace the Seat: Even a minor fender-bender can create micro-fractures in the plastic shell. These are stress concentrators that can cause the seat to fail in a subsequent crash. All major manufacturers and NHTSA mandate replacement.
Choosing the safest position involves more than just picking the center. You must verify a proper fit and installation there first.
Securing Your Child in the Carrier
A perfectly installed base is useless if the child is not properly restrained in the carrier.
- Harness height: The shoulder straps must be at or just below the child’s shoulders for a rear-facing seat. You adjust these by rethreading the harness through the shell’s back.
- Harness tightness: After buckling the 5-point harness, perform the “pinch test.” Try to pinch the harness strap vertically at the child’s collarbone. If you can gather any material between your fingers, it’s too loose. Tighten until the strap lies flat and you cannot pinch any slack.
- Chest clip position: The chest clip must be positioned at armpit level. A clip too low rests on the soft abdomen. A clip too high rests on the neck.
For visual guidance, see our tutorials on adjusting straps and ensuring a tight fit.
Frequently Asked Questions
Can I install an infant car seat in the middle seat?
You can, but you likely cannot use LATCH. Most vehicles do not have dedicated lower anchors for the center seat. You must use the seat belt method. Always check your vehicle owner’s manual to confirm if the center seat belt is approved for car seat installation and if it has a locking feature.
How tight should the car seat base really be?
It should be tight enough that when you perform the 1-inch test at the belt path, the base moves the vehicle seat cushion with it. You should feel the entire vehicle seat deforming slightly under your pull, not just the car seat sliding over it.
What is a load leg and do I need to use it?
Load leg is a retractable bar that extends from the front of the car seat base to the vehicle floor. If your base has one, like the Cybex Cloud G Lux, you must use it. It dramatically reduces forward rotation (rebound) in a frontal crash by transferring energy directly into the floorpan. It turns a two-point connection (LATCH/seat belt) into a stabilizing three-point system.
My car seat seems to rock at the front even though it passes the 1-inch test. Is this okay?
Some movement at the front of the seat (the foot or canopy end) is normal, especially if you’re pressing on a lever or release mechanism. The critical test is at the belt path where the seat is actually secured to the vehicle. If it’s rock-solid there, you’re good.
How do I know if I’m using a locking clip correctly?
Locking clip is a small H-shaped metal piece used to lock a vehicle seat belt that lacks its own locking mechanism. It must be placed within one inch of the latchplate (the buckle tongue) on the seat belt. It is not a substitute for proper tightening. If you’re unsure, our proper use of a car seat locking clip guide has pictures.
The Bottom Line
Installing an infant car seat is a mechanical process, not a mystical art. Success hinges on three things: choosing the right securing method for your vehicle, using your body weight to eliminate slack, and verifying your work with the 1-inch test. The manuals are your blueprint, your car seat manual for the “how,” your vehicle manual for the “where.”
When in doubt, get a second pair of eyes. Many fire stations and hospitals offer free car seat checks by certified technicians. The goal is a seat so secure that when you give it that final, hard tug, nothing moves but your confidence.
