
How to Strap In an Infant Car Seat: The Crucial 1-Inch Test
This post contains affiliate links. As an Amazon Associate, we earn from qualifying purchases.
To strap in an infant car seat, you must position the harness straps at or just below the child’s shoulders, secure the chest clip at armpit level, and tighten the harness until you cannot pinch any excess webbing at the shoulder. The entire seat must not move more than 1 inch (2.5 cm) side-to-side or front-to-back at the belt path. This 1-inch rule is the federal standard, and a loose harness is the single most common installation error.
The harness is the only thing connecting your child to the shell of the seat during a crash. A loose strap doesn’t just allow slumping; in a sudden stop, it can create enough slack for a small infant to be partially ejected, leading to head or spinal injury. The difference between “snug” and “dangerous” is about half an inch of webbing.
What follows is the breakdown most manuals bury: three non-negotiable fits (shoulder, chest, pinch), the exact movement test Transport Canada and the NHTSA require, and the one accessory that voids your seat’s warranty and safety rating on contact.
Key Takeaways
- The harness straps must be at or just below the shoulders for a rear-facing infant. Straps above the shoulders force the child downward in a crash, risking spinal compression.
- Perform the pinch test on the harness webbing at the child’s shoulder. If you can pinch a vertical fold of material, the harness is too loose. This is the manufacturer’s definitive check.
- The chest clip is a pre-crash positioner, not a restraint. It must be at armpit level to keep the straps properly aligned over the strong bones of the chest and shoulders.
- Never use aftermarket strap covers or inserts not approved by your seat’s manufacturer. They can compress in a crash, creating lethal slack, and have caused recalls.
- The entire car seat, when installed, should not move more than 1 inch (2.5 cm) at the belt path. More movement multiplies crash forces on your child.
The Three Anchor Points of a Safe Harness
A five-point harness works by distributing crash forces across five of the strongest parts of a small body: both shoulders, both hips, and the crotch. Getting it wrong concentrates those forces on the soft abdomen or the fragile neck.
Harness straps for a rear-facing infant must be positioned at or just below the child’s shoulders. This ensures the child is pushed back into the seat shell in a frontal crash, rather than being forced downward. The chest clip must be at armpit level to keep the straps on the shoulders. – Transport Canada & NHTSA consensus.
Harness Height: At or Just Below the Shoulders
For a rear-facing infant, the shoulder slots are your first setting. Open the manual. For a Chicco KeyFit Max, you adjust the headrest. For a Graco SnugRide SnugLock 35 LX, you rethread the straps through different slots in the shell.
The rule is absolute: straps at or just below the shoulders. Straps above the shoulders create a ramp. In a crash, the child’s body will travel up the ramp, loading the fragile neck and spine. You are not guessing. Press down on the seat near the child’s back; the shoulders will settle. The strap should exit the shell level with or up to an inch below that point.
Where this goes sideways: Assuming the “next slot up” is fine for growth. An inch too high is enough to change the crash dynamics for a 10-pound infant. Adjust it now, not after the next car ride.
Chest Clip Position: Armpit Level, Always
The chest clip is not a decorative clasp. Its sole job is to hold the shoulder straps in the correct position before a crash occurs. Once impact forces hit, the clip is designed to open or break.
If the clip is over the abdomen, the straps can splay outward off the shoulders. This allows the child to submarine—slide downward under the lap belt—during a frontal crash, risking serious internal injury. If it’s too high near the neck, it can cause direct impact trauma.
Slide it up until it’s even with the armpits. Not the nipples, not the collarbone. The armpits.
The Crotch Buckle: The Forgotten Fit
The crotch buckle strap length matters. Most infant seats offer two or three positions. Use the position that allows the buckle to sit between the child’s legs without pressing upward.
If the strap is too short, the buckle will be pushed up into the child’s crotch, encouraging you to leave the harness too loose for comfort. If it’s too long, the buckle can sit too far forward, allowing the child to slump forward. The buckle tongues should click cleanly into the central buckle with no twisting of the straps.
The 1-Inch Harness Tightness Test
Forget “comfortable.” A safe car seat harness is snug. A child will fuss about confinement, not about pressure. The official test from every manual is the pinch test.
- Buckle the chest clip and the crotch buckle.
- Tighten the harness adjuster strap until you see no obvious loose webbing over the shoulders and chest.
- At the child’s shoulder, try to pinch the harness strap webbing vertically between your thumb and forefinger.
If you can pinch a fold of the webbing, the harness is too loose. Tighten it and try again. You should only be able to pinch the strap itself, not any extra material. The straps should lie flat against the child’s body without pressing into the flesh.
Common mistake: Leaving the harness loose to accommodate a bulky winter coat. The coat compresses instantly in a crash, creating inches of deadly slack. Place blankets over the secured child, not under the harness.
This isn’t a gentle check. Put some force into the pinch. If there’s slack, your child is not safe.
Step-by-Step: Securing Your Baby
Follow this sequence every single time. Ritual prevents mistakes.
- Loosen the Harness Fully. Press the harness adjuster button and pull both shoulder straps forward. This gives you room to place the child without forcing them in.
- Position the Child. Place the child deep in the seat, ensuring their back and bottom are flat against the back of the carrier. Check for slouching.
- Thread the Straps. Bring the shoulder straps over the child’s shoulders. For a newborn under 11 pounds using a Chicco KeyFit Max, you must first install the official newborn insert. Never use a generic aftermarket one.
- Buckle the Crotch Buckle. Snap the two buckle tongues into the central buckle. Listen for a definitive click. Tug on the buckle to confirm it’s latched.
- Secure the Chest Clip. Bring the two sides of the chest clip together at armpit level and snap it closed.
- Tighten the Harness. Pull the harness adjuster strap firmly until the webbing is snug. Perform the pinch test at the shoulder.
- Final Check. Ensure the straps are flat and untwisted, the chest clip is at armpits, and the child is not slouching.
Skipping step one—loosening fully—is how parents end up forcing a child into a tight space, never getting the back and bottom properly seated. The child will slouch, and the harness will bridge across the belly.
What “Snug” Actually Feels Like (And What to Avoid)
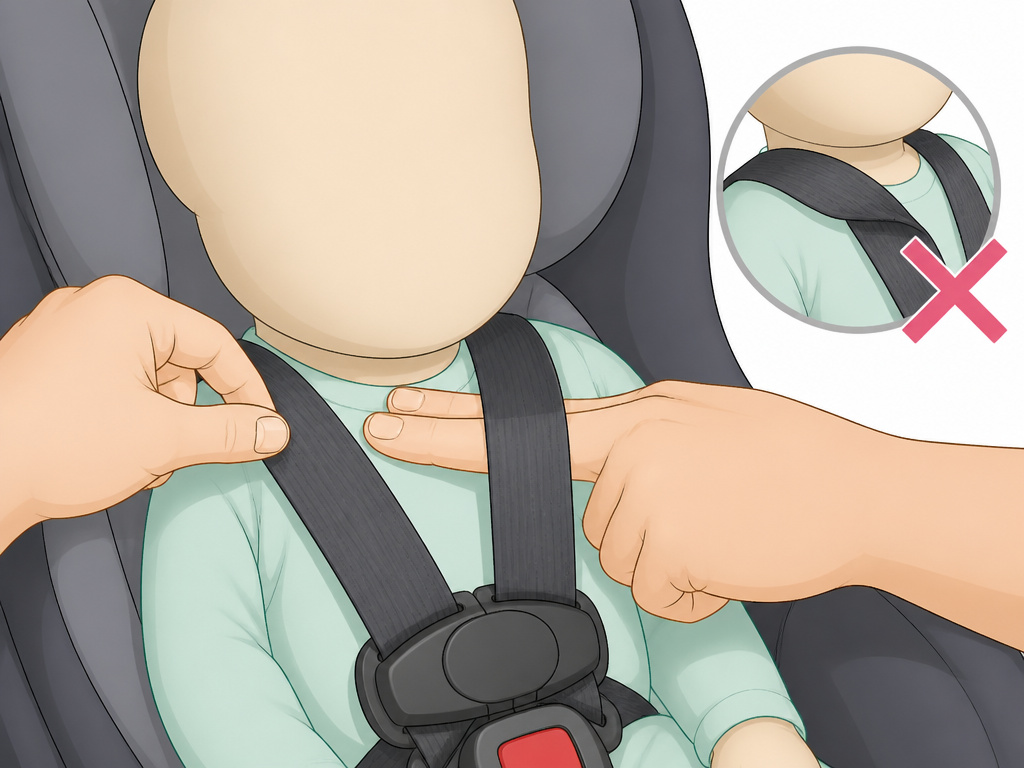 New parents are often afraid of hurting their baby. The harness should be snug enough that you cannot pinch excess webbing, but you should still be able to slip a finger or two between the strap and the child’s collarbone. The child’s body should not be forced into an unnatural position.
Avoid these pitfalls: * Bulky Clothing: As stated, it’s a major hazard. Use a thin fleece suit and a blanket over the buckled harness. * Twisted Straps: A single twist in a strap reduces its effective strength and can create pressure points. Straighten them every time. * Aftermarket Products: Head supports, strap covers, and seat inserts not sold by your car seat brand are not crash-tested with your seat. They can interfere with the harness path or create slack. Stick to the manufacturer’s strap covers or infant insert only. * Harness Over the Shoulder Pads: The straps must go under any removable shoulder pads. The pads are for comfort, not part of the restraint system.
The NHTSA car seat safety guidelines explicitly warn against using unapproved accessories for this reason.
When the Fit Changes: Adjusting as Your Baby Grows
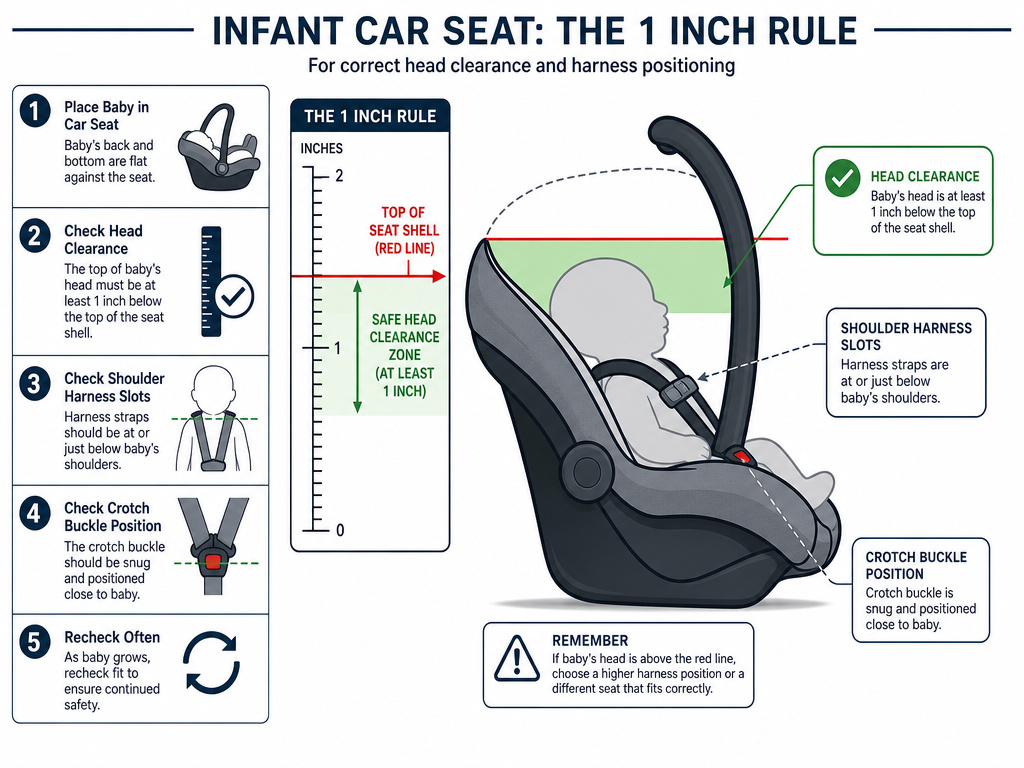 Your baby will grow faster than the car seat manual. You are not “setting and forgetting.”
| Growth Milestone | Required Harness Adjustment | Risk If Ignored |
|---|---|---|
| Shoulders rise above current strap slot | Move straps to next higher slot (still at/below shoulders) | Straps above shoulders create a ramp, loading the neck in a crash. |
| Top of head within 1 inch of seat shell top (Chicco/Cybex rule) | Child has outgrown the seat; transition to a convertible seat. | Head is not contained by the shell, risking impact with vehicle interior. |
| Crotch buckle feels tight or presses upward | Move buckle strap to the next farther position. | Discomfort leads to loose harnessing; buckle can cause injury. |
The most critical limit is height. For a Chicco KeyFit Max or a Cybex Cloud G Pro, the top of the child’s head must be at least 1 inch below the top of the seat shell or headrest. This is a non-negotiable, model-specific rule. When the child’s head reaches that line, the seat no longer contains them properly. It’s time for a convertible car seat.
You’ll also need to know when to take the infant car seat insert out, typically around 11 pounds. Keeping it in too long restricts the child and affects harness routing.
Installation: The Foundation the Harness Depends On
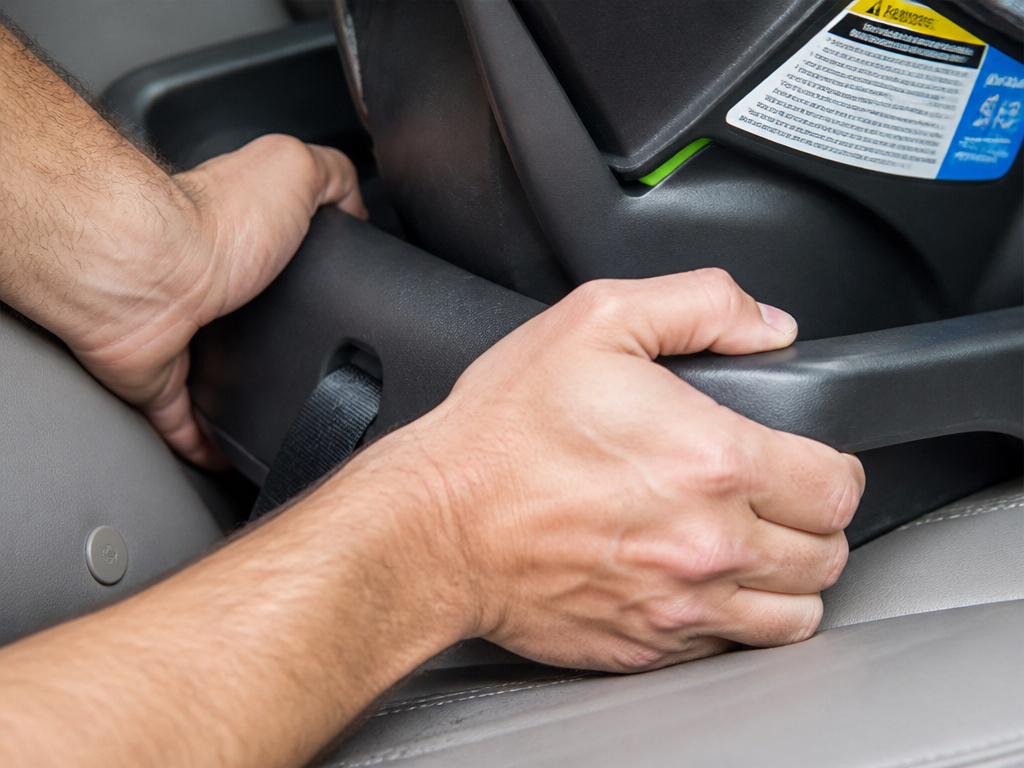 A perfectly strapped-in child is only safe if the car seat itself is secured to the vehicle. The harness and the installation are a system. A loose seat magnifies every force.
You have two approved methods: the vehicle seat belt or the LATCH system (Lower Anchors and Tethers for Children). You can never use both together. The Mayo Clinic car seat safety guide lists this as a top error.
Whether you’re installing a car seat with LATCH or a seat belt, the final test is the same. Grasp the seat at the belt path (where the belt or LATCH strap goes through the base) and try to move it side-to-side and front-to-back.
It should not move more than 1 inch (2.5 cm) in any direction. If it does, kneel into the seat base and tighten further. This 1-inch rule is as important as the harness pinch test.
Frequently Asked Questions
How tight should infant car seat straps really be?
The straps should be snug enough that you cannot pinch any vertical fold of the webbing at the child’s shoulder. You should be able to slip only a finger or two between the strap and the child’s collarbone. The child should not be able to slouch or slump forward.
Where should the chest clip go on an infant car seat?
The chest clip must be positioned at the child’s armpit level. This ensures the shoulder straps stay positioned over the strong bones of the shoulders and chest. A clip over the soft abdomen or near the neck is dangerous and ineffective.
Can I use aftermarket strap covers or head supports?
No. You should only use accessories that are sold by and approved by your specific car seat manufacturer. Aftermarket products have not been crash-tested with your seat and can interfere with the harness system, creating dangerous slack or altering the fit.
How do I know when to move the harness straps up?
Move the harness straps to the next higher set of slots when the child’s shoulders rise above the current slots. For a rear-facing infant, the straps must still be at or just below the shoulders. You should never have the straps above the shoulders when rear-facing.
What does it mean if the car seat moves more than 1 inch?
If the installed car seat moves more than 1 inch (2.5 cm) at the belt path, it is not installed tightly enough. A loose installation allows excessive movement in a crash, increasing the risk of injury. Re-tighten the seat belt or LATCH strap, using your weight to press the base down as you pull.
The Bottom Line
Strapping in an infant car seat correctly boils down to three measurable checks: straps at or below the shoulders, chest clip at the armpits, and zero slack in the pinch test. The 1-inch rule governs both the harness and the seat’s installation. This isn’t about perfectionism; it’s about physics. Crash forces are brutal and instantaneous. A half-inch of webbing slack or seat movement translates into inches of uncontrolled travel for your child’s body. Check the fit every trip. Adjust the straps with every growth spurt. And when your child’s head reaches that 1-inch line from the top of the shell, move them to their next seat. That’s how you buy the safety the seat is engineered to provide.
