
How to Properly Buckle a Newborn in a Car Seat: A Safe Guide
This post contains affiliate links. As an Amazon Associate, we earn from qualifying purchases.
To properly buckle a newborn in a car seat, you must secure a 5-point harness with the shoulder straps at or just below the shoulders, the chest clip at armpit level, and the harness tight enough that you cannot pinch a horizontal fold in the strap. The car seat must be rear-facing and installed with less than one inch of movement at the belt path. Never place blankets or bulky clothing between the child and the harness.
The harness tightness rule is the one parents get wrong most often. A loose strap lets the child’s body move several inches in a crash, multiplying the force on their neck and spine. The difference between snug and loose is about two finger-widths of webbing.
What follows is the five-point physical checklist every car seat manual assumes you know, the one mistake that voids the seat’s safety rating, and the two tools that make the job consistent.
Key Takeaways
- Shoulder straps must be at or below the newborn’s shoulders in a rear-facing seat. Straps above the shoulders force the child down and out in a collision.
- The chest clip is a pre-crash positioner, not a restraint. It must sit at armpit level to keep the shoulder straps correctly placed over the collarbones.
- Perform the pinch test on the harness strap at the collarbone. If you can pinch a horizontal fold of webbing, the harness is too loose.
- Bulky winter coats and snowsuits compress on impact, creating dangerous slack. Use thin layers and a blanket over the buckled harness instead.
- A car seat is correctly installed when it moves less than 1 inch side-to-side or front-to-back at the vehicle’s belt path.
The 5-Point Harness Checklist
A car seat harness has five connection points: two at the shoulders, two at the hips, and one at the crotch. Your job is to position and tighten all five as a single system. Missing one point compromises the entire restraint.
Start by placing your newborn in the seat with their back and bottom flat against the backrest. Their legs should bend naturally over the edge of the seat cushion.
The Pinch Test: After buckling, try to pinch the harness strap vertically at your child’s collarbone. If your fingers slide off the strap without grabbing a horizontal fold, the harness is snug enough. If you can pinch a fold of webbing, tighten the strap further. This test is cited verbatim in the Graco SNUGRIDE 35 ELITE manual.
Shoulder Strap Height. This is the most common setup error. For a rear-facing newborn, the harness straps must thread through slots at or just below the child’s shoulders. Straps above the shoulders create a dangerous downward vector in a crash. Most seats have multiple harness height slots; you adjust them by rethreading the straps, not by pulling them up. The Peg Perego manual specifies you must remove the child and loosen the harness completely before changing the strap height.
Chest Clip Position. The chest clip is not a secondary buckle. Its sole job is to hold the shoulder straps in the correct position over the child’s strong collarbones before a crash occurs. It must be positioned at armpit level. A clip placed too low rests over the soft abdomen and can cause internal injury. A clip too high rests against the neck.
Where This Goes Sideways: Bulky Clothes and Blankets
The manual for the Peg Perego PRIMO VIAGGIO is explicit: “In winter time do not put bulky clothes or extra blankets between the body and the harness.” This isn’t a comfort suggestion. It’s a physics problem.
A puffy coat or snowsuit compresses dramatically under crash forces. What was a snug harness over a 3-inch-thick coat suddenly has 2.5 inches of slack as the coat flattens. That slack allows the child’s body to ram forward into the harness, risking ejection or severe internal injury. The same risk applies to any blanket or bunting bag placed under the straps.
The safe alternative is to dress your newborn in thin, warm layers like fleece. Buckle the harness snugly against their body, then tuck a blanket over their lap and the already-tight straps. You can also put their coat on backwards after they are secured.
How to Tighten the Harness Correctly
You tighten the harness by pulling the adjustment strap located at the front of the seat, between the child’s legs. Pull slowly and steadily until all slack is removed from the shoulder and lap portions. You should see the harness webbing lie flat and straight without twisting.
Common mistake: Tightening only the shoulder straps. The lap straps over the hips must also be snug. A loose lap strap allows the child’s pelvis to submarine forward under the harness, concentrating crash forces on their soft abdomen.
For most seats, you loosen the harness by pressing and holding a release button near the adjuster strap, then pulling up on the shoulder straps. Never leave more than a finger’s width of slack. The Children’s Hospital of Philadelphia recommendations state you should not be able to pinch any excess webbing.
If you’re struggling to get it tight enough, check for twists in the straps or confirm the child’s back is fully flat against the seat. A newborn insert can help position a smaller infant correctly, ensuring a safer and more secure first car seat ride.
The Installation: LATCH vs. Seat Belt
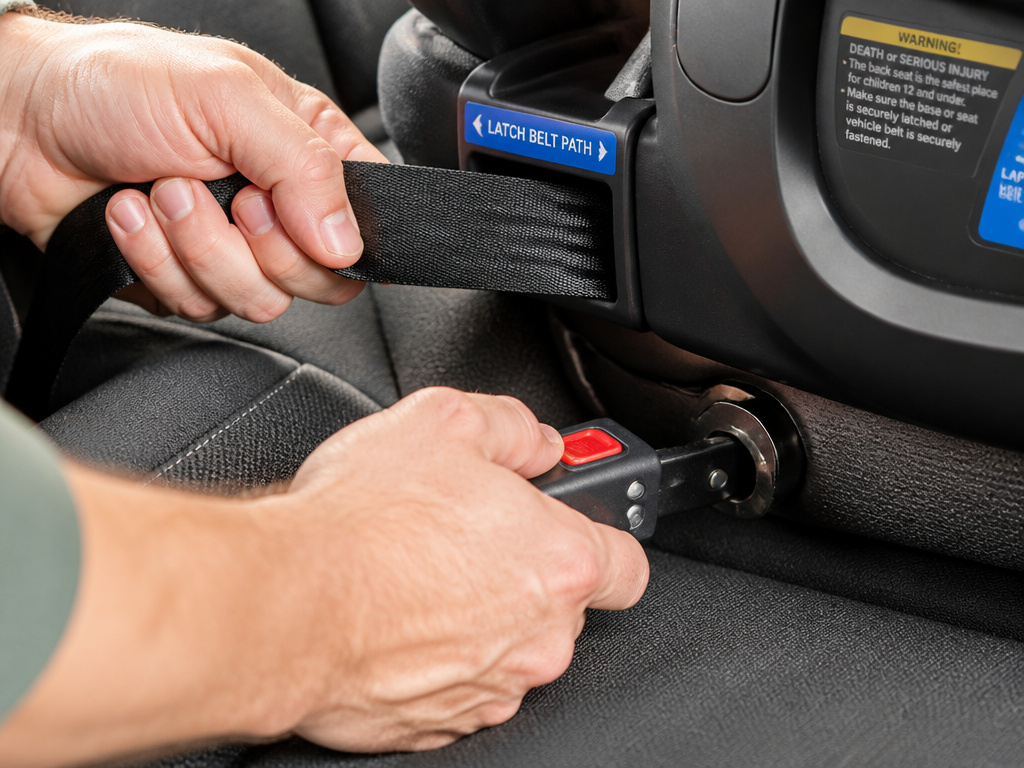 A perfectly buckled child is only safe if the car seat itself is secured to the vehicle. You have two approved methods: the LATCH system (Lower Anchors and Tethers for Children) or the vehicle’s seat belt. The federal car seat regulations state you must use one or the other, never both together.
| Installation Method | Best For | Critical Check |
|---|---|---|
| LATCH System | Newer vehicles (model year 2003+). Often easier to get a tight fit. | Combined weight of child + seat must be under 65 lbs. Check seat label. |
| Vehicle Seat Belt | Older vehicles, center rear seat (often lacks LATCH), or when child+seat exceed LATCH weight limit. | Belt must be locked. Use locking clip if vehicle lacks a switchable retractor. |
For a rear-facing seat, the belt or LATCH strap must be routed through the correct belt path, usually marked with a blue label. Once installed, grab the seat at the belt path and try to move it side-to-side and front-to-back. It should not move more than 1 inch in any direction. This 1-inch rule is a non-negotiable spec from the Graco SNUGRIDE manual.
If using a seat belt, you must lock it. Most modern cars have a switchable retractor: pull the shoulder belt all the way out until it clicks, then let it retract while keeping tension. If your belt doesn’t lock this way, you need a locking clip. This step is where most buckling an infant car seat attempts fail.
When to Adjust and When to Move On
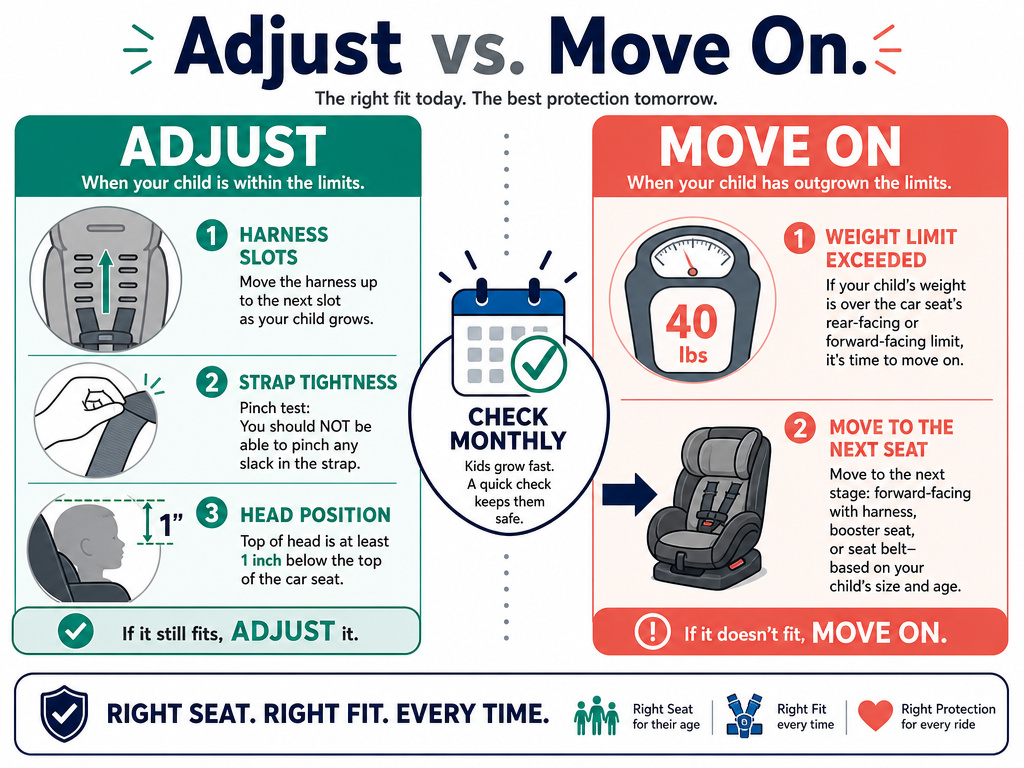 Your newborn will grow quickly. You need to know when to adjust the harness and when the seat itself is outgrown.
Adjust the harness height when the child’s shoulders rise above the current strap slots. You’ll be rethreading the straps every few months.
Remove the newborn insert when the child’s shoulders are above the bottom harness slots or their head is within an inch of the seat shell. The insert is for positioning, not padding; using it too long can create a dangerous gap between the child’s back and the seat. Follow the guidelines for removing the newborn insert in your manual.
The seat is outgrown rear-facing when the top of the child’s head is less than one inch from the top of the car seat shell OR they exceed the seat’s rear-facing weight limit (commonly 35, 40, or 50 lbs). The one-inch rule is another direct spec from manufacturer manuals. They outgrow it by height long before they outgrow it by weight.
Frequently Asked Questions
How do I know if the harness is tight enough?
Perform the pinch test. Try to pinch the harness strap vertically at the child’s collarbone. If your fingers slide off without grabbing a horizontal fold of webbing, it’s tight enough. If you can pinch a fold, tighten further. This is the standard method taught by certified technicians.
Can I use aftermarket head supports or strap covers?
No. Do not add any product not provided by the car seat manufacturer, including head huggers, strap covers, or bunting bags. These are not crash-tested with your seat and can interfere with harness function. For head and neck support, use only the approved insert that came with your seat and ensure proper recline.
Why does my newborn’s head slump forward in the car seat?
This is common and is often a sign of incorrect recline angle. A rear-facing seat for a newborn should be reclined enough so the baby’s head does not flop forward. Check the seat’s built-in level indicator. You can also use a tightly rolled receiving blanket placed on either side of the baby’s head (outside the harness) for support, as recommended by many hospitals. Learn specific techniques to keep a newborn’s head upright.
Is it safe for my newborn’s spine to be in a car seat?
Yes, when used correctly. A properly reclined rear-facing seat supports the newborn’s natural C-shaped spinal curve. The concern for spinal development arises from prolonged, continuous time in the seat outside the vehicle. Limit car seat time to travel only, and never let your baby sleep in the seat when it’s not installed in the car. The car seat safety for newborn spines is well-documented when these usage rules are followed.
The Bottom Line
Buckling a newborn is a mechanical procedure, not an art. Follow the five-point checklist: shoulder height, chest clip, pinch test, thin layers, and a one-inch install. The harness should be so snug it feels wrong—that’s when it’s right.
The stakes are in the numbers from a peer-reviewed infant restraint research analysis: up to 90% of car seats are used incorrectly. Most of those errors are in harness fit and installation tightness. Your best resource after the manual is a free inspection from a certified Child Passenger Safety Technician. They’ll spot the gap you didn’t feel and show you the click you didn’t hear.
