
Steps for How to Buckle a Car Seat Without Base Correctly
This post contains affiliate links. As an Amazon Associate, we earn from qualifying purchases.
To buckle a car seat without a base, you must route your vehicle’s lap and shoulder belt through the car seat’s specific belt path, lock the seat belt, and tighten it until the seat moves less than one inch side-to-side. Then, secure your child in the seat’s 5-point harness, ensuring the chest clip is at armpit level and you cannot pinch any slack in the straps. Models like the Peg Perego Primo Viaggio require a visual level check, and a locking clip is mandatory if your vehicle belt doesn’t lock on its own.
This process isn’t a generic one-size-fits-all. The belt path, where the lap and shoulder portions of your seat belt thread through the car seat’s shell, is different for every model. Getting that path wrong is the single most common reason an installation feels tight but fails in a crash.
What follows: the universal first step every installation shares, the model-specific details for major brands, the non-negotiable final checks, and the one tool you must have if your car is older than 1996.
Key Takeaways
- The belt path is everything. It’s molded into the car seat’s shell or handle, and using the wrong one creates a dangerous false sense of security.
- Lock the seat belt. Most modern cars have locking retractors; if yours doesn’t, you must use a locking clip. An unlocked belt will loosen.
- Tighten, then check. After threading and locking, put your weight into the seat and pull the belt tight. The car seat should not move more than one inch side-to-side or front-to-back at the belt path.
- Harness before belt. Always buckle and tighten the child into the car seat’s 5-point harness before you install the seat in the vehicle. A snug harness is the primary restraint.
- Audible clicks are mandatory. The car seat buckle and, for some models like Cybex, the harness connectors must produce a distinct click. Pull on each tongue to verify.
The Universal First Step: Finding Your Belt Path
Open your car seat’s manual. Right now. If you don’t have the physical copy, the model number is on a sticker on the seat itself, search it online to download the PDF. This advice is mandatory, following the law of physics.
Every car seat certified for use without a base has a specific belt path designed to channel crash forces into the seat’s strongest points. There is no universal diagram. The Peg Perego Primo Viaggio 4.35 routes the lap belt through slots in the carry handle and the shoulder belt through a rear slot. The Joie i-Snug 2 uses side guides for the lap belt and a rear guide for the shoulder belt. The Cybex Cloud T has a dedicated “carrier-only” belt path marked on the shell.
Common mistake: Assuming the belt path is the same as when using the base. It almost never is. Installing with both the lap and shoulder belt through the carrier-only path on a Cybex, for example, is explicitly warned against in the manual and compromises the seat’s integrity.
Using the correct path is how you secure a car seat without the base in a way that meets federal safety standards. Guessing here voids the entire process.
How Your Vehicle’s Seat Belt Actually Locks
Your car’s seat belt is the anchor. If it doesn’t stay locked under tension, the whole installation is for nothing. There are three main types of locking mechanisms in vehicles, and you need to know which one you have.
First, try the simple test. Pull the shoulder belt all the way out. Does it retract smoothly, or does it make a ratcheting sound as it goes back in? That ratcheting sound is a switchable retractor, it’s locked. Many cars from the last 25 years have this. Second, some belts lock at the buckle (a locking latchplate). You’ll feel it click into place and not slide along the webbing. Third, some older belts do neither, they are emergency locking retractors (ELR) that only lock in a sudden stop or crash. These are the problem.
If your belt is an ELR type, you cannot install a car seat without a base safely without a locking clip. This isn’t a suggestion. The NHTSA car seat safety guide states that with a non-locking belt, a locking clip is required to prevent dangerous slack.
| Belt Type | How to Identify | Action Required |
|---|---|---|
| Switchable Retractor | Pull belt all the way out; it ratchets/retracts slowly. | Pull fully out to engage lock mode before threading. |
| Locking Latchplate | The metal latchplate has a moving piece that grips the belt webbing. | Buckle it; the latchplate locks automatically against slippage. |
| Emergency Locking Retractor (ELR) | Belt retracts smoothly with no ratchet; latchplate slides freely. | You must use a locking clip. Install it within 1/2 inch of the buckle. |
Step-by-Step: Buckling the Seat Into the Car
This sequence assumes you’ve already placed your child in the car seat and secured the 5-point harness. The harness is step one. The vehicle belt is step two.
- Position the seat. Place the car seat firmly against the back of the vehicle seat, facing the rear. The vehicle should be on level ground.
- Thread the lap belt. Route the lap portion of your vehicle’s seat belt through the car seat’s designated lap belt path. This is usually through slots in the carry handle or molded channels on the sides of the shell. Buckle it.
- Route the shoulder belt. Drape the shoulder portion of the belt around the back of the car seat, following the specific guide (rear slot, over the handle, etc.) shown in your manual.
- Lock the belt. Engage your seat belt’s locking mechanism. For a switchable retractor, you did this when you pulled it all the way out. For a locking latchplate, it happens at the buckle.
- Tighten. Put one hand on the car seat near where the child’s legs would be and press down hard with your weight. With your other hand, pull the shoulder belt webbing to remove all slack from the lap portion. You should see the car seat compress into the vehicle seat cushion.
- Check for movement. Grab the car seat at the belt path and try to move it side-to-side and front-to-back. It should not move more than one inch in any direction. If it does, re-tighten.
Where this goes sideways: Tightening only the shoulder belt. The lap belt does the primary job of holding the seat down. If the lap belt is loose, the seat can rotate or submarine in a crash, even with a tight shoulder strap. Always pull slack from the lap belt first.
This method is how you strap a car seat in without a base securely. If the belt is too short to complete this routing, some models, like the Peg Perego, allow an alternate method using only the lap belt through the handle slots. Your manual has the final say.
Model-Specific Checks You Cannot Skip
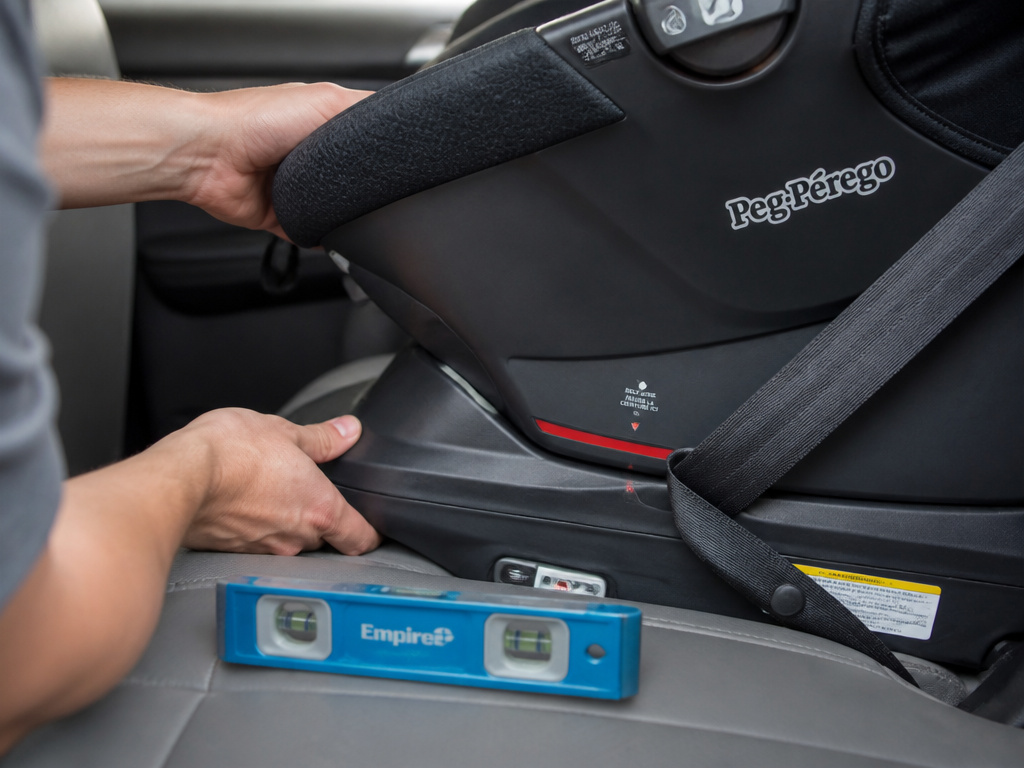 Once the seat belt is tight, the job isn’t done. Your specific car seat model has at least one additional verification step printed in the manual and often on the seat itself. These are not suggestions.
Peg Perego Primo Viaggio 4.35 / 4-35 Nido: Look for a red line on the side of the car seat shell. When the installation is complete and tight, this line must be level with the ground. If it’s tilted, the seat is over-reclined or too upright, which affects the harness geometry on your child. You must uninstall and adjust the angle by adding or removing support (like a rolled towel) under the car seat’s front edge.
Cybex Cloud T & Cloud G Pro: These seats emphasize an audible click. When inserting the harness buckle tongues into the chest clip, you must hear a distinct click. The manual then instructs you to pull on each tongue to verify they are secure. The same goes for connecting the seat to a stroller. No click means it’s not locked.
Joie i-Snug 2: Check the level line on the infant carrier module. It must be level to the ground after installation. The manual also warns that the seat “cannot be used if the vehicle safety belt buckle is too long to anchor the infant carrier module securely.” If the buckle stalk is so long it prevents a tight fit, you need a different seating position.
These checks exist because a proper car seat installation guide goes beyond just a tight belt. It ensures the seat is in the correct position to protect your child’s airway and spine.
The Final Two Checks Before Driving
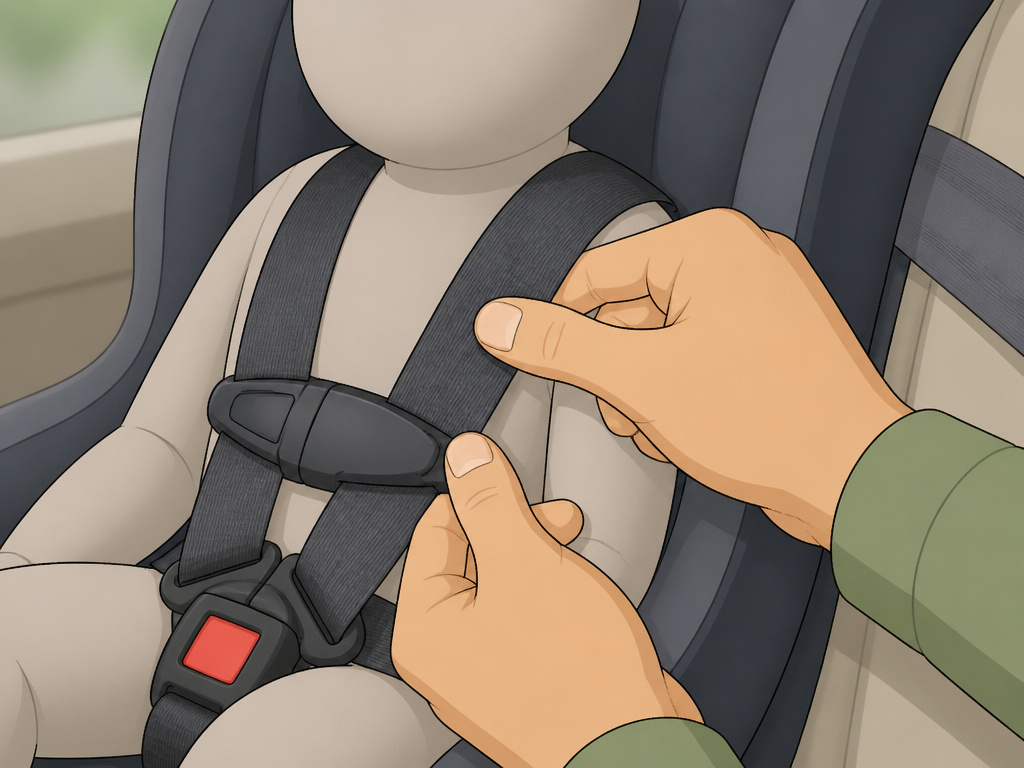 Before you turn the key, do these two things. They take ten seconds and catch the majority of critical errors.
The Pinch Test. On the harness straps over your child’s shoulders, try to pinch the webbing vertically between your thumb and forefinger. If you can pinch any material, the harness is too loose. Tighten it until the webbing lies flat and you cannot pinch a fold. A loose harness is the number one cause of injury, the child can be ejected from the seat within the shell.
The Chest Clip Position. The plastic chest clip is not a decoration. It must be positioned at your child’s armpit level. Too low (on the belly) puts pressure on soft organs in a crash. Too high (on the neck) is a choking hazard. It also serves to keep the shoulder straps properly positioned on the body.
Worth knowing before you start: The chest clip is not a load-bearing piece. It’s a pre-crash positioner. The real crash forces are handled by the harness straps where they attach to the seat’s shell. A correctly positioned clip ensures those straps are on the strong parts of the child’s skeleton, the shoulders and hips.
When You Must Use a Locking Clip (And How)
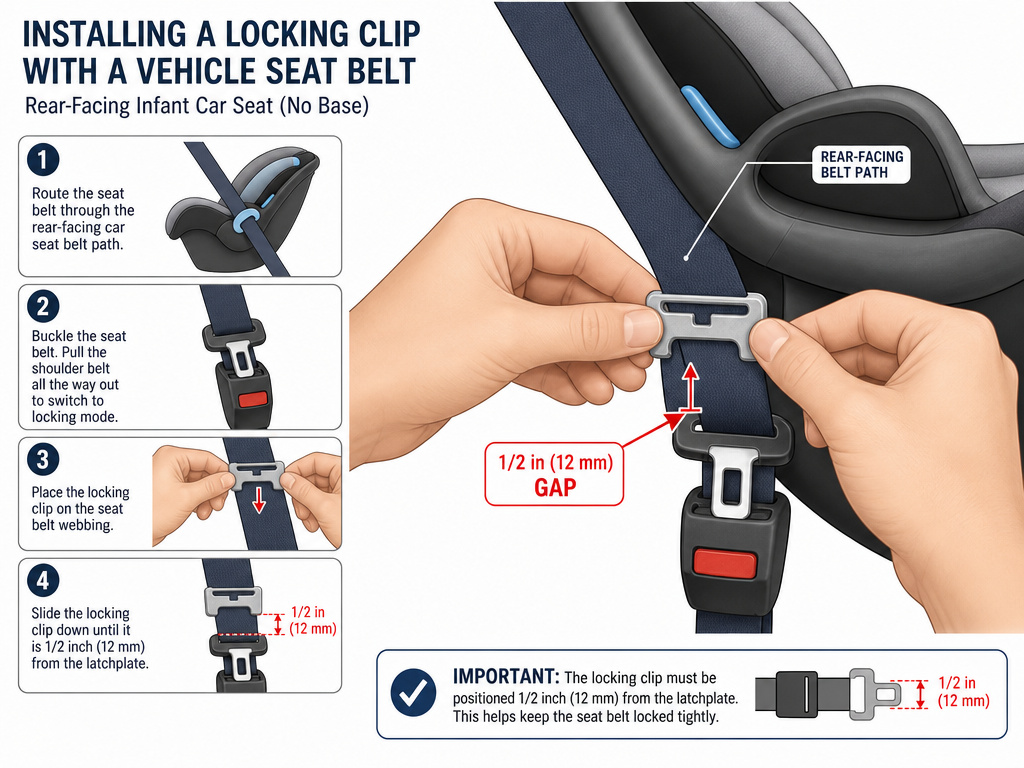 This is the tool most parents hope they never need. If your vehicle has a sliding latchplate (ELR) seat belt, you need one. New locking clips usually come with the car seat or can be purchased for a few dollars. Never use a used or rusty one.
The rule is simple: the locking clip must be placed on the seat belt webbing within half an inch of the latchplate. It holds the lap and shoulder portions together, creating a fixed point that prevents slippage.
Here’s the drill. Buckle the seat belt through the car seat’s belt path. Before tightening, hold the lap and shoulder belts together just above the buckle. Unbuckle the belt while still holding them. Slide the locking clip onto both straps, leaving that half-inch gap. Re-buckle the belt. Now you can tighten as normal. The clip, not the retractor, now keeps the belt locked.
This precise procedure is why understanding your vehicle’s belt type is non-negotiable for a safe to use car seat without base installation. Skipping the clip with a non-locking belt means the installation will fail in a sudden stop.
Frequently Asked Questions
Can I install any infant car seat without its base?
Most, but not all. You must check the specific car seat manual. Nearly all infant seats sold in the U.S. Are certified for installation with a seat belt only, but the manual will state this explicitly. Some European models have different rules. Always verify.
Is it safe to use the car seat without the base in a taxi or rideshare?
Yes, if you can achieve a proper installation. This is the primary reason to learn this skill. The base is for convenience in your personal vehicle. The seat belt installation is for every other car your child rides in. Practice at home first so you’re not fumbling on the curb.
How do I know if my seat belt locks?
Perform the test described in the table above. Pull the shoulder belt all the way out. Listen for a ratchet. If it retracts smoothly, try to pull more webbing out from the retractor while the belt is buckled, if it gives, it’s not locked. Your vehicle’s owner’s manual will also state the belt type.
The car seat seems to wiggle a bit even when the belt is tight. Is that okay?
No. The “one inch” rule is absolute. Movement at the belt path means energy from a crash will be spent jerking the seat around instead of being managed by the seat’s structure. Check for twisted seat belt webbing. Make sure you’re pressing down with significant weight when tightening. If it still moves, try a different seating position in the vehicle or consult a car seat installation guide for your specific model.
Why does my car seat manual say to use the base if possible?
Bases are designed for easier, more consistent correct installation. They also often provide a better, more upright recline angle for the baby. A base is highly recommended for daily use in your primary vehicle. Knowing how to install in the middle seat or in other cars without the base is a backup skill, not a replacement.
Before You Go
Buckling a car seat without its base is an essential skill. It relies on three pillars: the exact belt path for your model, a definitively locked vehicle seat belt, and a harness tightened past the point of parental comfort.
The Peg Perego’s red line, the Cybex’s audible click, and the mandatory locking clip are the verification steps that bridge the gap between ‘seems tight’ and ‘is safe.’ Print your manual.Practice the install on a rainy afternoon when there’s no pressure. Your ability to do this correctly in a rental car, a grandparent’s sedan, or a taxi is what keeps your child protected when the base isn’t there.
