
How to Install a Car Seat Base in the Middle Seat Properly
This post contains affiliate links. As an Amazon Associate, we earn from qualifying purchases.
Installing a car seat base in the middle seat requires two checks first: your vehicle’s LATCH anchor spacing and your car seat manual’s limit. If the anchors are more than 22 inches apart or your manual forbids center LATCH use, you must use the vehicle seat belt instead.
That spacing number is the pivot. The Graco GoMax manual says its lower anchors need exactly 11 inches. The UPPAbaby MESA V2 manual draws the line at 22. Your vehicle manual is the final word on whether the center position is even approved for LATCH. This isn’t just about tightness; it’s about the geometry of the mounting points and whether the base can bridge that gap without stressing the straps. Get the spacing wrong, and a crash pulls the base sideways.
What follows is the three-part sequence: verify your vehicle, choose your method (LATCH or belt), and lock it down. We’ll cover the 1-inch movement test, the recline angle everyone misreads, and what to do when your seat belt won’t lock.
Key Takeaways
- The vehicle owner’s manual overrules everything. It dictates if the center seat has LATCH anchors and if they’re approved for use.
- Check LATCH spacing. If the anchors are more than 22 inches apart, or beyond your specific base’s limit (like the GoMax’s 11 inches), you must use the seat belt.
- The recline level indicator must be flush with the ground, not just “in the zone.” A base tilted too upright can let an infant’s head slump forward.
- A proper install moves less than 1 inch side-to-side at the belt path, not the top of the seat. Testing at the top gives a false pass.
- If your vehicle’s seat belt doesn’t lock, you need a locking clip. Most bases include one stored underneath.
Before you start: Never install a rear-facing base in front of an active airbag. Always place it in the back seat. Bulky winter coats prevent a tight harness fit, strap the child in first, then drape coats or blankets over the buckled harness.
Your Vehicle Manual Is the First Step
Your car’s manual isn’t a suggestion. It’s the engineering spec for where and how a child restraint can be attached. This is where you confirm three things: if your rear center seat has dedicated lower anchors, if the manufacturer approves their use for a car seat, and what the exact spacing is.
Common mistake: Assuming all center seats have LATCH. Many vehicles have anchor sets only for the outboard seats, and the center position must use the seat belt. Some newer models have a dedicated center LATCH, but the spacing often exceeds 22 inches.
Look for the symbols, a small anchor icon usually marks the spot. Run your fingers along the seat crease near the backrest. The anchors are metal bars between the seat cushion and back. Measure the distance between them. If it’s over 22 inches, your LATCH base installation is off the table. Cross-reference this with your car seat manual. The UPPAbaby MESA V2, for example, explicitly states it cannot be used with lower anchors in the center if the spacing exceeds 22 inches.
If the manual is silent or says not to use LATCH in the center, that’s your answer. The seat belt is your only safe option. This isn’t a compromise; it’s following the tested and certified method for your specific vehicle.
The LATCH vs. Seat Belt Decision
You have two paths: Lower Anchors and Tethers for Children (LATCH) or the vehicle seat belt. The safest method is the one your vehicle and car seat manuals agree on.
| Method | Best For | When You Can’t Use It |
|---|---|---|
| LATCH (Lower Anchors) | Vehicles with approved, spaced-under-22-inch center anchors. Quicker, often easier to get tight. | Anchor spacing over 22 inches, vehicle manual prohibits center LATCH use, or car seat manual specifies a lower limit (e.g., Graco GoMax’s 11 inches). |
| Vehicle Seat Belt | Any center seating position. The universal fallback. Required when LATCH spacing is too wide or not approved. | Never. This method always works if the belt is in good condition and can be locked. |
The federal NHTSA infant car seat installation guide states both are equally safe when installed correctly. The choice isn’t about safety level; it’s about compliance. If your vehicle has a center LATCH system approved for use and your car seat fits the spacing, use it. It’s often simpler. If not, the seat belt is just as safe.
This is the core of a safe middle seat installation. The middle is statistically safest, but only if the restraint is properly secured using the right hardware for your car.
Step-by-Step: Installing the Base
Park on level ground. This is non-negotiable for checking the recline angle later. Grab both manuals, car seat and vehicle.
If using LATCH:
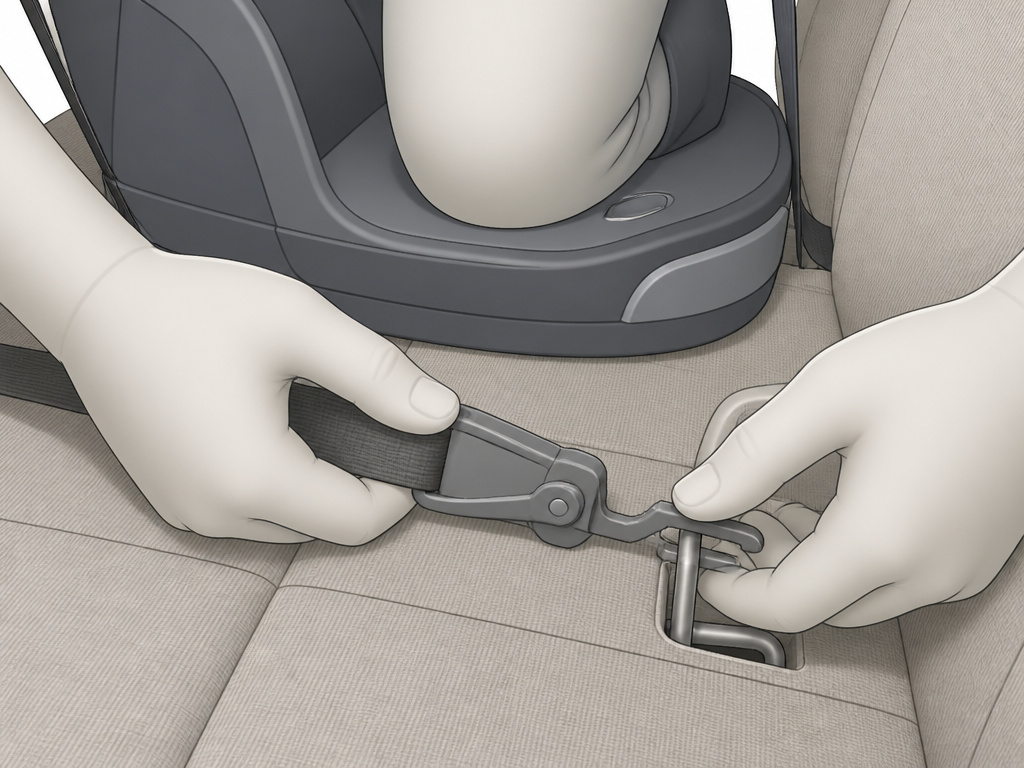 1. Locate the lower anchors in your vehicle’s seat bight.
2. Attach your base’s LATCH connectors to the anchors. A firm click or positive latch is what you want.
3. Press down into the vehicle seat with your knee and pull the LATCH strap tight. Remove all slack.
4. Check the recline indicator. Adjust the base’s foot until the level line is parallel to the ground.
If using the seat belt:
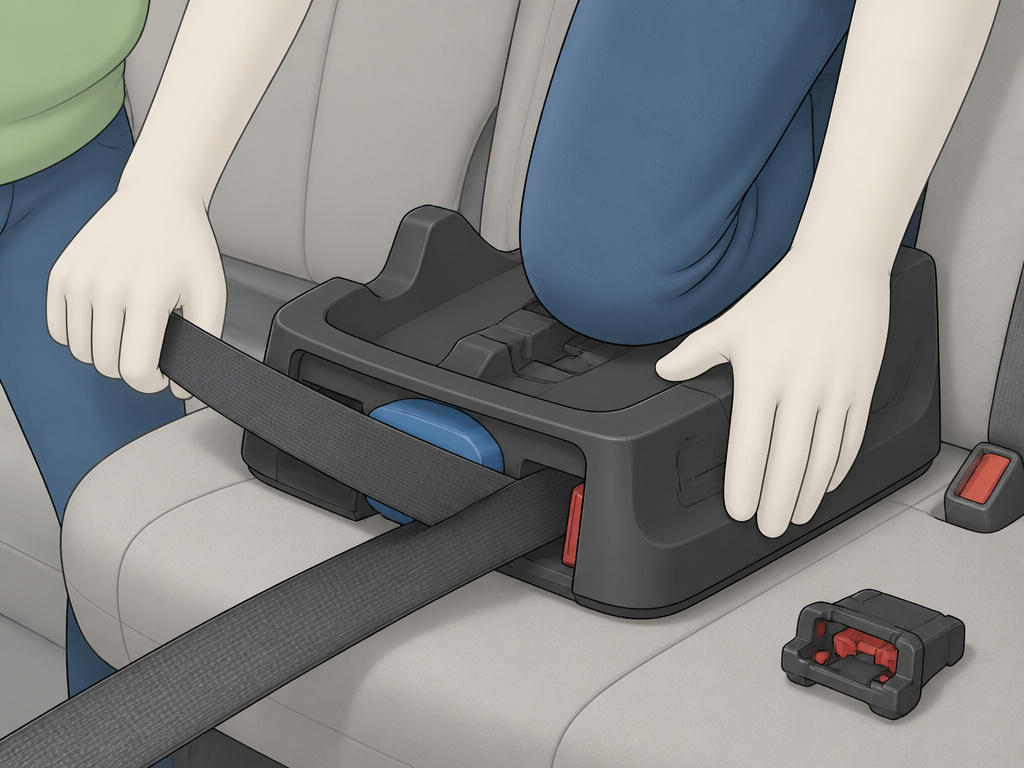 1. Place the base flat on the seat.
2. Thread the seat belt through the rear-facing belt path marked on the base. Ensure the belt isn’t twisted.
3. Buckle it. Now, lock the belt. Most modern belts lock at the retractor by pulling them all the way out and letting them retract slowly. You’ll hear a ratcheting sound.
4. Press down hard on the base with your knee and pull the loose end of the seat belt to tighten.
5. Check the recline indicator and adjust.
Where this goes sideways: Not locking a sliding latchplate. If your car has an older seat belt with a sliding latchplate (the buckle piece), it cannot lock on its own. You must use a locking clip, a small metal H-shaped piece included with your base. It pinches the belt webbing 1 inch from the latchplate after you tighten, preventing slippage.
The 1-Inch Movement Test (And Why It’s Wrong)
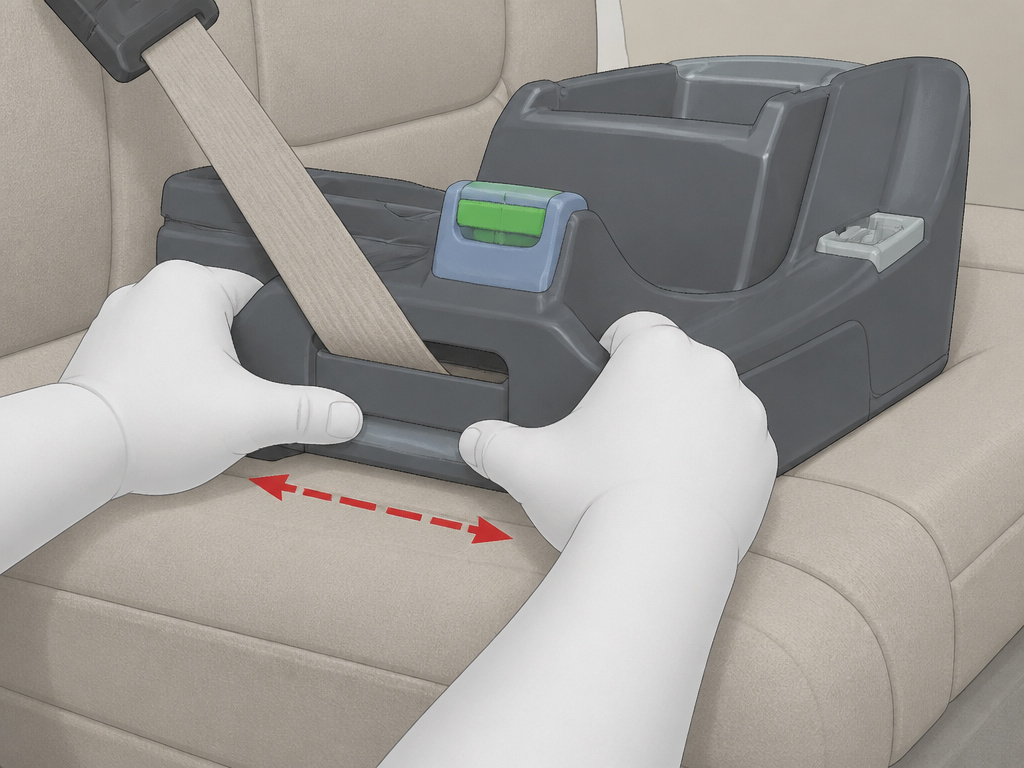 Every manual says the same thing: the base should not move more than 1 inch side-to-side or front-to-back at the belt path. People fail this test by grabbing the top of the seat and wiggling.
The belt path is where the seat belt or LATCH strap routes through the base. That’s the pivot point. Grasp the base there, where it’s anchored, and try to move it. You’re testing the connection to the car, not the flexibility of the plastic shell.
If it shifts more than an inch, you don’t have it tight enough. Re-engage your knee, put your full weight into the seat cushion, and pull the strap or belt again. This is the most physically demanding part of the job. A proper car seat base installation should leave you out of breath.
Checking the Recline Angle
The level indicator, a line, bubble, or ball, isn’t a suggestion. A base angled too upright can let a newborn’s head slump forward, risking airway restriction. Too reclined, and the child isn’t properly secured.
The Graco GoMax is strict: the red level line on the side must be parallel to the ground. The bubble must sit completely within the blue lines. Not touching, but centered. This is why a level parking surface is critical. An inclined driveway throws everything off.
Adjust using the recline foot or lever on the base. You may need to add a rolled towel or pool noodle under the front edge of the base (only if the manual allows) to achieve the correct angle in a sloped vehicle seat. Never compromise on this.
What If My Car Doesn’t Have LATCH Anchors in the Middle?
This is the most common scenario. You check the manual, and it says the lower anchors are for outboard seats only, or the spacing is 24 inches. Your path is clear: use the seat belt.
The process for a middle seat without LATCH is the same as the seat belt steps above. The key difference is ensuring the belt is locked. If you pull the belt all the way out and it retracts but doesn’t lock, you have an emergency locking retractor (ELR). You’ll need that locking clip.
For a secure base without LATCH, the belt must be routed correctly and free of twists. A single twist in the webbing can reduce the belt’s strength by up to 40% in a crash. It’s a five-second fix with massive consequences.
The “Waterfall” Gap and How to Fix It
Look at the base from the side. Is there a gap between the bottom of the base and the vehicle seat near the backrest? That’s a “waterfall.” It means the base is contacting the seat back before the seat cushion, leaving space underneath.
| Symptom | Cause | Fix |
|---|---|---|
| Gap under the rear of the base | Vehicle seat cushion slopes down toward the back. | Recline the base more using its adjustment mechanism. If that doesn’t work, check if your manual permits a rolled towel or pool noodle under the front edge. |
| Base rocks side-to-side | Uneven pressure on the seat cushion or LATCH straps not equally tight. | Press down on the high side and re-tighten. For LATCH, ensure both connectors are fully latched and the strap is centered. |
A waterfall gap isn’t always a fail, but it can prevent a solid 1-inch test. The base needs even, full contact along the seat cushion to distribute crash forces. If adjusting the recline doesn’t eliminate it, consult your car seat manufacturer.
Final Safety Check Before You Click the Carrier In
Run through this list every time. A missed step is a weak point.
- Movement: Less than 1 inch at the belt path.
- Recline: Level indicator shows correct angle.
- Belt/LATCH: No twists in the webbing or strap. LATCH connectors are fully latched.
- Locking: Seat belt is locked (ratcheting sound) or a locking clip is correctly placed 1 inch from the latchplate.
- Position: Base is rear-facing. At least 80% of the base is on the vehicle seat.
- Manual: Your specific vehicle and car seat manuals were followed.
This is the moment for a correct installation check. Once the carrier clicks into place, you shouldn’t have to revisit the base unless you uninstall it.
Frequently Asked Questions
Can you always use LATCH in the middle seat?
No. It depends entirely on your vehicle. Many cars only have LATCH anchors for the outboard seats. Even if there are anchors in the middle, your car seat manual may prohibit their use if the spacing is too wide, commonly anything over 22 inches apart. Always check both manuals first.
Is the middle seat safer than the side for a car seat?
Statistically, yes. The center rear seat is farthest from any potential point of impact in a side collision. It’s why the safety of an infant car seat in the middle is often emphasized. However, a properly installed seat on either side is still very safe. The safest seat is the one you can install most securely.
What if my seat belt doesn’t lock?
You need a locking clip. All new car seats include one, usually stored on the base or in the manual pouch. Pinch the seat belt webbing together about 1 inch from the latchplate, slide the locking clip on, and rebuckle. This prevents the belt from loosening. Never use a locking clip with a seat belt that already locks on its own.
How do I know if the recline angle is correct?
Use the built-in level indicator on the base, a line, bubble, or ball. The vehicle must be parked on level ground. For a newborn, the indicator must show the base is reclined enough so the baby’s head does not fall forward. Each model has its own specific guideline; follow what’s in your manual, not a general rule.
Can I install the base myself, or do I need a professional?
You can absolutely do it yourself by carefully following the manual. However, having a second person to press down on the base while you tighten the belt can make it easier to achieve a rock-solid install. Many local fire stations or police departments offer free installation checks by certified technicians if you want a second pair of eyes.
Before You Go
The middle seat is the goal, but only if your hardware allows it. Your vehicle manual is the law. The 22-inch LATCH limit is real. If your anchors are wider or your manual says no, the seat belt is your safe, certified path.
Double-check the belt path for twists. Press down until your arms shake. Watch that level line. That’s the difference between an install and a secure install. Once it’s done, you shouldn’t doubt it.
