
Your Guide on How to Use a Convertible Car Seat Correctly
This post contains affiliate links. As an Amazon Associate, we earn from qualifying purchases.
To use a convertible car seat, you must match the seat’s configuration to your child’s exact age, weight, and height, then install it tightly using either the vehicle’s LATCH anchors or seat belt, and finally secure your child with a properly adjusted harness. The Chicco NextFit manual specifies rear-facing for children 5–40 lbs and under 43 inches tall, while forward-facing is for children at least one year old, 22–65 lbs, and under 49 inches tall.
That weight and height split is where most setups fail. Parents follow the age guideline but miss the physical fit checks, the harness slot position relative to the shoulders, the top of the ears relative to the seat shell. A seat installed perfectly is useless if the child inside doesn’t fit its specific design limits for that mode.
What follows: the three non-negotiable setup steps, the math for the lower anchor weight limit every manual hides, the visual cues that mean switch modes now, and the one post-crash check that decides if the seat is trash.
Key Takeaways
- Installation is a binary test. A properly installed convertible seat should not move more than 1 inch side-to-side or front-to-back at the belt path.
- Harness height is directional. For rear-facing, harness straps must be at or below the child’s shoulders. For forward-facing, they must be at or above.
- The lower anchors have a secret weight limit. It’s not 65 lbs. Calculate it: 65 lbs minus the weight of the car seat itself. Exceed it, and you must switch to a seat belt installation.
- Forward-facing requires the tether. Always use the top tether strap in forward-facing mode if your vehicle has an anchor. It reduces forward head movement in a crash by up to 6 inches.
- A crash usually means a new seat. If the vehicle was undriveable, the door near the seat was damaged, anyone was injured, or airbags deployed, the seat must be replaced.
The 3-Step Setup Most Parents Miss
You read the manual. You watched a video. The seat looks secure. The three steps below are the reality check, the specifics that turn a “probably okay” installation into one a certified technician would pass.
A proper car seat installation leaves no more than 1 inch of movement at the belt path when you grasp it and pull side-to-side and front-to-back. This “1-inch rule” is the universal standard for a secure fit, as emphasized in every major manufacturer’s manual.
Step 1: Match the Mode to the Child’s Body, Not Just Age.
Age is the gatekeeper, but the body is the final judge. Pull out your seat’s manual, the Chicco NextFit and Peg Perego Primo Viaggio guides are clear examples.
- Rear-Facing: Use this mode if your child meets ALL of these: weight between 5-40 lbs (Chicco) or 4-40 lbs (Peg Perego), height under 43 inches, and the harness straps thread through slots at or below their shoulders.
- Forward-Facing: Use this mode if your child meets ALL of these: at least one year old, weight between 22-65 lbs, height under 49 inches (or tops of ears below the seat shell), and harness straps at or above their shoulders.
The harness slot position is non-negotiable. It controls how the child’s body is cradled or restrained in a crash. Wrong slot direction increases injury risk.
Step 2: Choose Your Anchor. LATCH or Seat Belt, and Know Its Limit.
Every car seat needs one secure connection to the vehicle. You can use the LATCH system (Lower Anchors and Tethers for Children) or the vehicle’s seat belt. Never use both at the same time for the same seat.
The LATCH system is easier but has a hidden ceiling. The anchors themselves are rated for 65 lbs, but that’s a combined weight of child AND car seat. Your Chicco NextFit might weigh 18 pounds.
| Installation Method | Best For | Critical Limit |
|---|---|---|
| LATCH System | New installations, ease of use | Combined child + seat weight ≤ 65 lbs. (e.g., 40 lb child + 18 lb seat = 58 lbs OK) |
| Vehicle Seat Belt | Older vehicles, heavier children, center rear seats | No weight limit; must be locked per vehicle manual (usually a switchable retractor) |
Calculate your LATCH limit: 65 lbs minus your seat’s weight (found in the manual). If your child’s weight exceeds that result, you must unclip the lower anchors and reinstall using the seat belt. This switch is a major, often-missed milestone.
Step 3: The Final Tighten and Tether.
Kneel in the seat. Use your full body weight to press the car seat down into the vehicle cushion while you pull the LATCH strap or seat belt tight. Remove all slack. Then perform the 1-inch test at the belt path.
If you are installing forward-facing, find your vehicle’s tether anchor (usually on the rear shelf, seat back, or floor). Connect the seat’s tether strap and tighten it until snug. This strap is what stops excessive head whip in a frontal crash.
Securing Your Child: The Harness Check
The seat is rock-solid. Now the harness must fit the child with the same precision. A loose harness is an ejection risk.
First, thread the harness straps through the correct height slots (refer to Step 1). Place your child in the seat. Buckle the crotch buckle, then the chest clip. Pull the harness adjustment strap to tighten.
The Pinch Test is your final authority. Try to pinch the harness strap vertically at the child’s collarbone. If you can gather any material between your fingers, it’s too loose. Tighten further until the strap lies flat and you cannot pinch any slack.
The chest clip must be at armpit level. A clip too low rests on the soft abdomen. A clip too high presses on the neck.
Where this goes sideways: Dressing a child in a puffy winter coat before buckling. The coat compresses in a crash, creating inches of deadly slack. Buckle the harness snugly over thin layers, then place the coat or a blanket over the secured child.
When to Switch from Rear-Facing to Forward-Facing
The official minimum is one year AND 22 pounds. The best practice, endorsed by the American Academy of Pediatrics and brands like Chicco, is to keep your child rear-facing until they reach the maximum limits of your convertible car seat.
Your child has outgrown rear-facing when any one of these occurs: 1. They exceed the seat’s maximum rear-facing weight limit (commonly 40 or 50 lbs). 2. They exceed the seat’s maximum rear-facing height limit (the top of their head is within 1 inch of the seat shell). 3. Their shoulders rise above the top harness slot when it’s in its highest rear-facing position.
Do not rush this. Rear-facing is significantly safer for a child’s head, neck, and spine. The transition to a forward-facing convertible seat is a step down in protection, taken only when necessary.
Forward-Facing Must-Dos and Must-Haves

Once you turn the seat forward, the rules change. Your margin for error shrinks.
The tether is mandatory. If your vehicle has a tether anchor (most 2000-and-newer models do), you must use it. The tether reduces forward head excursion, how far the child’s head flies forward in a crash, by up to 6 inches. It’s the difference between a controlled stop and a violent impact with the front seat.
Harness height flips. Remember, straps must now be at or above the shoulders. The recline angle is also more upright. Most seats have an indicator for the correct forward-facing recline.
Check the fit monthly. Children grow quickly. Regularly verify that the harness height is still correct, the child’s ears are still below the top of the seat shell, and they haven’t surpassed the 65-pound harness weight limit. When they do, it’s time to research converting to a booster.
Installation Troubleshooting: Common Problems and Fixes
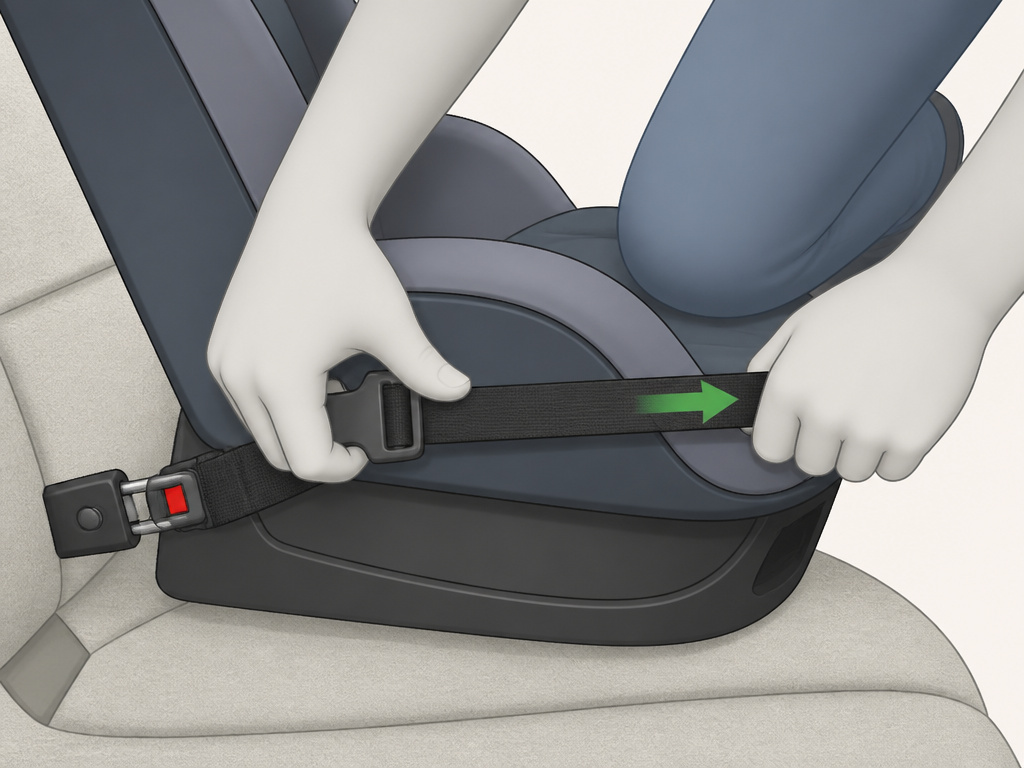
The seat moves more than an inch. The harness won’t tighten. The base won’t sit flat. These are daily frustrations.
| Problem | Likely Cause | The Fix |
|---|---|---|
| Seat is loose | Belt path not at correct angle; slack in LATCH strap | Re-thread. Kneel in seat, press down hard, pull strap tight from the buckle end. |
| Harness won’t tighten | Twisted strap; mechanism jammed with food/debris | Uninstall seat. Fully loosen harness, untwist all straps, clean buckle area. |
| Seat is crooked | Vehicle seat cushion is uneven; LATCH connectors uneven | Try a different seating position. Use a rolled towel or pool noodle under the seat base only if the manual allows to level it. |
| Can’t lock seat belt | Vehicle has a switchable retractor not engaged | Consult your vehicle manual. Pull belt all the way out until it clicks, then slowly feed it back in. |
If problems persist, stop. Your installation is not safe. Use the NHTSA car seat safety guidelines to find a certified Child Passenger Safety Technician for a free inspection. Do not guess.
What to Do After a Crash: The Replacement Rule
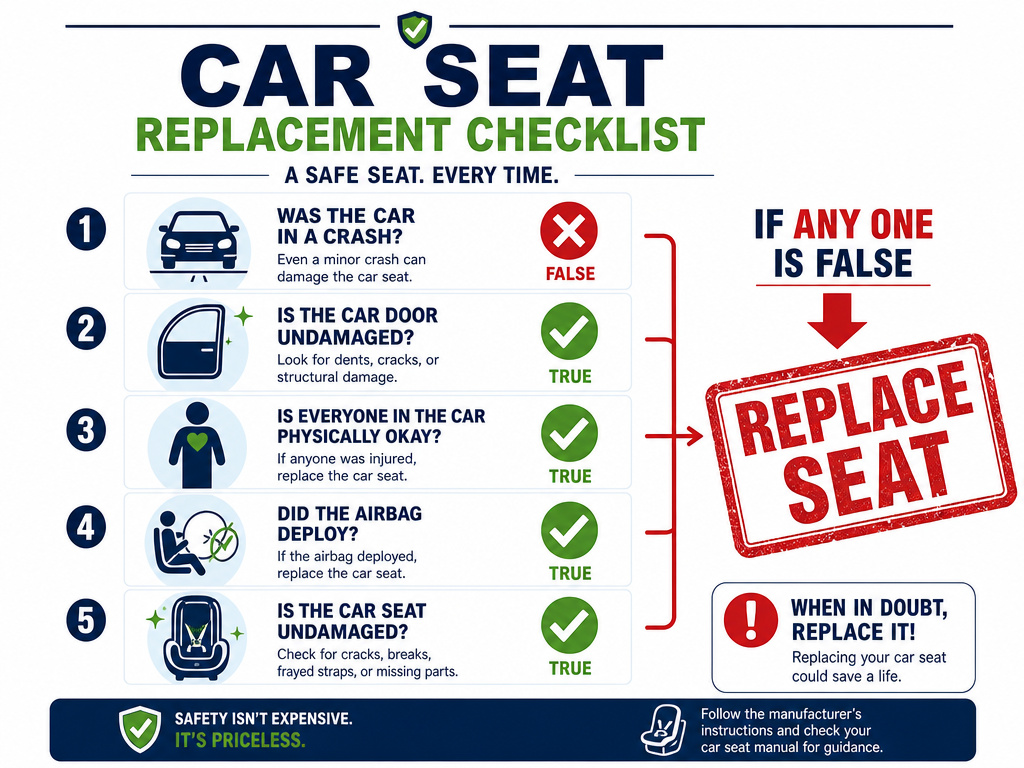
A minor fender-bender might not total your car, but it can total your car seat. The internal energy-absorbing materials are designed for one major impact.
The Peg Perego manual provides a clear, five-point checklist. The seat is likely okay only if: * The vehicle could be driven from the crash site. * The door nearest the car seat was not damaged. * No one in the vehicle was injured. * The airbags did not deploy. * There is no visible damage to the car seat.
If any one of those is false, the seat must be replaced. The damage may be internal and invisible. Most insurance policies will cover the cost of a new seat, call yours and ask. Never buy a used seat without knowing its full history, as you cannot verify this.
Maintaining Your Convertible Car Seat
A seat is a long-term investment. Proper care keeps it functioning.
- Clean only the fabric covers according to the manual. Usually, this means removing the pad (often with a zipper, like on the Chicco NextFit), machine washing cold on gentle, and air drying. Never submerge the harness straps or plastic shell in water.
- Store the manual in the seat’s designated pocket. You will need it.
- Check for recalls. Register your seat with the manufacturer to get direct notifications.
- Know the expiration date. Most seats expire 6-10 years from manufacture. The date is stamped on the plastic shell. Plastic degrades over time.
Routine maintenance is part of correct car seat installation. A clean, intact seat is a safer seat.
Frequently Asked Questions
Can I use both LATCH and the seat belt together for extra safety?
No. Never use both systems simultaneously unless the car seat manufacturer explicitly instructs you to do so for a specific model. Using both can place conflicting forces on the seat in a crash, compromising its integrity and increasing the risk of injury.
My child’s legs are bent or touching the vehicle seat while rear-facing. Is that safe?
Yes. This is perfectly safe and comfortable for children. It is far safer for a child to have bent legs than to have a forward-facing spinal load in a crash. Children are flexible and will sit cross-legged or prop their feet on the seat back.
How do I know if my car has LATCH or tether anchors?
LATCH anchors are found in the crease of the vehicle seat, usually marked by a small symbol. Tether anchors are often on the rear shelf, the back of the seat, or the floor. Your vehicle owner’s manual has a diagram showing their exact locations. Most vehicles manufactured after September 2002 are required to have them.
When should I stop using the harness and switch to a booster seat?
Follow your convertible seat’s maximum limits. Most harnesses go to 65 pounds. Once your child exceeds that weight or their shoulders go above the top harness slot, they have outgrown the harness. They should then use a belt-positioning booster seat until the vehicle seat belt fits them properly, typically around 4’9″ tall.
Is it okay to use aftermarket accessories like head supports or strap covers?
Only if they are sold by and approved by your car seat’s manufacturer. Unapproved accessories can interfere with the harness’s performance, compress in a crash, or introduce flammable materials. The AAP car seat recommendations advise against using any product that did not come with the seat or isn’t listed in its manual.
The Bottom Line
Using a convertible car seat correctly is a series of deliberate, physical checks. It’s the 1-inch test at the belt path. It’s the pinch test at the collarbone. It’s the monthly glance to see if shoulders have crept above a harness slot.
The manuals for seats like the Chicco NextFit or Peg Perego Primo Viaggio are your single source of truth, not well-meaning advice. Your child’s safety doesn’t depend on buying the most expensive seat from a list of the best convertible car seats. It depends on you matching the one you have to your child’s body, installing it tighter than you think is possible, and securing the harness snugger than feels comfortable. That’s the job.
