
How to Install a Locking Clip for a Car Seat | Full Guide
This post contains affiliate links. As an Amazon Associate, we earn from qualifying purchases.
To install a locking clip for a car seat, you must identify a non-locking seat belt (an Emergency Locking Retractor or ELR with a sliding latch plate), thread the clip onto both the lap and shoulder belt webbings exactly 1 inch (2.5 cm) from the metal latch plate, and re-buckle. The clip physically locks the belt at a fixed length, replacing the missing locking mechanism your car needs for a safe installation.
The clip isn’t a universal fix. It’s a specific tool for one specific, common vehicle belt type. Using it on a belt that already locks can damage the webbing or create a false sense of security.
What follows: how to read your seat belt’s retractor type in 10 seconds, the precise five-step clip installation that every manual agrees on, and the one test that proves you got it right.
Key Takeaways
- A locking clip is only for seat belts with an Emergency Locking Retractor (ELR) and a sliding latch plate that cannot lock on its own. Using it on a switchable (ALR) or locking latch plate belt is wrong and unsafe.
- The clip must be placed exactly 1 inch (2.5 cm) from the seat belt’s metal latch plate. Any farther and the lap belt can loosen in a crash.
- After installation, the car seat must not move more than 1 inch (2.5 cm) side-to-side or front-to-back at the belt path. If it does, the belt isn’t locked.
- Locking clips are a temporary, belt-based solution. For a permanent, easier install, consider using your vehicle’s LATCH system if the seat position and weight limits allow.
- Never use a locking clip with a lap-only belt. These belts lock differently, usually with a sewn-on latch plate or an ALR retractor.
The One Belt Type That Demands a Locking Clip
You don’t decide to use a locking clip. Your vehicle’s seat belt design decides for you. The clip exists for one scenario: a seat belt with an Emergency Locking Retractor (ELR) paired with a sliding latch plate.
Here’s how that belt works, and why it fails for car seats. An ELR is the retractor in your shoulder belt that locks only during sudden stops or crashes. It lets you lean forward normally. The sliding latch plate is the metal piece that slides freely up and down the webbing. Together, they cannot hold a car seat tight because there’s no way to lock the belt at a fixed length during installation. You pull it tight, it just slips back.
Where this goes sideways: Using a locking clip on a belt that already locks. If your belt has a switchable (ALR) retractor or a locking latch plate, adding a clip adds a pivot point that can concentrate force and tear the webbing in a crash. The Graco Nautilus Snuglock manual explicitly states a locking clip is not needed if you use its built-in lock-offs.
When Do You Absolutely Need a Locking Clip?
Check your vehicle owner’s manual first. Then, perform this quick test. With the car seat out of the vehicle, buckle the empty seat belt. Pull the lap portion tight. Now, let go of the tail and try to pull up on the webbing near the buckle. Does it stay tight, or does it instantly loosen?
If it loosens, you likely have an ELR with a sliding latch plate. That’s your signal.
| Belt Retractor Type | Latch Plate Type | Does It Lock for Car Seats? | Locking Clip Needed? |
|---|---|---|---|
| Emergency Locking Retractor (ELR) | Sliding | No | YES |
| Automatic Locking Retractor (ALR) | Sliding | Yes (when switched) | No |
| ELR or ALR | Locking | Yes | No |
| None (Lap Belt Only) | Sewn-On | Yes | No |
The Cybex Cloud G Pro manual puts it in a warning box: “NEVER install this Child Restraint using a non-locking vehicle Lap/Shoulder Belt. A locking clip must be used.” That’s the non-negotiable line.
Gathering the Right Tools (It’s Not Just the Clip)
You need two things: the locking clip and your car seat’s instruction manual. The clip itself is a simple, H-shaped piece of hardened steel. Most new car seats include one, often stored on the underside of the seat base or in a storage compartment.
If yours is missing, you must get one approved for your specific seat. Contact the manufacturer directly. Graco, for instance, instructs owners to call 1-800-345-4109 to order a genuine replacement. Using a random hardware store clip is a gamble on metallurgy and sizing you cannot afford.
Your car seat manual is the other critical tool. While the locking clip procedure is standardized, your specific seat has a designated belt path and may have belt guides or lock-offs that change the process. The Peg Perego Primo Viaggio manual, for example, shows the clip being used only after the belt is routed through the seat’s guides. Never wing it.
The 5-Step Installation Process
This is the sequence every manufacturer agrees on, from Evenflo to UPPAbaby. The key is the 1-inch rule. Miss that, and the installation can fail.
- Route, Buckle, and Tighten. First, install the car seat or base using the vehicle seat belt as you normally would, routing it through the correct belt path. Buckle it. Get on your knees in the seat, press your full weight into the car seat, and pull the shoulder belt webbing as tight as you can to remove all slack from the lap portion.
- Pinch and Hold. While maintaining that downward pressure, pinch the lap and shoulder belt webbings together tightly, right behind the metal latch plate (the buckle tongue). Do not let the webbing slip even a millimeter.
- Unbuckle. Carefully unbuckle the seat belt while keeping that firm pinch. The belt will now be tight around the car seat, held only by your hand.
- Thread the Clip. Slide the locking clip onto the two strands of webbing you’re pinching. The rounded side faces the latch plate. Slide it down until it is exactly 1 inch (2.5 cm) from the latch plate. This distance is non-negotiable; it’s repeated in the Graco, Peg Perego, and Cybex manuals. A greater gap allows the lap belt to leverage itself loose.
- Re-buckle and Release. Keeping everything tight, re-buckle the seat belt. You can now slowly release your pinch. The locking clip is now physically clamping the two belt strands together, preventing the latch plate from sliding.
I won’t recommend skipping the knee-in-the-seat weight step. Your body weight removes the cushion compression that otherwise creates hidden slack. The first time you do it right, you’ll feel the difference in the belt’s tension, it goes from tight to rigid.
Testing and Final Safety Check
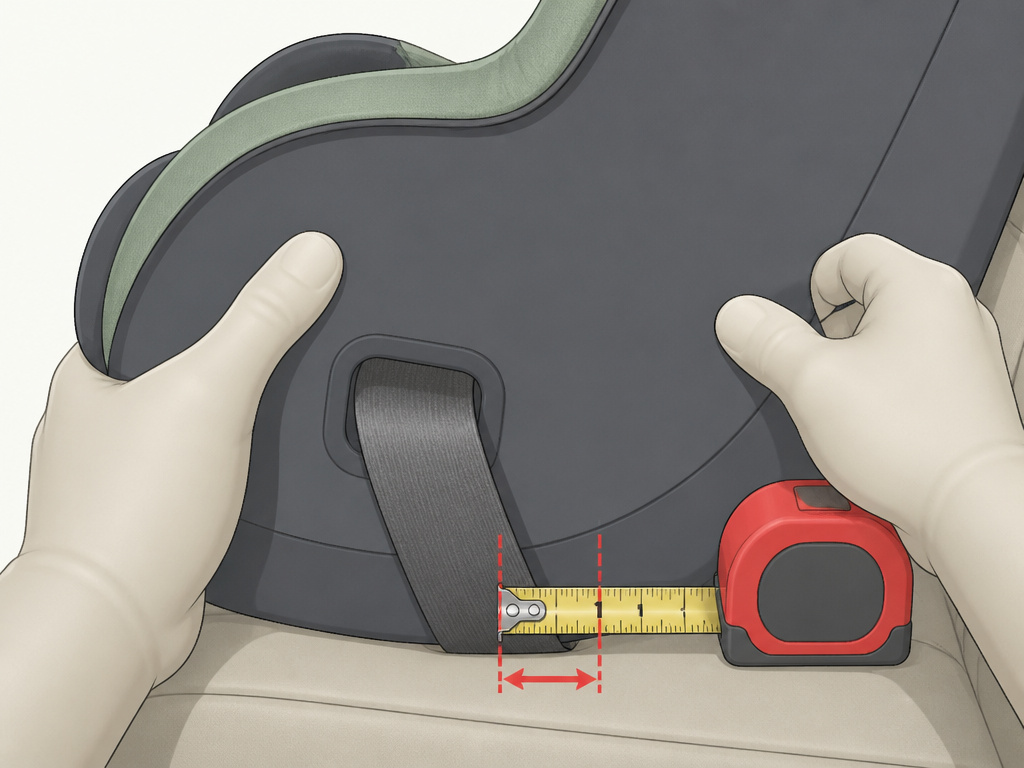
The locking clip doesn’t make the installation safe. A correct, rigid installation makes it safe. The clip is just a part. You must verify the whole system.
The 1-Inch Movement Test: This is the universal standard. Grab the car seat firmly at the belt path, where the seat belt passes through it. Try to move it side-to-side and front-to-back. It should not move more than 1 inch (2.5 cm) in any direction. If it moves more, the belt is not locked. Unbuckle and start over, applying more weight and pulling the belt tighter before pinching.
The Harness Fit Check: A secure seat is useless if the child isn’t secured in it. For a final safety check, ensure the child’s harness is snug. The chest clip should be at armpit level. Perform the “pinch test” on the harness straps at the child’s shoulder, if you can pinch a vertical fold of webbing, it’s too loose.
This final verification mirrors the checks for any proper seat belt installation for car seats. The principles of a tight seat and a snug child are constant, whether you’re using a LATCH system, a locking clip, or a simple lap belt installation.
Locking Clip vs. Built-In Lock-Offs vs. LATCH
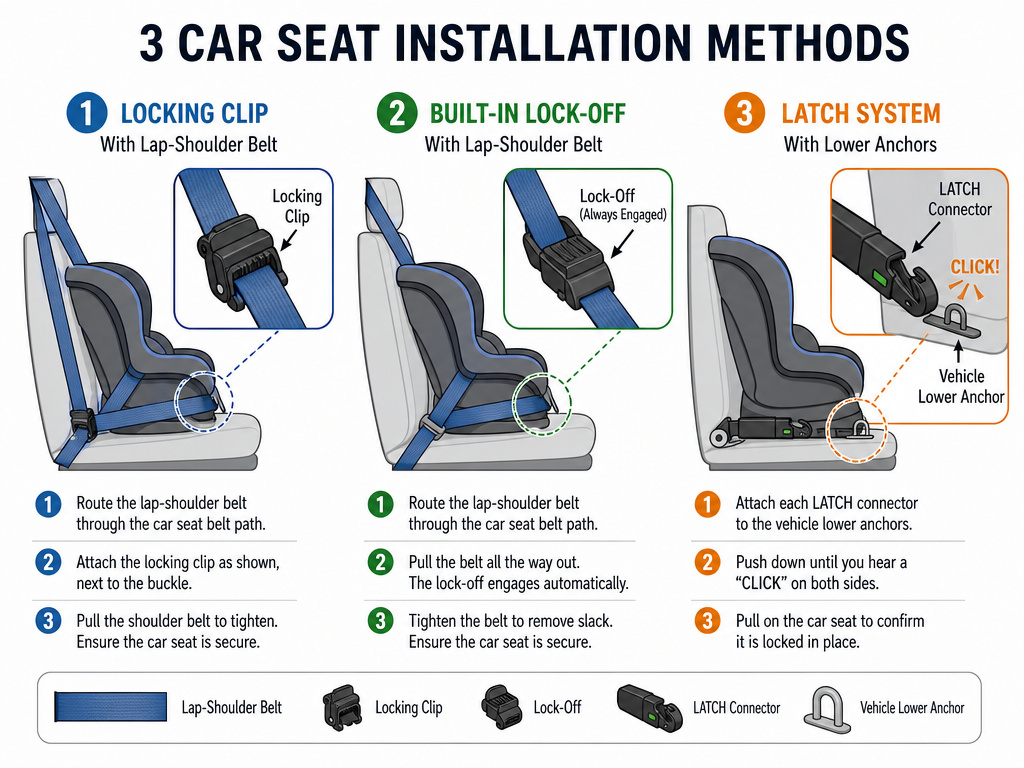
A locking clip is a workaround. Modern car seats often include a better solution: built-in lock-offs. These are plastic clamps on the seat itself that grip the seat belt, performing the same function as a locking clip but with less room for error. If your seat has them, use them per the manual, they often replace the need for a clip entirely.
The most straightforward alternative, however, is your vehicle’s LATCH system. LATCH (Lower Anchors and Tethers for Children) provides dedicated metal anchors in the vehicle seat crack, designed for a one-click, tight connection that doesn’t rely on the quirks of seat belt retractors. It’s often the easiest path to a correct install. If you’re struggling with a belt that needs a clip, check if your car seat position allows for a LATCH installation. Remember, you cannot use both LATCH and a seat belt (with or without a clip) at the same time in harness mode.
For installing a car seat base, the same belt rules apply. A base that requires a locking clip follows the same 1-inch placement rule.
Frequently Asked Questions
Can I use any metal clip as a locking clip?
No. Never use a hardware store clip, a paper clip, or a hair clip. Certified locking clips are made of hardened steel to withstand crash forces without bending or shearing. A failure here is catastrophic.
My car has old-style lap-only belts in the center. Do I need a locking clip?
Almost certainly not. Lap-only belts typically use a different locking mechanism, like a sewn-on latch plate or an ALR retractor. These lock by design. Your vehicle manual and car seat manual will confirm. This is a common scenario for installing in the middle seat.
I lost my locking clip. Can I buy one online?
You can, but you must ensure it’s a genuine part from your car seat’s manufacturer. Look for OEM replacement clips sold by reputable baby gear retailers. The safest route is to contact the manufacturer’s customer service line directly.
How do I know if my seat belt is already an ALR (locking) type?
With the car seat out, slowly pull the shoulder belt all the way out. Listen for a click or ratcheting sound. If it then only retracts and will not extend again until fully rewound, you have an ALR. You switch it to locking mode by pulling it all the way out. No clip needed.
Is it safer to just use LATCH instead of dealing with a locking clip?
Both LATCH and a correctly installed seat belt with a locking clip are equally safe when used properly. The “safer” method is the one you can install correctly every single time. For many, LATCH is simpler and less prone to error, which is why it’s often recommended for a proper infant seat installation.
Before You Go
Installing a locking clip isn’t about adding hardware. It’s about correctly identifying a gap in your vehicle’s safety system and filling it with a specific, regulated tool. The process hinges on two numbers: finding the ELR/sliding latch plate belt type, and placing the clip 1 inch from the latch plate.
If this feels finicky, that’s because it is. It’s a precise solution for a precise problem. When in doubt, your car seat manual and vehicle owner’s manual are the final authorities, not a blog, not a video, and certainly not guesswork. A tight install that passes the 1-inch test is the only acceptable outcome. Everything else is a rehearsal.
