
How to Adjust a Car Seat Base for a Secure Installation
This post contains affiliate links. As an Amazon Associate, we earn from qualifying purchases.
To adjust a car seat base, you must achieve two things: a level indicator bubble within the correct zone for your child’s weight, and a base so tight it moves less than 1 inch side-to-side or front-to-back at the belt path. The recline lever or adjustment foot changes the angle; your body weight and the locking mechanism secure it.
This is a physics problem concerning the heavy head of a rear-facing infant relative to their body.An overly upright base lets the head slump forward, which can close the airway. An overly reclined base changes the crash dynamics, increasing the risk of the seat rotating or the harness failing to contain the child. The level indicator is your guide to the Goldilocks zone.
What follows is the sequence that works for every base: identify your adjustment points, set the angle, install with crushing force, and verify with the 1-inch test. We’ll cover what the bubbles and colors actually mean, when a rolled towel is a manufacturer-approved fix, and the one mistake that makes a tight install impossible.
Key Takeaways
- The level indicator’s specific zone (clear, notched, green-only) corresponds to your infant’s weight, not just a generic “level.” Misreading this is the most common error.
- A secure base moves less than 1 inch (2.5 cm) at the belt path. If it moves more, the installation is unsafe regardless of how level it looks.
- Use the base’s recline lever or adjustment foot first. A rolled towel or pool noodle under the foot is a last-resort fix explicitly allowed by brands like Graco when the foot is fully extended.
- Tighten the LATCH strap or seat belt after setting the angle. Cranking it down first can bind the recline mechanism, locking it at a wrong angle.
- Always perform the final check with the infant car seat carrier clicked into the base. The carrier’s weight changes the base’s position on the vehicle seat.
The Anatomy of an Adjustable Base
Look at the back of your base. You are looking for three things: a level indicator window, a recline lever or adjustment handle, and an extending foot. These parts work together, but they are not the same.
The level indicator is a sealed plastic window with a bubble floating in liquid. On a Graco SnugRide base, that bubble must sit in the “clear” area for a 4–20 lb infant. For a 20–30 lb infant, the bubble should be within the “notched” area. The manual states this distinction verbatim. On an Evenflo Embrace base, the rule is simpler: only green should show in the window. No red.
The part nobody mentions: On many vehicles, the seat cushion slopes backward. You might set the bubble level on your garage floor, only to install it in the car and watch the bubble slide forward out of the zone. Set the angle with the base sitting on the vehicle seat where it will be installed.
The recline lever is usually a large, textured handle you squeeze to unlock the base’s back. Lifting the back extends a plastic foot from the bottom. This foot is the only part that should contact the vehicle seat to change the angle. The Maxi-Cosi base manual directs you to squeeze the adjustment handle at the back, lift, and release to lock the foot.
The foot itself has multiple click-stopped positions. Do not force it between clicks. Find the position that makes the level indicator correct. If the foot is fully extended and the base is still too upright, that is when you reach for a towel.
Step-by-Step: Setting the Correct Recline Angle
This sequence matters. Adjust the angle first, before you even thread the seat belt or LATCH strap.
- Place the base on the vehicle seat. Push it firmly back into the seat crease. This is its starting position.
- Locate and activate the recline mechanism. Squeeze the lever or press the button. You’ll feel the base’s back section unlock.
- Lift the base’s back to extend the foot. Lift until the level indicator bubble enters the correct zone for your child’s weight. For a newborn in a Graco, that’s the clear area. Release the lever to lock the foot.
- Check the level indicator again. Jiggle the base. The bubble should settle and stay in the zone. If it drifts, repeat steps 2 and 3.
Where this goes sideways: Cranking the LATCH strap tight before adjusting the angle. The tension can pull the foot back into its stowed position or prevent the lever from moving at all. You end up fighting the installation, and the angle is always wrong. Set the angle on a loose base, then tighten.
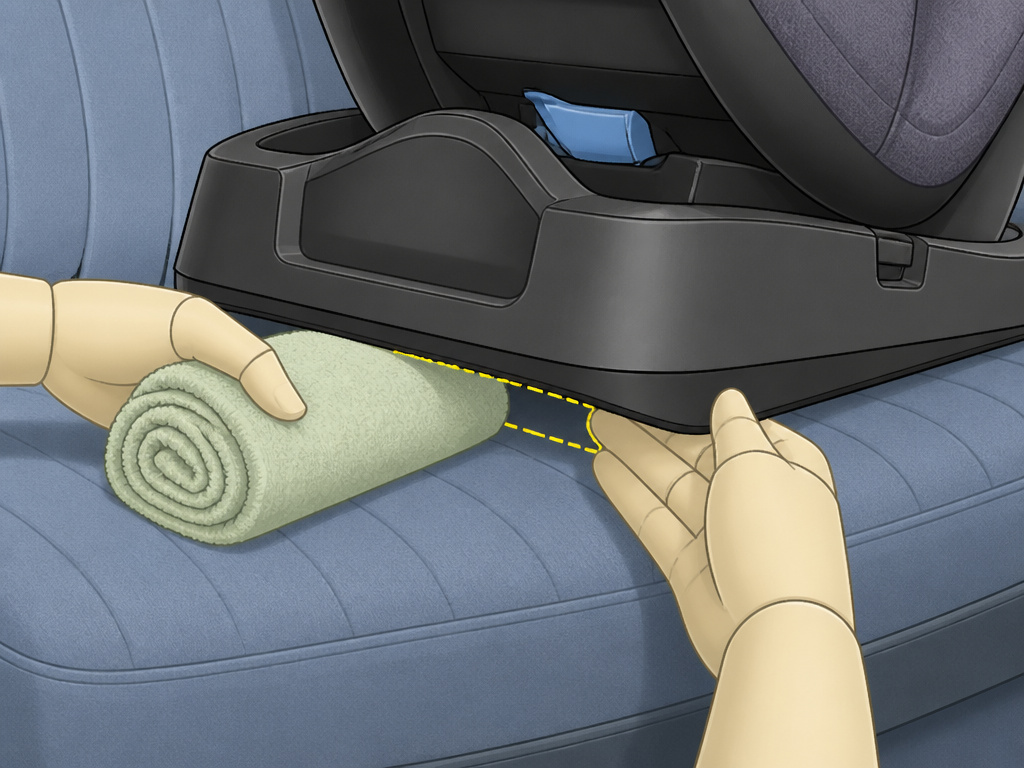
What if the foot is all the way out and the bubble is still not level? The Graco GoMax manual has the answer: “If the foot is completely extended and the level line is still not level, a rolled towel or pool noodle can be placed under the foot.This is a manufacturer-sanctioned last resort for deeply sloped vehicle seats. Use a firm, non-compressible roll, place it under the foot only (not the base itself), and re-check the indicator.
The 1-Inch Rule: Your Final Security Check
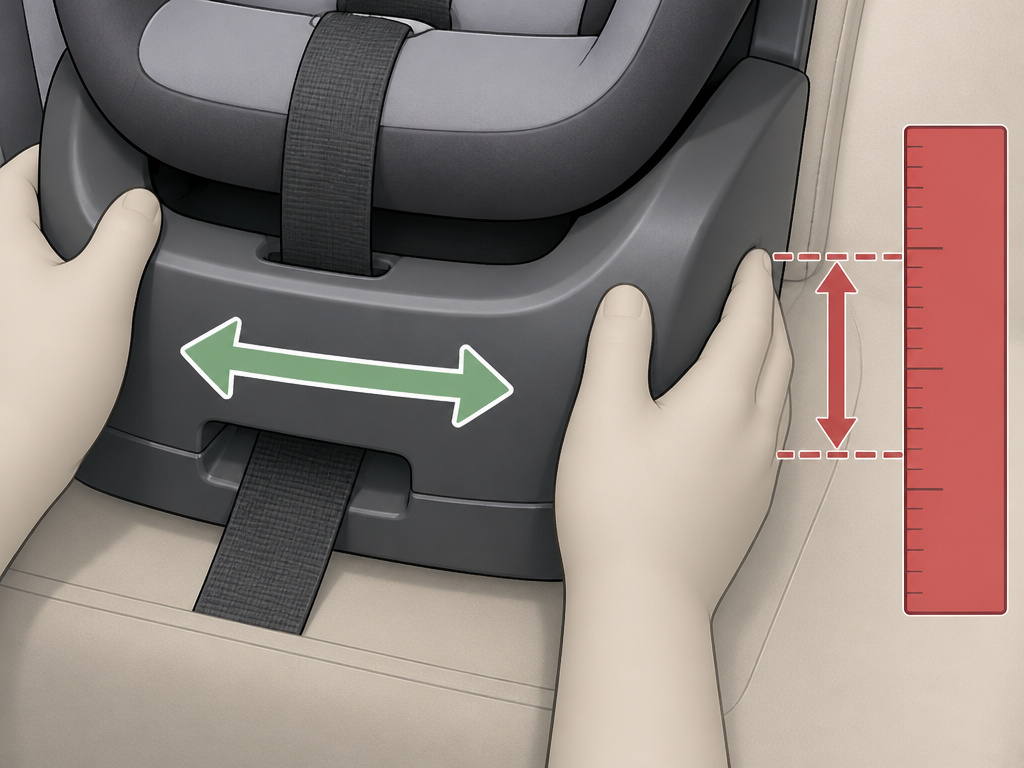
The angle is correct. Now the base must be immovable. The standard is not subjective. The Evenflo Embrace manual quantifies it: the base must not move more than 25 mm (1 inch) from side-to-side or front-to-back at the lower anchor connector assembly. The Nuna PIPA manual states the same limit at the belt path.
This is your non-negotiable test. Here is how to perform it.
| Grip Location | Test Motion | Pass/Fail Threshold |
|---|---|---|
| Base sides at the belt path | Side-to-side wiggle | Less than 1 inch (2.5 cm) of movement |
| Base front at the belt path | Front-to-back pull | Less than 1 inch (2.5 cm) of movement |
Why the belt path? That is where the vehicle’s locking mechanism, the seat belt buckle or LATCH anchors, actually secures the base. Testing anywhere else, like the top of the base, gives a false sense of security.
Common mistake: Testing without the infant carrier attached. The carrier adds 10-15 pounds of weight, which settles the base into the vehicle seat cushion. A base that feels tight when empty might rock when loaded. Always do your final 1-inch test with the car seat clicked into the installing a car seat base.
If the base moves more than an inch, the installation is unsafe. Do not blame the vehicle seat. The problem is almost always incomplete tightening or a twisted strap.
- For LATCH: Kneel in the base, put your full weight into it, and pull the tightening strap upward with a steady, hard pull. You should hear the ratchet click multiple times.
- For Seat Belt: After buckling, ensure the belt is in locking mode. For a switchable retractor, pull the shoulder belt all the way out until it clicks. Then, feed the slack back while pressing down on the base.
Still loose? Check for a twisted LATCH anchors strap or a seat belt routed incorrectly through the seat belt installation lock-off.
Problem-Solving: When the Base Won’t Cooperate
Sometimes the base fights you. The angle is wrong, or it stays loose. These are the usual suspects.
The bubble is in the right zone, but the seat looks too upright or too reclined.
Trust the bubble, not your eyes. Vehicle seats are not flat, and our perception is skewed. The level indicator is calibrated to the safe angle range tested for crash performance. If the bubble is correct per the manual, the angle is correct.
The base is tight but rocks front-to-back on a bench seat.
This is a contour issue. A base designed for a modern, sculpted seat might not sit flat on a older, flat bench. The solution is often a middle seat installation, where the contour is less pronounced. Alternatively, a tightly rolled towel placed under the front edge of the base (far from the foot) can fill the gap. This is different from the towel-under-the-foot trick for angle correction.
The recline lever is stuck and won’t release.
You probably tightened the LATCH or seat belt first. You must loosen the installation significantly to free the mechanism. Unbuckle or detach the anchors, set the angle, then re-tighten from scratch. Forcing the lever can break it.
Worth knowing before you start: After a proper installation, mark your vehicle seat and base with masking tape. Draw a line where the base meets the seat back. Next time you reinstall, you can align the tape for a perfect angle in seconds.
Frequently Asked Questions
Why does the recline angle matter so much for a newborn?
An infant’s head is proportionally large and their neck muscles are weak. An overly upright angle can cause the head to fall forward, potentially restricting their airway. The correct recline angle ensures the head is supported and the airway remains open, which is critical for safe sleep positioning during travel.
Can I use both LATCH and the seat belt to get it tighter?
No. Never use both systems simultaneously. This is a direct violation of every car seat manual. The base and vehicle anchors are not tested or rated for the combined forces. It does not make it safer; it creates unknown stress points that could fail in a crash. Choose one method, either using anchors or the belt method, and install it correctly.
My car seat base doesn’t have a level indicator. How do I adjust it?
Some very simple, older bases have a fixed recline angle. These typically rely on the vehicle seat’s natural slope. Your only adjustment is using a rolled towel under the base (following its manual) to achieve the correct angle. The 1-inch rule for tightness still applies absolutely. If you’re unsure, consult a Child Passenger Safety Technician.
Is it okay to adjust the base angle with the car seat attached?
It’s not recommended. The carrier’s weight makes it harder to feel the recline mechanism engage and can strain the plastic. It’s safer and easier to remove the infant carrier, adjust the base installation angle, secure the base, then re-attach the carrier.
The foot is extended, I used a towel, but it’s still not level. What now?
First, double-check you are on a firm vehicle seat. Some plush, memory-foam seats compress too much. Try a different seating position. If no position in your vehicle allows for a correct angle with your specific base, that base may be incompatible with your car’s seat geometry. Contact the manufacturer. The next step may be considering a different model of infant seat or a base placement in a different vehicle.
The Bottom Line
Adjusting a car seat base is a two-part job: angle and anchorage. Get the level indicator right for your child’s weight, then use your body weight to achieve a rock-solid, sub-1-inch installation. The rolled towel is in the Graco manual for a reason. When the base is secure, the final click of the infant carrier is the sound of a problem solved.Now you can focus on the road, not the rearview mirror.
