
When to Install Car Seat | The 3 Times It Matters Most
This post contains affiliate links. As an Amazon Associate, we earn from qualifying purchases.
Install a car seat before you bring your newborn home from the hospital, before any trip with your child in the vehicle, and after any adjustment to the seat or your child’s size. The NHTSA states a properly installed car seat reduces the risk of death by over 70% for infants in a crash, which is why timing the installation correctly is the first layer of safety.
That 70% figure is the documented outcome when the seat is installed correctly and the child is secured properly. Getting the timing wrong means you’re driving with a safety device that isn’t ready to do its job.
What follows is a breakdown of the three non-negotiable installation windows, the specific triggers that demand a re-install, and the choice between LATCH and seat belt that decides how tight the seat actually gets.
Key Takeaways
- Install the car seat at least a month before your due date. This gives you time to practice, get a professional check, and fix any vehicle compatibility issues without pressure.
- The Graco SlimFit manual states children under 26.5 pounds must ride rear-facing. If you install forward-facing before hitting that weight, the harness geometry is wrong and the seat can fail in a crash.
- Never use both LATCH and a seat belt together. This doubles the load on the car seat’s structure and can cause it to crack under crash forces.
- A bulky winter coat adds inches of compressible padding between your child and the harness straps. In a crash, that padding compresses, leaving the straps too loose for effective restraint.
- Register your car seat with the manufacturer the day you install it. That’s how you get recall notices for defects that could take years to surface.
The Three Installation Checkpoints You Can’t Miss
Most guides tell you to install the seat before the baby comes. They’re not wrong, but they’re incomplete. “When” has three distinct phases, and missing any of them puts the entire system at risk.
The first checkpoint is the pre-arrival dry run. You should have the car seat installed and checked by a certified technician at least a month before your due date. Why that early? Vehicle compatibility isn’t guaranteed. The NHTSA notes that not all car seats fit in all vehicles. Some back seats are too sloped, some have awkward seat belt placements, and some simply don’t have the clearance. Discovering your chosen seat doesn’t fit in your car with a newborn in your arms is an emergency you can avoid.
Before you start: The vehicle’s front airbag is a serious hazard for a rear-facing seat. Never install a rear-facing car seat in front of an active airbag. The force of deployment can crush the seat and the child. Always use the back seat.
The second checkpoint is before any trip. This sounds obvious, but it’s the check most people skip after the initial installation. Did you remove the seat for a deep clean? Did another caregiver use it and reinstall it? A quick tug at the belt path confirms it’s still secure. The rule is simple: if the car seat moves more than one inch side-to-side or front-to-back at the belt path, it’s not tight enough.
The third checkpoint is after any growth or configuration change. This is the most overlooked trigger. Moving the harness straps up a slot, switching from rear-facing to forward-facing, or transitioning to booster mode—each requires a full re-installation. The belt path changes, the recline angle changes, and the seat’s center of gravity shifts.
Why “Before the Baby Comes” Isn’t Enough
The common advice to install the seat before the hospital trip misses two critical sub-deadlines. The first is the compatibility test. The second is the practice session.
You need to know how to get a tight install with both the LATCH system and the seat belt. Vehicles have lower anchor weight limits, and you must know when you’ll exceed them. The NHTSA provides the formula: the lower anchor weight limit is 65 pounds minus the weight of the car seat. For a seat like the Graco SlimFit, which weighs about 20 pounds, the lower anchor limit for your child is roughly 45 pounds. After that, you must switch to the seat belt.
I learned the practice lesson the hard way with our first. We installed the Chicco OneFit LX base with LATCH a week before my due date, and it seemed fine. At the hospital, the nurse did the car seat test and asked us to adjust the recline angle. We fumbled with the base for twenty minutes in the parking lot with a newborn screaming in the carrier. My hands were shaking. Now I tell every expecting parent: do the install, then uninstall it, then do it again. Your future self will thank you.
The practice focuses on the harness. Can you achieve a snug fit with the chest clip at armpit level and no slack in the straps?A loose harness is the single most common installation error, and it’s why children are ejected from seats in crashes. The manual for the Evenflo EveryFit 3-in-1 explicitly warns against bulky clothing that interferes with the harness. You need to practice with the clothes your child will actually wear.
| Checkpoint | Action Required | Consequence If Skipped |
|---|---|---|
| 1 Month Before Due Date | Install seat, schedule professional inspection, test vehicle fit. | Discovery of incompatibility at hospital discharge; no time for a different seat solution. |
| Before Any Trip | Verify seat movement is <1″ at belt path; confirm harness tightness. | Undetected loosening from vehicle motion or prior removal renders seat ineffective. |
| After Size/Config Change | Full re-installation for new harness height, direction, or mode. | Incorrect belt path or recline angle compromises structural integrity during a crash. |
The LATCH vs Seat Belt Decision Tree
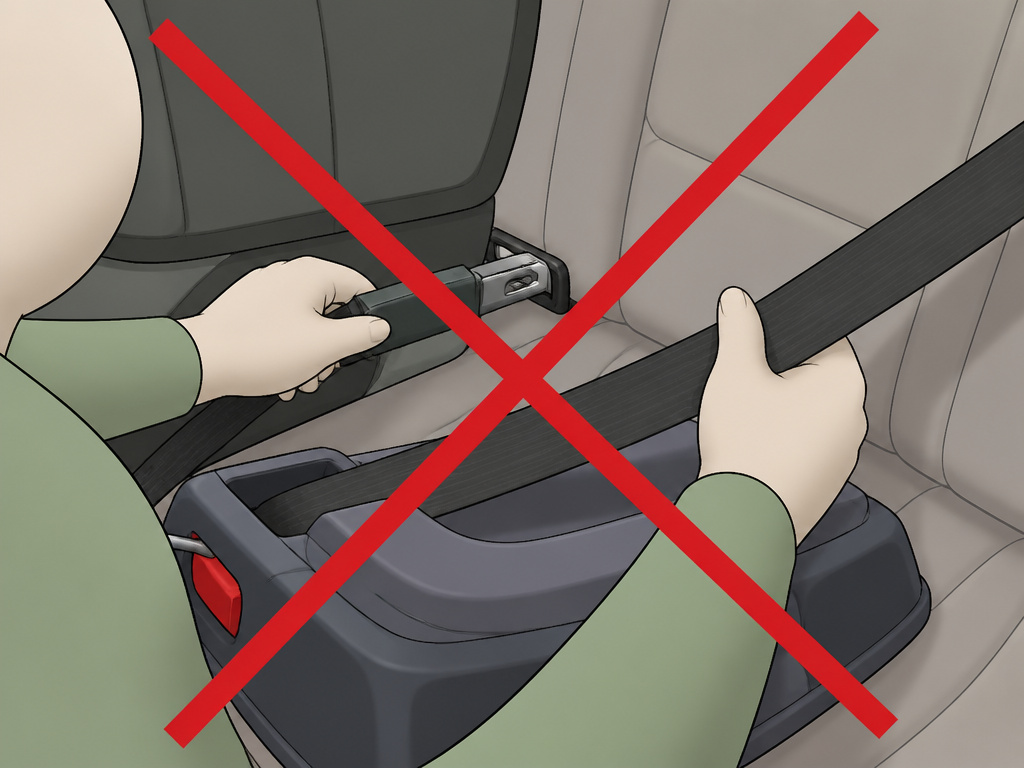
You have two approved methods to secure a car seat: the vehicle’s LATCH (Lower Anchors and Tethers for Children) system or the seat belt. The official rule from the NHTSA is that you must use one or the other, never both. Using both creates multiple load paths that the car seat wasn’t engineered to handle, potentially stressing the plastic shell to the point of fracture.
So which one is better? The answer isn’t universal. It depends on your child’s weight, your vehicle’s design, and the specific car seat model.
LATCH is often easier to get a tight install with, especially for beginners, because the connectors click directly into the vehicle’s anchors. However, LATCH has a weight limit. As noted above, once your child’s weight combined with the seat’s weight exceeds 65 pounds, you must switch to the seat belt. For forward-facing seats, you should always use the tether strap if your vehicle and car seat permit it. The tether limits forward head movement in a crash by up to 6 inches, drastically reducing the risk of head and neck injuries.
The seat belt method is universally available and has no upper weight limit for the child. Its challenge is ensuring the belt is locked. Many vehicles require a locking clip or have switchable retractors. The Chicco OneFit LX manual emphasizes using its LeverLock mechanism when installing with a seat belt to prevent slippage.
| Factor | LATCH System | Seat Belt |
|---|---|---|
| Ease of Use | Often easier; direct click-in connection. | Can be trickier; requires proper locking. |
| Weight Limit | Child + seat weight ≤ 65 lbs (check labels). | No upper weight limit for the child. |
| Tether Use | Should be used with forward-facing seats. | Should be used with forward-facing seats. |
| Vehicle Compatibility | Requires dedicated lower anchors in vehicle seat. | Works in any seating position with a seat belt. |
| Best For | Smaller children within weight limits; easier initial install. | Larger children exceeding LATCH limits; center seat installations. |
The bottom line? Use LATCH while you can, for its simplicity. The moment your child’s growth forces a change, switch to a seat belt installation without hesitation. The NHTSA car seat safety guidelines are the final authority on this, and they provide detailed videos for both methods.
Reading the Manual: Your Car Seat’s Law Book
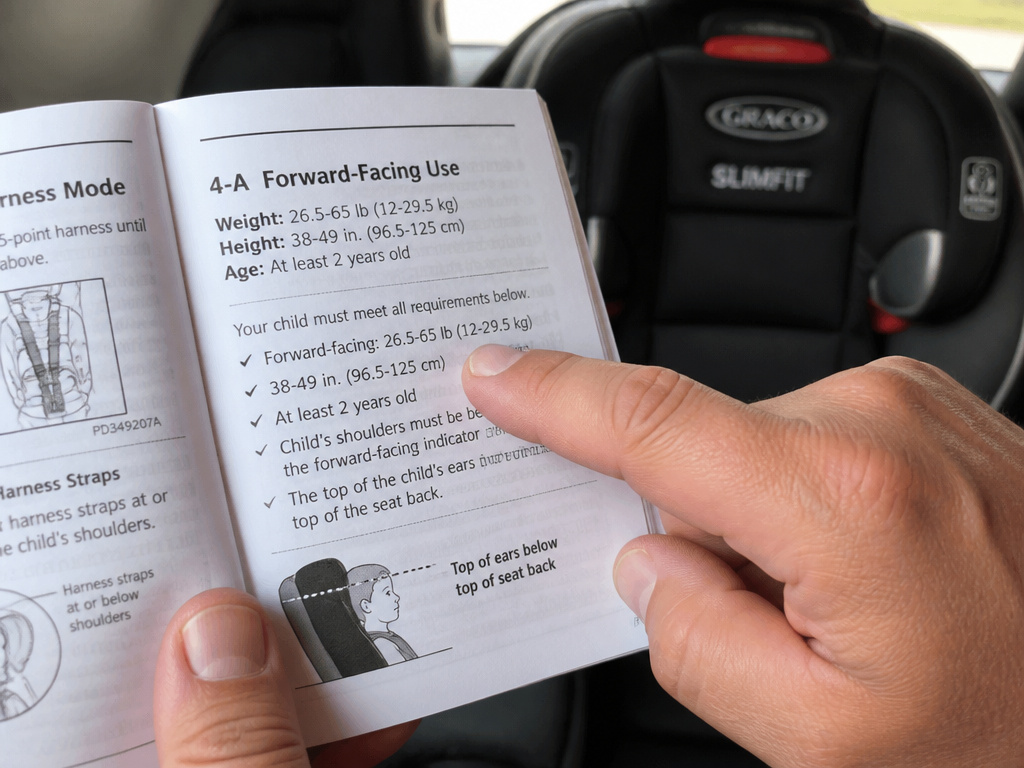
Every car seat model is different. The Graco SlimFit, the Chicco OneFit LX, and the Evenflo EveryFit 3-in-1 all have unique weight limits, recline indicators, and belt path designs. Basing your installation on generic advice is a direct path to failure.
The manual is where you find the non-negotiable numbers. For the Graco SlimFit, the rules are printed: rear-facing from 5-40 pounds, forward-facing with harness from 26.5-65 pounds, booster from 40-100 pounds. If your child is 25 pounds and you turn them forward-facing because they’re tall, you’ve violated the manufacturer’s instructions. In the event of a crash, that could void any certification and shift liability.
Where this goes sideways: Assuming all convertible seats transition at the same weight. The Graco SlimFit requires 26.5 lbs for forward-facing, while the Chicco OneFit LX allows it at 26.5 lbs but recommends rear-facing longer. Missing this detail turns a safety device into a guessing game.
The manual also explains the physical cues for a correct install. The 1-inch movement rule is universal. After you’ve installed the seat using your chosen method, grab it at the belt path and pull side-to-side and front-to-back. If it shifts more than an inch, tighten it. The level indicator—a bubble or line—must show the correct recline angle for rear-facing seats. An overly upright seat can cause an infant’s head to fall forward, restricting their airway.
Finally, the manual dictates the harness rules. The straps must be at or just below the shoulders for rear-facing, and at or just above for forward-facing. The chest clip must be at armpit level. These positions ensure the harness applies crash forces across the strongest parts of the child’s body.
The Hidden Triggers That Demand a Re-Install
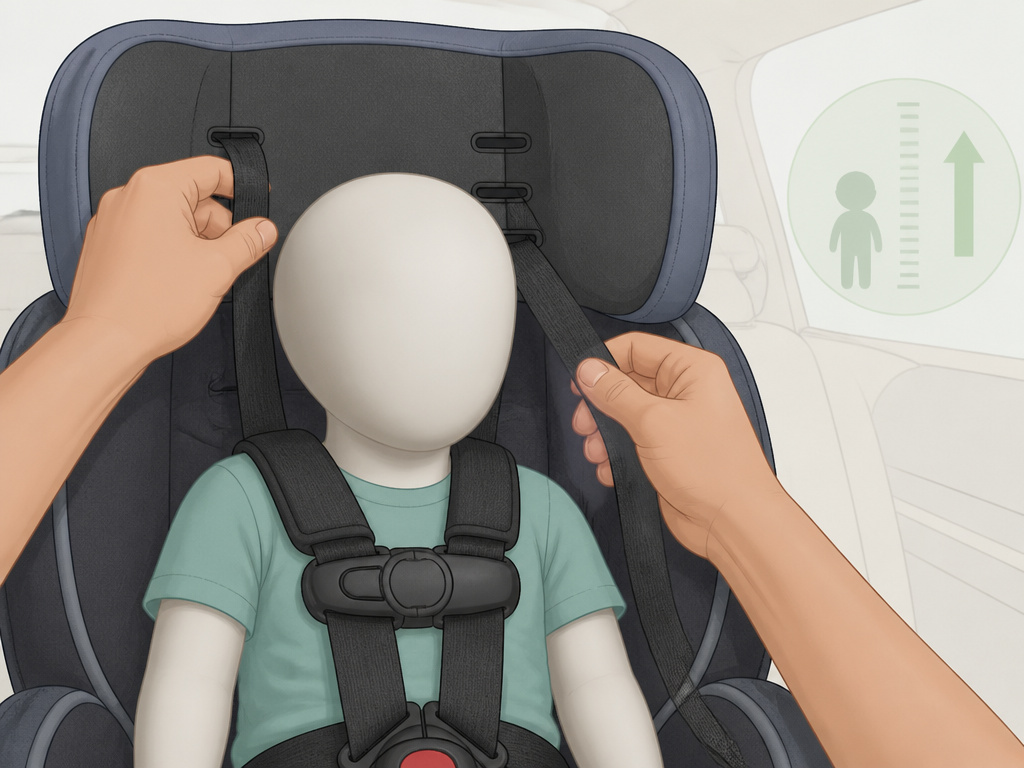
Installation isn’t a one-and-done event. Several specific, easily overlooked changes in your child, your car, or the seat itself force a complete do-over.
Weight and Height Milestones: This is the big one. Each time your child grows out of a mode, you must re-install. Moving from rear-facing to forward-facing changes the belt path. Transitioning from a harness to booster mode means removing the lower anchors or seat belt entirely and using the vehicle’s lap/shoulder belt. The Graco SlimFit manual specifies a child must be at least 4 years old for booster mode. Ignoring age and moving a wiggly 3-year-old to a booster is a severe risk.
Vehicle Changes: A new car means a new installation. Even the same model year can have slight differences in seat contour or anchor depth. Never assume a tight install in your old car translates to a correct one in the new one.
Seat Adjustments: Did you raise the headrest to the next slot? That often changes how the harness straps route and can affect the seat’s angle against the vehicle seatback. It counts as a re-install.
Seasonal Changes: Bulky winter wear is a known hazard, but the Evenflo manual also warns about hot weather. Buckle tongues left in the sun can burn a child’s skin. The manual advises checking for heat and covering the seat with a light-colored blanket. After you remove that blanket for the cooler season, double-check the harness tightness without it.
Frequently Asked Questions
Can I install a car seat in the middle seat?
Yes, the center rear seat is statistically the safest position. You can install in the middle seat using the vehicle’s seat belt if the seat is flat and the belt locks securely. Most vehicles do not have LATCH anchors for the center position, so seat belt installation is usually required. Always check your vehicle owner’s manual to confirm.
When should I stop using LATCH and switch to the seat belt?
Switch from LATCH to a seat belt installation when the combined weight of your child and the car seat exceeds 65 pounds. You can find the car seat’s weight in its manual and the lower anchor weight limit on a label on the seat itself. For many convertible seats, this happens when your child is between 40 and 50 pounds.
Is it okay to install a car seat with both LATCH and a seat belt?
No. You should never install a car seat with LATCH and a seat belt together. This “double-belting” can place conflicting forces on the car seat shell during a crash, potentially causing it to fail. Use only one securement method at a time, as approved by both the car seat and vehicle manufacturers.
How do I know if my car seat is installed tightly enough?
After installation, grip the car seat at the belt path (where the seat belt or LATCH strap goes through) and try to move it side-to-side and front-to-back. If it moves more than one inch in any direction, it is not tight enough. Re-tighten the belt or LATCH strap, applying pressure into the vehicle seat cushion as you pull.
When can my child stop using a car seat?
Children should use a car seat or booster seat until the vehicle’s seat belt fits them properly, which typically occurs when they are between 8 and 12 years old. The lap belt must lie across the upper thighs, not the stomach, and the shoulder belt should cross the chest and shoulder, not the neck. The NHTSA recommends children stay in the back seat at least through age 12.
Before You Go
Installing a car seat correctly is a series of deliberate choices, not a single task. The three checkpoints—before arrival, before travel, after change—frame the entire process. Your car seat’s manual is the final word on weights and configurations. The choice between LATCH and seat belt is dictated by hard numbers on a label.
If you remember one thing, let it be the one-inch rule. That’s the physical test that separates a photo-ready install from one that will actually hold. When in doubt, find a certified Child Passenger Safety Technician. They’ll spot the twists, the slack, and the missed steps that your eyes have started to gloss over. Your child’s safety literally hinges on getting this right.
