
When to Take Newborn Insert Out of Doona Car Seat Safely
This post contains affiliate links. As an Amazon Associate, we earn from qualifying purchases.
Remove the Doona infant insert when your baby’s shoulders, while sitting in the seat without the insert, are above the lowest set of harness slots. The manufacturer also states you must remove it once your child weighs 11 pounds (5 kg) or more. Keep the head support in place at all times for side-impact protection, even after the insert comes out.
That’s the short answer from the manual. It gives you two clear triggers. Most parents hit the weight limit first, around three months for an average baby. But the shoulder check is the real failsafe. A long-torso baby might outgrow the insert by height before they hit 11 pounds.
What follows is the visual guide the manual doesn’t give you: how to perform that shoulder-slot test without second-guessing yourself, what the seat feels like when the insert is overdue to come out, and the one part of the official advice some experienced parents quietly ignore.
Key Takeaways
- The Doona infant insert (#26) must come out when your baby weighs 11 lbs (5 kg) OR when their shoulders sit above the lowest harness slots without it. The shoulder rule is the ultimate decider.
- The head support stays in permanently for enhanced side-impact protection, per Doona. The seat passed safety testing with and without it, so some parents remove it for comfort in stroller mode.
- An insert left in too long creates a dangerous gap between your child’s back and the seat shell, allowing dangerous slouch and reducing crash protection.
- Threading the harness buckle (#12) through the insert’s bottom hole is a mandatory step during installation that’s easy to miss, leading to improper fit.
- Register your Doona for recall alerts. Check the NHTSA website with your model number and manufacture date if you bought it secondhand.
The Two Official Rules for Removing the Insert
The Doona car seat manual gives you two non-negotiable rules for removing the infant insert, listed as item #26. You must follow the one that happens first.
Rule 1: The 11-Pound Weight Limit. This is the number Doona leads with. The manual states you must ALWAYS secure your child with the Infant Insert if your child weighs below 11lbs (5 kg). The inverse is also true: once your child hits 11 pounds, the insert must come out. For most babies, this happens around the two- to three-month mark. It’s a clean, objective line, put them on a scale, and you know.
Rule 2: The Shoulder-Slot Test. This is the rule most parents overlook, and it’s the one that matters more. The manual’ directive is precise: “Remove the Infant Insert (#26) when your child’s shoulders, when sitting in the Doona Car Seat without the Infant Insert, are above the lowest shoulder strap slots (#20).”
The shoulder-slot test overrides everything. If your baby’s shoulders are above the lowest slots without the insert, the insert comes out, even if they haven’t hit 11 pounds. This catches long-torso infants who outgrow the padding by height before they outgrow it by weight.
Here’s how to perform the test correctly. First, take the insert out completely. Sit your baby in the seat and buckle the harness loosely. Look at where the harness straps emerge from the seat back, those are the shoulder strap slots. The lowest set is for the smallest infants. Now, look at your baby’s shoulders. Draw an imaginary line across their shoulders. If that line is above the top of the lowest slot openings, the insert is done. If their shoulders are at or below the slots, the insert can stay, but only if they’re still under 11 pounds.
The manual includes a crucial, often-missed note for installation: “Place the Infant Insert (#26) at the lowest part of the seat to provide better support for your child’s back.” Then, “Thread the harness buckle (#12) and its sleeve through the hole at the bottom of the Infant Insert.” Forgetting to route the buckle through that hole is how you end up with a loose, ineffective install.
| Trigger | What It Means | How to Check |
|---|---|---|
| 11 lbs (5 kg) | Manufacturer’s weight limit for insert use. | Use a baby scale. |
| Shoulders above lowest slots | The harness won’t sit at or below shoulder level without the insert, compromising safety. | Remove insert, sit child in seat, compare shoulder height to slot height. |
| Either condition is met | The insert must be removed. The seat is not safe for continued use with the insert. | If one is true, proceed to removal. |
Why the Insert Exists (And When It’s Dangerous to Keep It)
The newborn insert isn’t just extra padding. It’s a positioning device. A newborn lacks the neck and core strength to sit properly in a relatively upright car seat shell. The insert cradles their spine and pelvis, filling the empty space so the harness straps can be snugged against their body without gaps. It brings the child forward so the harness rests at or just below shoulder level, a non-negotiable for rear-facing safety.
Common mistake: Leaving the insert in because your baby still seems to fit. The manual’s rules are based on crash-test dynamics, not comfort. An overdue insert creates space between the child’s back and the seat shell, allowing dangerous slouch and reducing crash protection.
The danger isn’t subtle. With the insert still in place for a too-large child, you’ll have to loosen the harness significantly to buckle it. That creates slack. In a crash, a child with slack in the harness can be thrown forward with more force, increasing the risk of injury. Their head can also fall forward, compromising the airway. You might also notice the top of your baby’s head creeping closer to the top of the seat shell, another hard stop for any car seat.
The transition point is sharp. One day the fit is perfect, the next it’s not. This is why the shoulder-slot test is the manual’s final word. Weight is an easy proxy, but anatomy is the law.
Step-by-Step: How to Remove the Doona Infant Insert
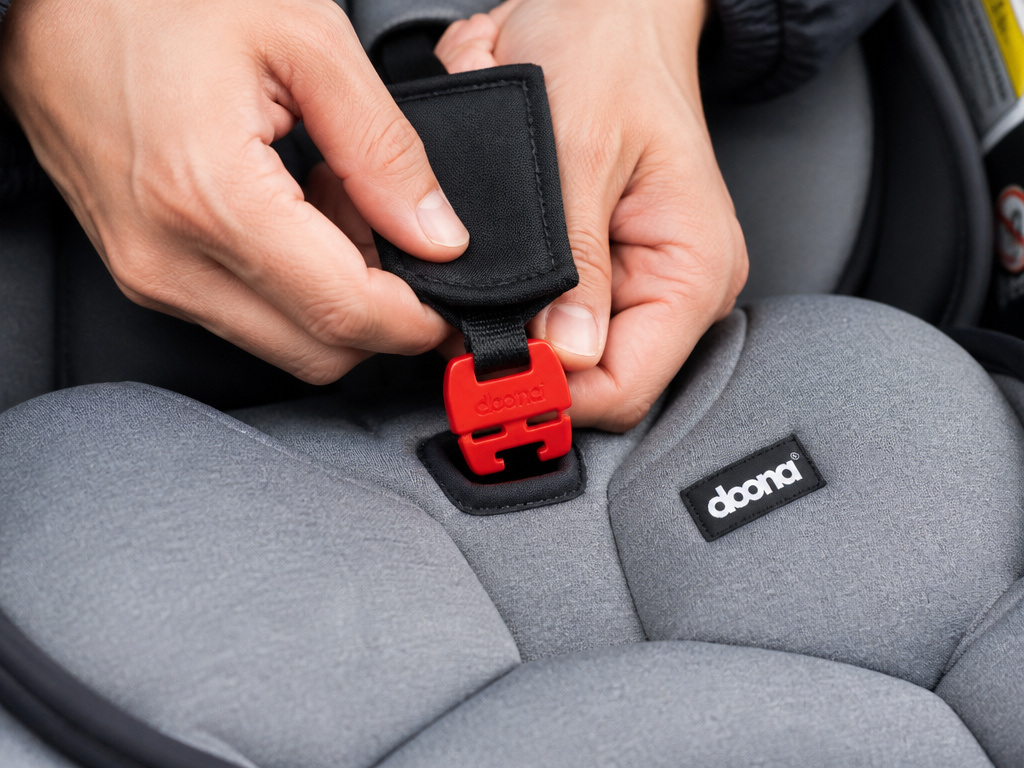
Removing the insert is straightforward, but there’s a right sequence. Doing it out of order can leave the harness incorrectly routed.
- Unbuckle and fully loosen the harness. Pull the harness adjustment strap at the front of the seat until the shoulder straps are completely slack. Unsnap the chest clip and open the buckle.
- Lift your child out of the seat. Place them in a safe spot nearby.
- Unthread the harness buckle from the insert. Find the harness buckle (#12) and its plastic sleeve. They are threaded through a dedicated hole at the bottom center of the infant insert (#26). You must pull the entire buckle assembly back through this hole to free it.
- Lift the insert out. Once the buckle is free, the insert should lift straight out. It’s one piece of molded foam with fabric covering. There are no snaps or fasteners holding it in besides the buckle threading.
- Re-thread the harness buckle. Without the insert, the buckle and its sleeve will now route directly through the seat shell’s opening. Make sure the sleeve isn’t twisted.
- Re-seat your child and adjust the harness. Place your baby back in the seat. Pull the harness straps over their shoulders. The straps must now route through the shoulder strap slots that are at or just below their shoulders. Snap the buckle, tighten the harness until you can’t pinch any slack at the collar bone, and secure the chest clip at armpit level.
Where this goes sideways: Forgetting to re-thread the buckle through the seat shell’s opening after pulling it from the insert. If you just lay the buckle on top of the seat, the harness won’t tighten correctly. You’ll have several inches of dangerous slack.
The head support stays. Doona’s manual is explicit: “Keep using the Head Support in the Doona Car Seat even after removing the Infant Insert.” Its job is different, it’s for side-impact protection. The seat passed FMVSS 213 testing with and without it, but the recommendation is to keep it in place.
What Happens If You Leave the Insert In Too Long?
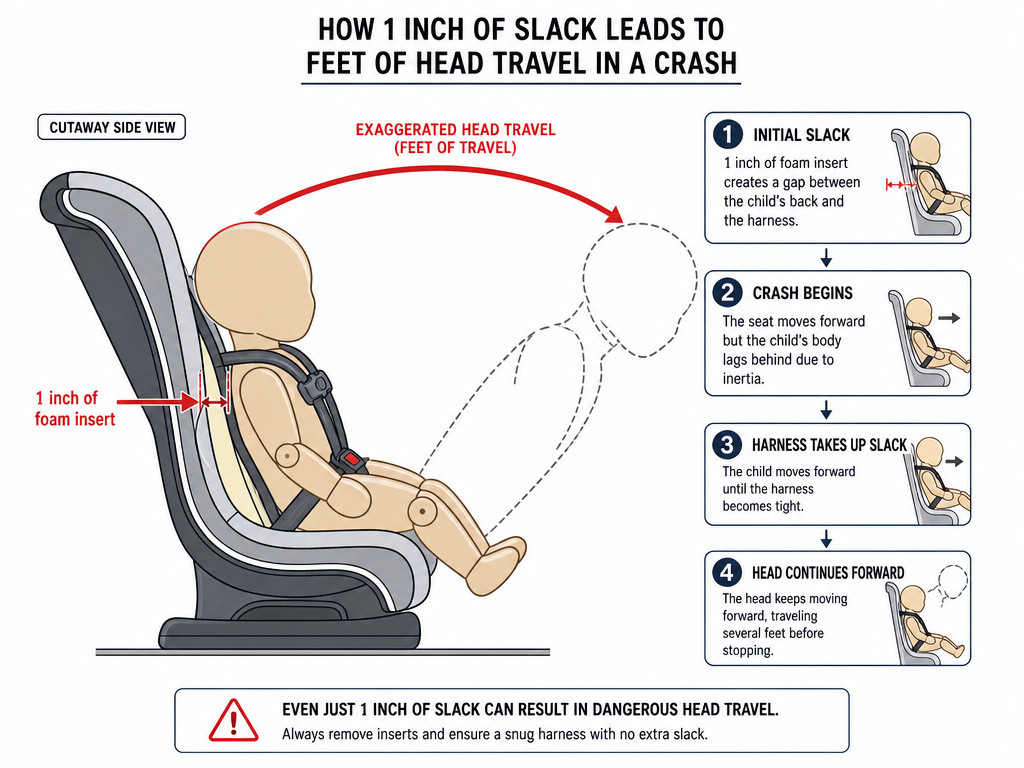
The consequences are physical and measurable. You will see them, feel them, and hear them.
First, the fit changes. You’ll find yourself cranking the harness adjuster strap harder to get it tight enough. The straps will seem shorter, or they’ll cut into your baby’s neck because the child is now sitting farther forward in the shell. The chest clip will sit too low, potentially resting on the abdomen instead of at armpit level.
Second, you introduce slack. Even if the harness feels tight over the bulky insert, the child’s body isn’t held firmly against the seat back. In a crash, that space allows for harmful forward movement. Think of it like a seatbelt worn over a puffy winter coat, it seems tight, but the body can still move inside the coat.
Third, you risk positional asphyxiation. A too-large child slumped in a space meant for a smaller infant can have their chin drop to their chest, restricting their airway. This risk is highest when the seat is used in stroller mode during a long walk and the child falls asleep.
The timeline isn’t years. It’s weeks. If your baby has hit the 11-pound mark or their shoulders are above the slots, the insert becomes a liability within a single car ride. There’s no grace period.
Head Support vs. Infant Insert: What Stays, What Goes
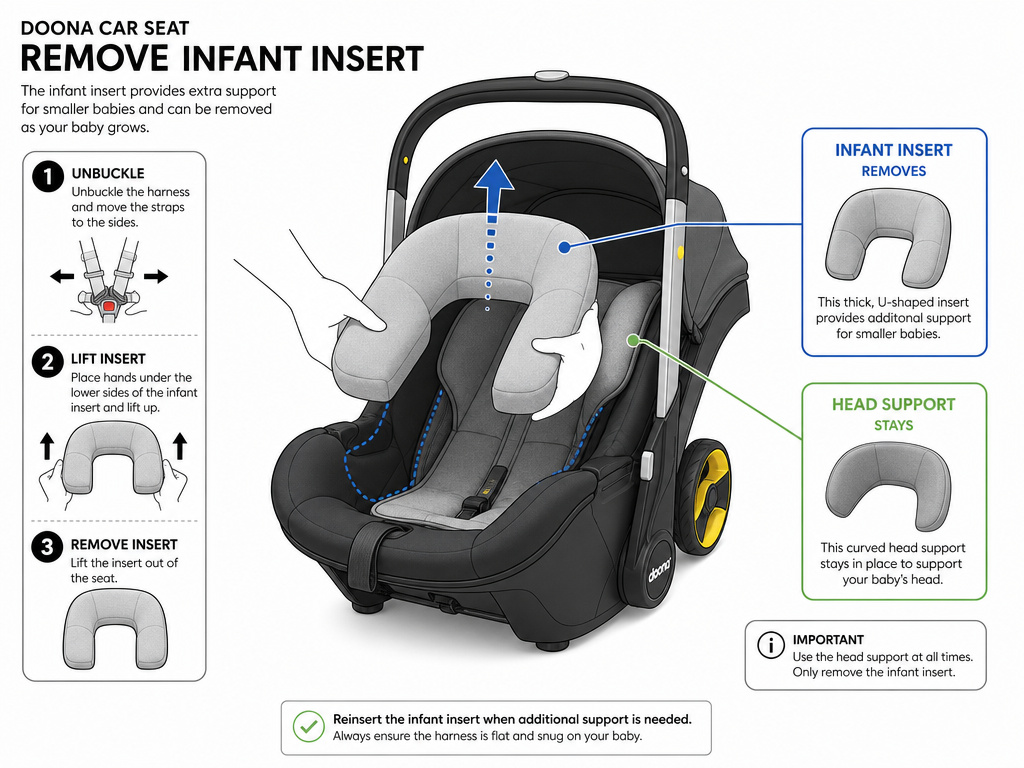
This is where even seasoned Doona users get tripped up. The infant insert (#26) and the head support are two separate pieces with two separate jobs.
The infant insert is the thick, U-shaped pad that sits in the seat bucket. Its job is positional support for a newborn’s spine and pelvis. It comes out per the 11-pound or shoulder-slot rule. It is not optional for newborns under those limits.
The head support is the curved, padded piece that wraps around the sides and back of the child’s head. Its job is lateral and side-impact containment. Doona’s official line is to never remove it: “NEVER place your child in the Doona Car Seat without the Head Support.”
The part nobody mentions: Doona’s own FAQ states, “the carseat successfully passed the FMVSS 213 in all instances, both with and without the head support and with and without the infant insert.” This is why some parents, at their discretion, remove the head support in stroller mode if their child finds it uncomfortable as they grow.
The manual’s warning is about car seat mode, where side impacts are a real risk. In stroller mode, on a smooth sidewalk, the risk profile changes. I kept the head support in for car rides but took it out for long stroller walks in the heat after my son started sweating and fussing. That’s a judgment call you make knowing the seat passed testing without it. The infant insert has no such flexibility, when it’s out, it’s out.
The Shoulder-Slot Check: A Visual Guide
Reading the manual’s instruction is one thing. Seeing it is another. Let’s translate “shoulders above the lowest shoulder strap slots” into something you can action.
- Remove the infant insert. Take it completely out of the seat.
- Sit your baby in the seat. Buckle the harness loosely so they are positioned as they would be for a ride.
- Locate the lowest slots. Look at the back of the seat shell. You’ll see a set of slots where the harness straps come out. The lowest pair is set close to the seat bottom. These are slots #20 in the manual.
- Find the shoulder line. Look at your child’s shoulders. Imagine a straight line running from one shoulder point to the other.
- Compare. Is that imaginary shoulder line above the top edge of the lowest slot openings? If yes, the insert must be removed. If the shoulders are at or below the slots, the insert can stay, but only if your baby is still under 11 pounds.
This check overrides everything. A long-torso baby can hit this limit before they hit 11 pounds. If you only go by weight, you’re using a seat in an untested configuration.
What About Other Car Seat Inserts?
The Doona’s rules are specific to its design. Other brands have different thresholds. The Chicco KeyFit 30 insert comes out at 11 pounds. The UPPAbaby Mesa insert has a removable head pillow and body insert with similar weight-based rules. The Graco SnugRide SnugLock 35 DLX’s insert is often removed around 8-10 pounds, but you must check its manual.
The principle is universal: the insert is for positioning a tiny newborn so the harness fits. Once the harness fits without it, the insert becomes a spacer that creates slack. Never assume the rules are the same across brands. Always check the manual for your specific model, like the guidelines for removing the Joie newborn insert, which may differ.
Worth knowing before you start: If you’re switching between a Doona and a second car seat, you have to track two separate sets of rules. What applies to your Doona car seat doesn’t automatically apply to your travel system’s main seat. This is a common point of failure in multi-vehicle households.
The purpose of a car seat newborn insert is safety, not comfort. When it starts compromising the harness fit, its job is done.
Frequently Asked Questions
When do most babies outgrow the Doona infant insert?
Most babies reach the 11-pound weight limit between 2 and 3 months of age. That’s the typical point for removing the newborn insert. However, a baby with a long torso might outgrow it by the shoulder-slot test earlier, sometimes as soon as 6-8 weeks.
Can I use the Doona without the infant insert from birth?
No. The manual is clear: you must ALWAYS use the infant insert if your child weighs below 11 lbs (5 kg) OR if their shoulders are below the lowest harness slots without it. Using the seat without the insert for a too-small infant creates dangerous gaps and improper harness routing.
Does the head support come out with the infant insert?
No. Doona instructs you to “Keep using the Head Support in the Doona Car Seat even after removing the Infant Insert.” It remains for side-impact protection. However, the seat passed federal safety standards (FMVSS 213) without it, so some parents remove it in stroller mode for a older child’s comfort.
What if my baby is under 11 lbs but their shoulders are above the slots?
Remove the insert. The shoulder-slot rule overrides the weight rule. The seat is certified for safe use only when the harness straps are at or below the child’s shoulders. If that’s not possible without the insert, the insert has to go.
How do I clean the Doona infant insert?
The insert’s fabric cover is removable and machine washable on a gentle cycle. Air dry it completely before putting it back on the foam core. Do not wash the foam itself or put it in the dryer, as it can degrade the material’s safety properties.
Before You Go
The Doona’s infant insert has one job: to make a too-small body fit the seat correctly. Its retirement is dictated by two hard lines, 11 pounds on the scale, or the shoulders rising above those lowest harness slots. The weight limit is easy to check. The shoulder test is what you need to learn.
Forget the insert the day your baby passes either mark. The space it leaves behind isn’t empty; it’s what your growing child now fills. The head support stays because its job, cradling the head in a side impact, isn’t done. And thread that harness buckle through the hole at the bottom of the insert every single time you put it back in. Miss that step once, and the whole system is just a well-padded seat, not a car seat.
Check the fit monthly. Growth isn’t linear, and a week can make the difference between a perfect fit and a dangerous one. When it’s time, pull the insert, re-thread the buckle, and snap your child in. That’s the transition.
