
Your Guide on How to Install a Doona Car Seat Properly (49 chars)
This post contains affiliate links. As an Amazon Associate, we earn from qualifying purchases.
To install a Doona car seat, you must match the car seat’s mode to your chosen method: use Car Seat Mode with the handle in Position C for seat belt installation, or use the LATCH Base with its visual red-to-green lock indicator. The critical failure point isn’t the hardware—it’s the handle position and belt routing, which if wrong, leave over an inch of lethal movement in a crash.
That “over an inch” is the measurable gap between a correct install and the one I see weekly in parking lots. The manual’s specs are precise, but they assume a perfect world with long seat belts and flat vehicle seats. Real cars have short belts, buckles that dig into plastic, and seats that slope. Your job is to force the Doona’s design to work within those limits, not just follow the pictures.
What follows: the two certified paths (with base and without), the three visual checks that override any doubt, and the exact reason most seat-belt installs fail before the first mile.
Key Takeaways
- The Doona handle must be in Position C (the anti-rebound position) for any seat belt installation. Using the wrong handle position is the most common critical error.
- The LATCH Base provides a foolproof visual check: a red-to-green indicator on the base itself confirms a proper lock. No guesswork.
- For seat belt installs, you must use the “European” routing method, wrapping the shoulder belt behind the seat back, unless your vehicle’s belt is too short.
- After any installation, perform the “one-inch test”: grasp the car seat at the belt path and tug. It should not move more than one inch side-to-side or front-to-back.
- Always register your Doona car seat and base with the manufacturer to be notified immediately of any safety recalls.
Before you start: Never install any rear-facing car seat in front of an active airbag. The vehicle seat must be flat and clear of debris. In a crash, a seat installed on a sloped cushion or over a misplaced toy can rotate violently, compromising the entire safety system.
The Two Paths: Doona Base vs. Seat Belt
You have two certified installation methods: using the dedicated Doona LATCH Base or using your vehicle’s seat belt directly. This isn’t a minor choice. The base is designed for a rigid, repeatable connection that eliminates human variables. The seat belt method is versatile for taxis, rentals, and grandparent cars but requires meticulous attention to angle and routing.
The base wins for daily use in your primary vehicle. Its built-in recline adjustment and visual lock indicator remove the two biggest guesswork factors. The seat belt method is your capable backup, but it shifts the burden of precision onto you every single time.
So which is safer? When installed perfectly, both meet the same federal safety standards. The base simply makes a perfect install more likely, especially when you’re tired, rushed, or installing in an unfamiliar car. Your goal is to make the correct install the easiest one to achieve.
Do You Actually Need the Doona Base?
No. The Doona car seat is fully certified for safe seat belt installation without its base. Many parents use it this way exclusively, especially for travel. The question isn’t about safety—it’s about convenience and consistency.
The base requirement is a trade-off. If you consistently use multiple vehicles or need to quickly move the seat, mastering the base-free installation is a essential skill. If the Doona lives in one car 95% of the time, the LATCH Base is a worthwhile investment for its ease and error-proofing.
Installing With the Doona Base: The Foolproof Method
The Doona LATCH Base turns installation from a puzzle into a plug. The system uses your vehicle’s lower LATCH anchors or, alternatively, the seat belt to secure the base itself. Then, the car seat clicks onto the base, with a clear color-coded signal to confirm the lock.
The Doona Base Installation Checklist
Follow this sequence. Skipping a step can leave the base insecure.
| Step | Action | What to Look For |
|---|---|---|
| 1. Prepare Vehicle Seat | Clear all debris. Ensure seat is flat. | No toys, crumbs, or raised seat covers under the base footprint. |
| 2. Position Base | Place base on vehicle seat. Extend support leg (if present) to floor. | Base sits flat against seat back. Support leg contacts vehicle floor firmly. |
| 3. Connect LATCH | Attach LATCH connectors to vehicle anchors. Tighten strap. | A distinct “click” and no slack in the strap. Base should not shift. |
| 4. Install Car Seat | Place Doona (in Car Seat Mode) onto base. Press down until click. | The base’s visual indicator changes from red to green. |
| 5. Final Check | Tug seat at belt path. Confirm handle is rotated back. | Less than one inch of movement. Handle is against the back of the vehicle seat. |
The base release button also turns from red to green when the car seat is locked. See two greens—one on the indicator, one on the button—before you walk away.
The most common mistake here is not tightening the LATCH strap enough. You should need to put your body weight into it. A loose base is a dangerous base. If you’re using the seat belt to secure the base instead of LATCH, the same rule applies: pull the belt taut until the base does not budge.
For a detailed walkthrough on connecting to your car’s anchors, see our guide on how to install a car seat base with anchors. If your vehicle requires using the belt for the base, our tutorial on installing base with belt covers the specific locking steps.
Installing Without the Doona Base: The Precision Method
This is where most mistakes happen. The official user guide lists this as the “preferred” method, but it demands precision. You are the locking mechanism.
First, set the car seat up correctly:
- Ensure the Doona is in Car Seat Mode (wheels retracted).
- Rotate the handle to Position C. This is non-negotiable. Position C is the anti-rebound position designed for crash dynamics.
- Place the seat rear-facing on the vehicle seat.
Next, route the vehicle seat belt. You have two approved options:
- Lap-Shoulder Belt (European Installation): This is the preferred method. Route the shoulder belt behind the seat back, down through the designated lap-belt guides on the handle, and buckle in. This creates a wraparound lock.
- Lap-Shoulder Belt (Standard Installation): Use this only if your vehicle’s shoulder belt is physically too short to wrap behind the seat. Route the belt directly through the lap-belt guides on the handle.
Where this goes sideways: Using the wrong handle position. Position A or B will not hold during a crash. The seat will over-rotate, and the child’s head can strike the vehicle interior. Position C every time.
After buckling, lock the seat belt according to your vehicle’s manual (usually by pulling it all the way out and letting it retract). Then, press down firmly into the vehicle seat cushion and tighten the belt. Remove all slack.
Finally, check the angle using the red level line sticker on the side of the Doona. Adjust the seat’s position until the red line is parallel to the ground. A too-upright seat can compromise an infant’s airway; a too-reclined seat reduces crash protection.
For a visual guide on this specific process, see our article on how to install the Doona without its base.
The Non-Negotiable Safety Checks
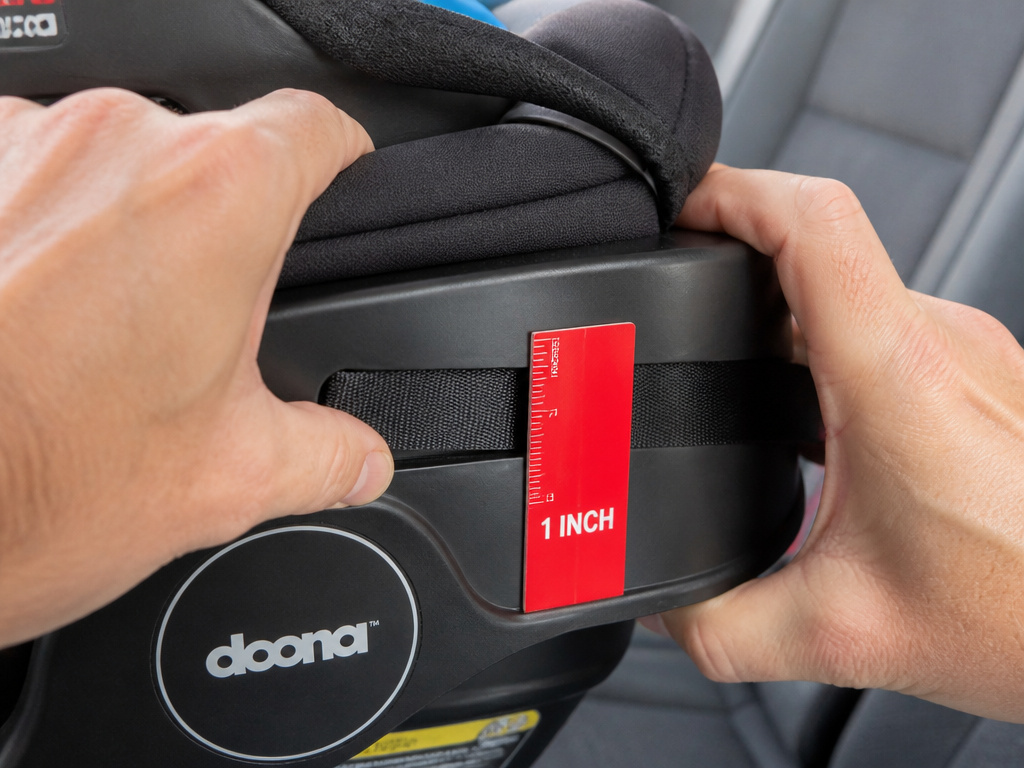
Installation is only half the job. Verification is what separates a guess from a guarantee. Perform these three checks every single time.
-
The One-Inch Test: Grasp the Doona car seat at the seat belt path (where the belt goes through the handle or base). Try to move it side-to-side and front-to-back. It should not move more than one inch in any direction. More movement means it’s not tight enough.
-
The Harness Pinch Test: Once your child is secured in the 5-point harness, try to pinch the harness strap vertically at the child’s collarbone. If you can pinch a fold of the webbing, the harness is too loose. It should be snug against the body with no slack.
-
The Visual Indicator Check (Base Only): Confirm the base’s lock indicator is solid green, not red. A red indicator means the car seat is not fully latched onto the base.
If any check fails, uninstall and start over. Do not proceed. These checks take 15 seconds and are the final gate before your child’s safety is entrusted to the system.
Common Doona Installation Mistakes & Fixes
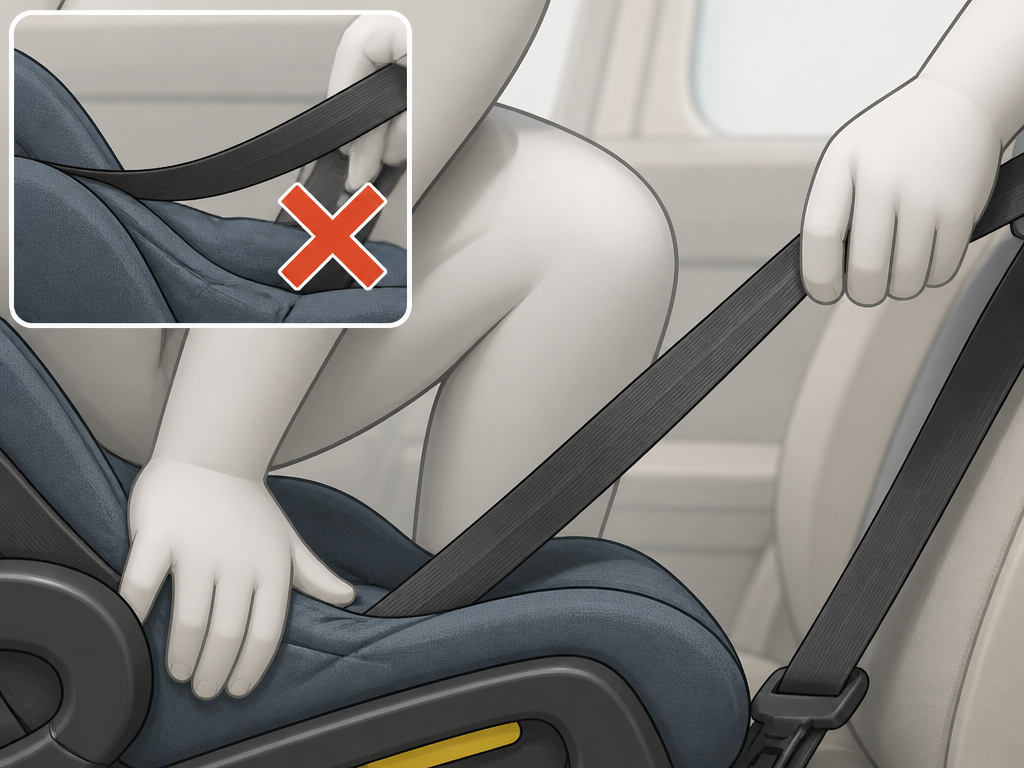
Even with the manual, predictable errors pop up. Here’s what goes wrong and how to fix it.
| Mistake | Why It’s Dangerous | The Fix |
|---|---|---|
| Wrong Handle Position | Eliminates anti-rebound protection, allows excessive rotation. | Always use Position C for vehicle installation. |
| Loose Seat Belt | Allows catastrophic seat movement in a crash. | Use your knee to press the Doona down into the vehicle seat while pulling the belt tight. Re-lock. |
| Ignoring the Red Level Line | Incorrect recline can injure an infant’s neck or reduce effectiveness. | Use a rolled towel or pool noodle under the foot of the seat (only if allowed by manual) to level the red line. |
| Double-Locking (Base) | Using both LATCH AND a seat belt to secure the base. This is not approved. | Pick one method: LATCH or seat belt. Never both. |
| Unregistered Seat | You won’t be notified of a critical safety recall. | Register your Doona car seat and base online immediately after purchase. |
The “loose seat belt” error is the most persistent. People are afraid to pull too hard. Pull harder. The belt should be guitar-string tight. If you can easily twist the belt webbing, it’s not tight enough.
Frequently Asked Questions
Can you use the Doona car seat without the base on an airplane?
Yes. The Doona is certified for aircraft use only without the base. You must use the aircraft’s lap belt and follow the Lap Belt Installation instructions in the manual. The handle must be in Position C. Contact your airline in advance to confirm their policy.
How do I know if my Doona is properly locked into the base?
The base has a visual indicator window. When the car seat is correctly latched, this indicator changes from red to green. Additionally, the release button on the base will also turn from red to green. Two green signals mean a secure lock. For the steps to reverse this, see how to remove the seat later.
What if my vehicle’s shoulder belt is too short for the European installation?
This is a common issue in older or smaller cars. If the shoulder belt cannot wrap around the back of the Doona, you must use the Standard Installation method. Route the lap-shoulder belt directly through the lap-belt guides on the handle. Do not force the belt or attempt an unapproved routing.
Is the Doona ISOFIX base different from the LATCH base?
Yes, but only in name and region. ISOFIX is the European term for the same lower anchor system that North America calls LATCH. The hardware is functionally identical. A Doona ISOFIX base is designed for European vehicle standards and certifications, while a LATCH base is for the US market. Do not mix markets.
How do I clean the Doona car seat after installation?
Remove the seat pad and harness straps according to the manual. Most components can be hand-washed in mild detergent and air-dried. Never submerge the car seat shell or base in water, and never use harsh chemicals, bleach, or machine washing/drying, as this can degrade the structural materials and webbing strength.
Before You Go
Installing a Doona car seat boils down to matching the right mode with the right method and then verifying with mechanical checks, not hope. The base is your set-it-and-forget-it tool for a primary vehicle. The seat belt method is your flexible, reliable plan B.
Whichever path you take, anchor your process in three things: the correct handle position (C), the one-inch movement rule, and the harness pinch test. Those three checks will catch 99% of dangerous errors. Print the checklist. Stick it in your car. This isn’t about passing a test. It’s about building a system that holds when everything else fails.
For a broader view of the principles behind a safe install, review our comprehensive car seat installation guide. It reinforces why each step here matters.
