
How to Install Car Seat in Third Row of Chevrolet Suburban
This post contains affiliate links. As an Amazon Associate, we earn from qualifying purchases.
Installing a car seat in the third row of a Chevrolet Suburban requires using the vehicle’s seat belt system, as lower LATCH anchors are not provided there. You must secure the seat with a tight seat belt installation and connect the top tether to the anchor on the back of the seatback. The fixed, non-adjustable head restraints are the main obstacle, often pushing the car seat forward and requiring you to route the tether strap around them for a proper fit.
That seat belt mandate changes the entire process. Most modern car seats are designed with LATCH in mind, but in the Suburban’s third row, the seat belt is your only primary attachment point. This shifts the focus to achieving a rock-solid seat belt lock and understanding how the top tether interacts with the rigid head restraint behind it.
What follows is the specific sequence for a seat belt install, the proven workaround for the head restraint interference documented in real fit tests, and the one booster seat quirk that frustrates older kids every time.
Key Takeaways
- The third row of a Chevrolet Suburban does not have lower LATCH anchors. You must use the vehicle’s seat belt for every car seat installation in that row.
- The fixed, non-removable head restraints can push forward-facing seats off the seatback. The tested fix is to route the top tether strap around the sides of the head restraint, not over it.
- Top tether anchors are located on the back of the third-row seatback. You must use them for all forward-facing installations.
- The “floppy” seat belt buckles in the third row can make it difficult for children to buckle their own booster seats independently.
- Always consult both your car seat manual and the 2025 Chevrolet Suburban owner’s manual for model-specific diagrams and warnings.
The Three Non-Negotiable Steps for a Third-Row Installation
Forget LATCH. In the Suburban’s third row, your process is built around the seat belt. Getting this right is a matter of mechanics, not guesswork.
A proper seat belt installation in the third row requires three confirmed actions: a locked seat belt, a correctly routed top tether, and less than one inch of movement at the belt path. Skipping the top tether on a forward-facing seat allows excessive head excursion in a crash, multiplying the risk of injury.
First, move the second-row seat forward. The third-row seatback needs space to recline slightly during installation. If the second row is all the way back, you won’t get the angle you need for a tight fit.
Second, place the car seat on the vehicle seat. For rear-facing seats, ensure the base is fully on the seat cushion. For forward-facing, press the back of the car seat firmly into the vehicle seatback before you even touch the belt.
Now, thread the seat belt. Follow your car seat manual’s specific belt path, rear-facing or forward-facing. Buckle it. Now, the critical move: pull the shoulder belt all the way out until you hear a click. This engages the automatic locking retractor (ALR). As you slowly release the belt, it will ratchet tight and lock. Use your full body weight, knee in the seat, to compress the car seat cushion while pulling the belt slack through.
Check for less than one inch of movement at the belt path. If it moves more, unbuckle, let the belt fully retract to reset it, and start again.
The Fixed Head Restraint Problem (And the Workaround)
This is where standard advice fails. The 2025 Suburban manual states the third-row outboard head restraints are not adjustable or removable. A 2020 Suburban fit test by Cars.com found these fixed restraints pushed a forward-facing convertible seat off the seatback, compromising the fit.
The manual says to route a tether over the seatback if no head restraint exists. It doesn’t address a rigid, interfering one. The practical solution from that real-world test is to route the tether around the restraint.
Do not ignore the gap. A car seat tipped forward by a head restraint is not properly braced. In a crash, that gap allows rotation, increasing the force on the child’s neck.
| Head Restraint Scenario | Correct Tether Action | Risk If Done Wrong |
|---|---|---|
| Forward-facing seat, fixed restraint | Route tether strap around the sides of the head restraint, then connect to anchor. | Seat is pushed forward, creating a pivot point and allowing dangerous head excursion. |
| Forward-facing seat, removable restraint (not in Suburban 3rd row) | Remove restraint, route tether over seatback, connect to anchor. | Using a removed restraint as a projectile hazard in the vehicle. |
| Rear-facing seat | Head restraint does not affect installation. Ignore it; focus on seat belt tightness and correct recline angle. | N/A |
For booster seats, the head restraint is less of an issue for fit but can be uncomfortable for the child. The larger problem is the buckle.
Where this goes sideways: The “floppy buckle” stalks in the third row. The buckle doesn’t stay upright, making it frustratingly difficult for a child to latch independently. You’ll be climbing back there to help every time.
Seat Belt vs. LATCH: Why the Third Row is Different
You might be used to the ease of LATCH installation. In the Suburban’s third row, that’s not an option. Understanding this limitation is key to accepting the seat belt method.
Lower LATCH anchors are metal bars between the seat cushions. In most SUVs, they are only installed in the second-row outboard seats to meet federal standards. The third row almost never has them. The Suburban follows this pattern.
This makes your seat belt installation skill the most important factor. A properly locked seat belt installation is equally as safe as LATCH. The challenge is achieving it consistently.
- The seat belt system is stronger. Vehicle seat belts are engineered to restrain adult-sized passengers. They have a higher weight capacity than LATCH anchors, which typically have a 65-pound combined child-and-seat limit.
- It requires more technique. You must find the correct belt path, engage the locking mechanism, and remove all slack. There’s no satisfying “click” of a LATCH connector.
- You cannot use both. Never attempt to use the seat belt and lower LATCH anchors together. This is a critical LATCH and seat belt error. The systems can fight each other, creating hidden slack. Pick one: in the third row, the seat belt is your only choice.
If you’re moving a seat from a LATCH position in the second row to a middle seat installation in the third, you’re already switching systems. The principle is the same for a middle seat without LATCH.
Top Tether Anchors: Find Them and Use Them
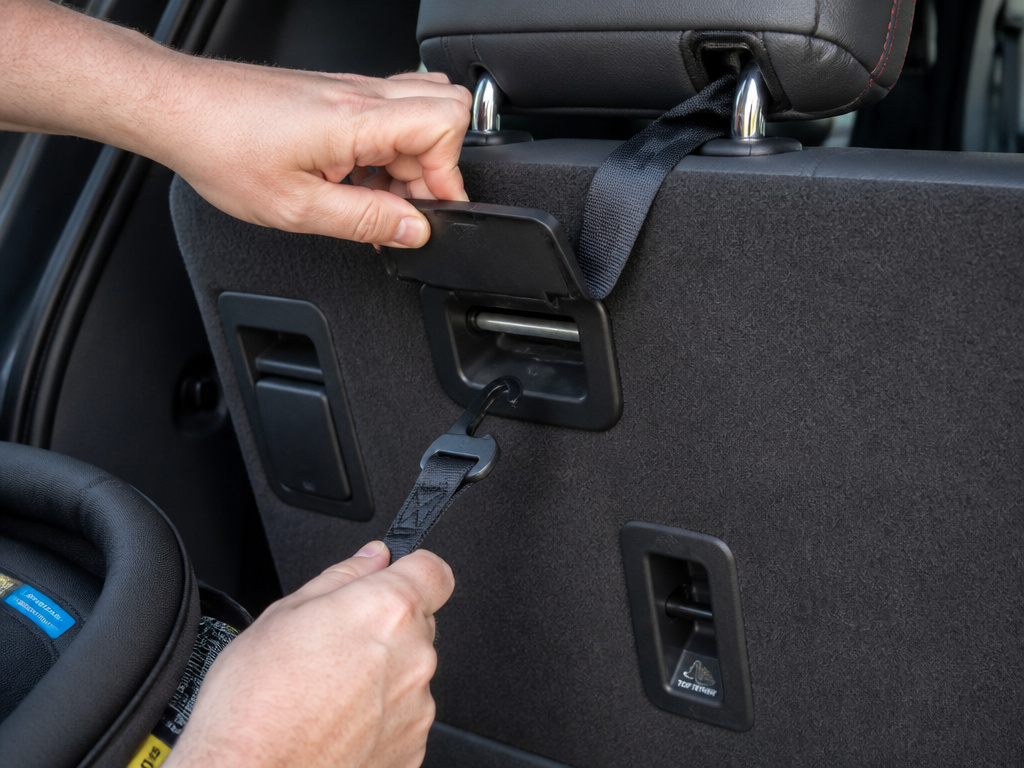
If the car seat is forward-facing, the top tether is not optional. It’s the final piece that controls head movement. In the Suburban, these anchors are on the back of the third-row seatback.
Open the liftgate and look at the rear of the seatback. You’ll see three plastic covers or metal bars near the base, behind each seating position. These are the top tether anchors.
Use the anchor directly behind the seat you’re using. Do not cross-tether to an anchor from a different seating position unless your car seat manual explicitly allows it.
- Adjust the tether strap on your car seat to its full length.
- Route it around the head restraint (as described above).
- Connect the tether hook to the metal anchor bar. Ensure the hook is closed and secure.
- Tighten the tether strap according to your car seat’s instructions. You should remove all slack, but not lift the car seat off the vehicle seat.
A tight tether will slightly compress the back of the car seat into the vehicle seat. This is correct.
When You Need a Locking Clip
Most seat belts made after 1996 have a built-in locking feature (ALR or switchable retractor). The Suburban’s belts lock. However, if you ever encounter a lap-only belt or a belt that will not stay locked, perhaps in an older vehicle, you need a locking clip.
A locking clip is a small H-shaped metal piece that comes with your car seat. It’s not for everyday use in a modern Suburban, but knowing how to use it is part of comprehensive car seat installation knowledge.
Easy to miss: A locking clip must be placed within one inch of the latch plate on the seat belt webbing. Placing it too far away creates a levering effect and the belt will still loosen.
If you need to perform a seat belt for base installation for an infant seat, the same locking rules apply. The base must not move side-to-side or front-to-back more than one inch.
Booster Seat Specifics in the Third Row
Booster seats use the vehicle seat belt directly on the child. The installation is the child. The Suburban’s third row presents two unique issues.
First, the floppy buckle stalk. The seat belt buckle is on a flexible stalk that doesn’t stand up. A child must fish for it behind the booster seat cushion. It’s a fine-motor challenge that leads to frustration and improperly latched belts.
Second, ensure the lap belt lies low across the child’s thighs, not the stomach. The shoulder belt should cross the center of the shoulder. The fixed head restraint should not push the child’s head forward uncomfortably. If it does, you may need a different booster with a lower back.
Safety Verification Checklist
Before you drive, run through this list. Every item must be checked.
- [ ] Seat Belt Lock: Did you pull the shoulder belt all the way out to engage the ALR lock?
- [ ] Less than 1″ of Movement: Grab the car seat at the belt path and pull firmly. It should not move more than an inch side-to-side or front-to-back.
- [ ] Top Tether (Forward-Facing): Is the tether connected to the correct anchor and tightened snugly?
- [ ] Head Restraint Check: For forward-facing seats, is the car seat back flush with the vehicle seatback? If a gap exists, re-route the tether around the head restraint.
- [ ] Buckle Position: For boosters, is the latch plate fully inserted into the buckle? Can the child unbuckle it in an emergency?
This final check takes 60 seconds. It catches the errors that matter.
Frequently Asked Questions
Can I use LATCH in the third row of a Suburban?
No. The third-row seating positions in the Chevrolet Suburban are not equipped with lower LATCH anchors. You must use the vehicle’s seat belt system for every car seat installation. Always use the top tether anchor for forward-facing seats.
How do I deal with the headrest that won’t move?
You work around it. For a forward-facing car seat, route the top tether strap around the sides of the fixed head restraint, then connect it to the anchor on the back of the seat. This pulls the top of the car seat back, counteracting the forward push from the restraint. Do not try to remove it; it is not designed to come out.
Is the third row safe for a car seat?
Yes, provided the seat is correctly installed. The safety of third row seats hinges on proper installation using the seat belt and top tether. The main considerations are ensuring a tight fit and being aware that the third row is farther from the primary point of impact in certain crash types.
My seat belt won’t stay tight. What do I do?
Ensure you are fully engaging the locking mechanism. Pull the shoulder belt all the way out until it clicks and ratchets. If the belt still will not lock, you may need to consult a proper seat belt installation method guide or learn how to properly use a locking clip. In a modern Suburban, the belt should lock.
Can I install a rear-facing seat in the third row?
Absolutely. The process is the same as a forward-facing install regarding the seat belt: use the belt, lock it, get a tight fit. You will not use the top tether. Ensure the car seat is at the correct recline angle as per its manual, which may require adjusting the third-row seatback angle if possible.
The Bottom Line
Installing a car seat in the Suburban’s third row is a seat-belt-only operation. Master that technique. The fixed head restraint is a known obstacle for forward-facing seats, route the tether around it, not over it. For boosters, accept that you’ll be helping with the floppy buckle. The third row is a viable, safe location once you adapt to its specific rules. Your final authority is always the combination of your car seat manual and the vehicle’s own documentation.
