
Guide: How to Adjust Your Infant Car Seat Straps Correctly
This post contains affiliate links. As an Amazon Associate, we earn from qualifying purchases.
Adjust infant car seat straps by setting the harness height at or just below the child’s shoulders, threading them straight and twist-free, and tightening until you cannot pinch any slack at the collarbone. This three-part check—height, path, tightness—is what keeps a baby secure in a crash, and skipping any one of them is how the National Highway Traffic Safety Administration (NHTSA) found 46% of car seats have at least one critical error.
The 46 percent figure comes from a federal study of real installations. That error rate means nearly half of all car seats wouldn’t perform as engineered in a collision because of something a caregiver did or didn’t do during the daily buckle-up.The harness is the direct physical link between your child and the seat’s protective shell. Get it wrong, and crash forces get redirected to the wrong parts of a small body.
What follows breaks down the adjustment into three non-negotiable specs, shows you where your specific seat hides its adjustment points, and names the one maintenance task that keeps the whole system working when you need it most.
Key Takeaways
- Harness height is the first and most frequent mistake. For rear-facing seats, the straps must pass through slots at or just below the shoulders. An inch too high adds dangerous slack in a crash.
- A proper tightness check uses the pinch test: try to pinch the harness strap vertically at the child’s collarbone. If you can gather any material, it’s too loose.
- Dirt and debris jam the harness adjuster mechanism. Cleaning the button and strap isn’t about looks; it’s about ensuring you can cinch the harness tight enough in an emergency.
- Bulky coats and snowsuits create a deadly air gap. Always buckle the harness snugly over thinner layers, then put the coat on backwards over the secured child.
- Model matters. A Britax uses a harness yoke on the seat back. A Cybex uses a splitter plate under the seat. Knowing which you have decides whether you adjust from the front or must take the seat out.
The 3-Step Adjustment Sequence
You don’t adjust a harness by feel. You follow a sequence. Height first, then path, then tightness. Change the order and you’ll fight the straps every time.
Step 1: Set the Harness Height Correctly
This is the step most people get wrong once their baby grows out of the newborn curl. The rule is absolute for rear-facing seats: the harness straps must come through the seat’s shell at or just below the child’s shoulders.
Where this goes sideways: Placing straps above the shoulders on a rear-facing seat. In a frontal crash, the child’s body is forced upward and backward. Straps that start above the shoulders allow the torso to ramp up, creating slack and increasing the risk of the head striking the seat back or being ejected.
The physics are simple. The straps need to hold the child down into the seat’s protective cocoon. If the anchor point is too high, the child can submarine upward. Transport Canada’s official guidance mirrors every manufacturer manual on this point.
Your seat has one of two systems to change the height. An externally adjustable harness lets you move a headrest up with a handle, sliding the straps with it. The Graco 4Ever is a common example. A re-thread harness requires you to pull the straps out of the current slots and re-thread them into higher ones on the seat back. The Britax B-SAFE 35 uses this method.
| Harness Type | How to Adjust | Best For | The Catch |
|---|---|---|---|
| Externally Adjustable | Lift headrest/button on seat back. | Quick growth spurts; easy in-vehicle changes. | Mechanisms can jam if not kept clean. |
| Re-Thread | Remove child, unthread straps, re-thread into new slot. | Simplicity; no moving parts to break. | Requires seat removal for adjustment. |
In short: Match the strap slot to the shoulder. Not the ear. Not the arm. The bony point of the shoulder.
Step 2: Ensure a Straight, Twist-Free Path
A twisted strap doesn’t lie flat. It concentrates crash forces on a narrow band of webbing instead of distributing them across the full width. This can reduce the strap’s effective strength and leave marks on your child.
Run your fingers down the entire length of each strap from the buckle tongue back to the seat shell. Look behind the child’s back and under the thighs. The Joie Saffron-SI manual is explicit: “Ensure the harness straps are free from twists.”
If you find a twist, you must fully loosen the harness to undo it. For seats with a front adjuster strap, press the release button and pull the straps forward. For seats like the Cybex ATON 2 that adjust from the back, you’ll need to turn the seat over.
Common mistake: Trying to straighten a twist by rotating the buckle tongue. This often just moves the twist to a less visible spot behind the child. Always loosen fully, lay the strap flat, then retighten.
Step 3: Achieve and Verify Snug Tightness
“Snug” has a test. It’s called the pinch test. After buckling and tightening, try to pinch the harness strap vertically at the child’s collarbone. If you can gather any webbing between your fingers, the harness is too loose.
The Safe Kids Worldwide car seat guide makes this their fourth key tip for a reason. Your hand is a better gauge than your eyes.
Why does this matter? A Consumer Reports harness adjustment guide explains that a loose harness allows excessive forward and upward movement in a crash. The child can slam into the seat’s interior or, in extreme cases, be partially ejected.
Do the pinch test every single time. Winter coats, thick sweaters, and even a child’s posture that day can change the fit.
Model-Specific Mechanics: Yoke vs. Splitter Plate
Not all infant seats adjust the same way. The mechanism hidden in the seat determines whether you can tighten the straps from the front or have to take the seat out of the car.
Harness Yoke System (e.g., Britax, Chicco KeyFit):
A plastic or metal “yoke” is mounted on the back of the seat shell. Both shoulder straps hook onto it. A single adjuster strap runs from the yoke down to the front adjustment button. When you pull the front strap, it pulls the yoke, tightening both shoulder straps evenly. To adjust the harness height, you slide the straps off the yoke and re-seat them in a different slot.
Splitter Plate System (e.g., Cybex ATON 2, Nuna PIPA):
The shoulder straps converge under the seat cushion at a metal or hard plastic “splitter plate.” The crotch strap also connects here. A single adjuster strap runs from this plate to the front. The Cybex ATON 2 manual is clear: if the straps need adjusting, “the child must be removed, and the infant carrier turned over to locate the Splitter Plate.” You adjust each strap length individually at this central plate.
The part nobody mentions: On splitter plate systems, you must adjust one strap at a time, using the other as a reference length. If you loosen both completely, you’ll never get them even again without a measuring tape.
Knowing your system tells you the right adjustment process. It turns a frustrating guess into a five-minute task.
Cleaning for Function, Not Just Looks
A harness adjuster button clogged with crumbs, sand, or dried spit-up will not release or catch properly. This is a functional failure that prevents you from achieving a safe, snug fit.
The Joie Saffron-SI manual dedicates a full section to cleaning the adjuster. The steps are specific: 1. Remove the seat cover to expose the button. 2. Push down on the lever on the back of the button to open the mechanism and expose the teeth. 3. Use a soft nylon brush to dislodge debris. A vacuum hose or damp cloth works for residue. 4. Never use harsh chemicals or submerge the strap.
This maintenance is a strap cleaning guide for safety, not hygiene. A clean mechanism lets you loosen the straps smoothly in an emergency and cinch them tight without fighting grit.
Do this every few months, or immediately if the adjuster starts to feel sticky or rough.
The Bulky Clothing Trap and Other Mistakes
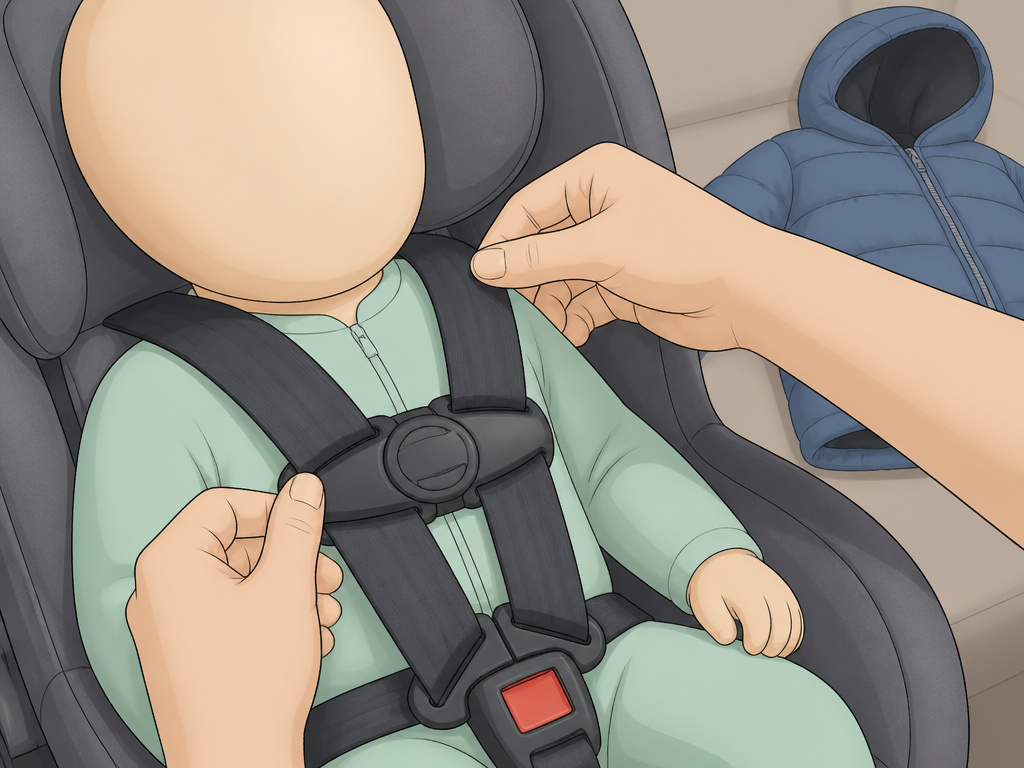
A puffy winter coat is the enemy of a properly fitted harness. You might think the coat is compressed, but in a crash, the force compresses it instantly, creating inches of deadly slack.
The safe method: Buckle your child in the seat with the harness snug over thin, tight layers like a onesie and leggings. Perform the pinch test. Then, put the winter coat on backwards over the already-secured child. Their arms go through the armholes from the front. The coat acts as a blanket, not part of the restraint system.
Other critical errors have direct consequences:
- Using Aftermarket Products: Strap covers, shoulder pads, or seat protectors not made and tested by your seat’s manufacturer can interfere with the harness path, twist geometry, or the seat’s ability to stay installed. They void your warranty and your safety assurances.
- Harness Behind the Back or Under the Arm: For an older child in a booster, this is a sign they are not ready. For an infant, it’s a catastrophic error that bypasses the 5-point harness entirely. The strap must be on the shoulder.
- Ignoring the Chest Clip: The chest clip’s only job is to keep the shoulder straps positioned. It must be at armpit level. Too low on the belly, and the straps can slip off the shoulders. Too high on the neck, and it’s a choking hazard in a crash.
These details are the difference between a seat that works and one that’s a plastic shell.
When to Adjust and When to Move On
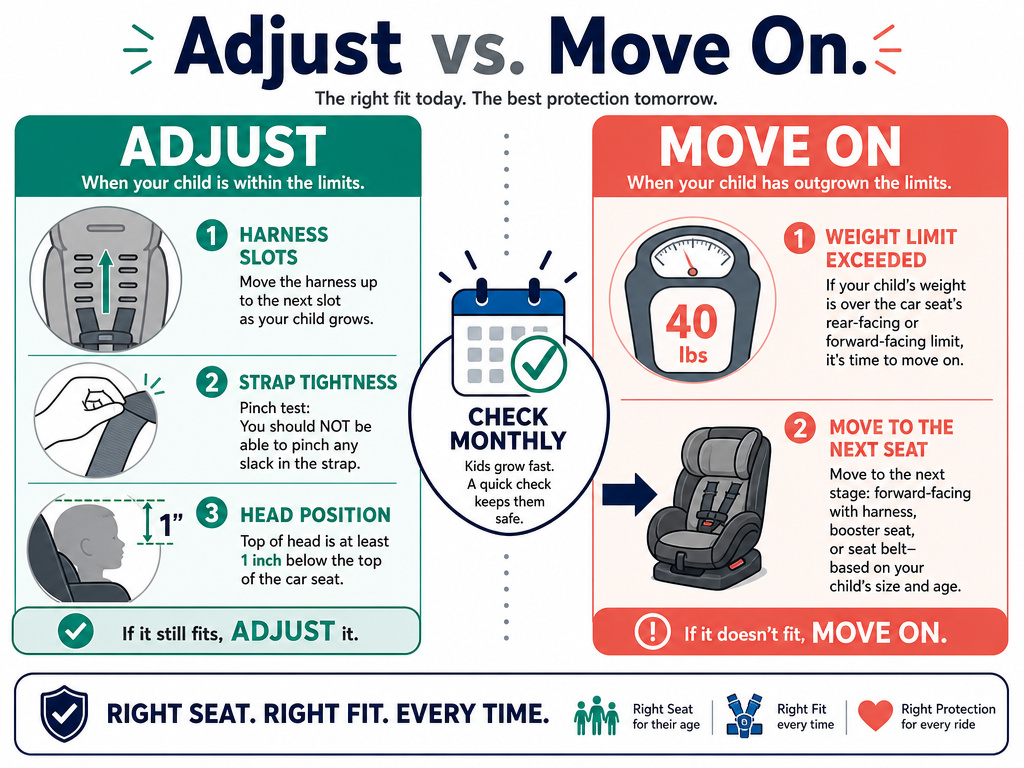
You don’t adjust forever. You adjust until the seat is outgrown, then you switch car seats. The triggers are clear.
Adjust (now):
- The shoulders are above the current harness slots.
- You can no longer get a snug fit with the pinch test.
- The top of the child’s head is within an inch of the seat shell’s top (per the Joie Saffron-SI manual’s 1-inch rule).
Move On (new seat):
- The child exceeds the seat’s maximum height or weight limit for rear-facing use.
- This means transitioning to a rear-facing convertible car seat, which has higher limits.
Check the fit every month. Growth isn’t linear, and a two-week spurt can change everything. This regular check is the core of knowing when to adjust.
Frequently Asked Questions
How often should I adjust the straps on my infant car seat?
Check the harness height and tightness every month. Adjust the height whenever the child’s shoulders rise above the current strap slots. You should be performing the pinch test to check tightness every single time you buckle your child in.
Can I adjust the straps with my baby in the seat?
For minor tightening or loosening using a front adjuster strap, yes. For any change to the harness height (moving straps to a new slot) or for addressing twists, you must take the baby out. This ensures you can see what you’re doing and don’t accidentally pinch them.
Why won’t my car seat straps tighten anymore?
The most common cause is debris jammed in the harness adjuster mechanism. Food, sand, or lint can block the teeth. Refer to your manual’s cleaning section. Other causes include a severely twisted strap caught in the mechanism or, rarely, a broken adjuster. If cleaning doesn’t fix it, contact the manufacturer.
What do I do if one strap is tighter than the other?
This usually indicates a twist in the webbing of the tighter strap or an uneven adjustment at the harness yoke or splitter plate. Fully loosen both straps, ensure both are routed identically and are twist-free, then retighten evenly. On splitter plate systems, you may need to manually even them out under the seat.
My child seems uncomfortable with the straps snug. Should I loosen them?
No. A safe harness is snug. Discomfort is often due to the chest clip being too high (rubbing the neck) or bulky clothing under the straps. Ensure the chest clip is at armpit level and that the child is dressed in thin, soft layers. A properly fitted harness should feel secure, not restrictive.
Before You Go
Adjusting an infant car seat harness is about geometry and force. The three-step sequence—height at or below the shoulders, a straight path, a pinch-test tightness—is the protocol that matches the seat’s engineering.Your model’s manual holds the specific map, whether it leads to a yoke on the back or a splitter plate underneath.
Keep the adjuster clean. Dress the child in thin layers. Check the fit monthly. When the shoulders creep above the top slots, you’re not just moving infant car seat straps up; you’re following the data that says getting this right is what the other 54 percent do.
