
Guide to Loosening Straps on an Infant Car Seat Correctly
This post contains affiliate links. As an Amazon Associate, we earn from qualifying purchases.
To loosen straps on an infant car seat, you must press the specific harness release button or lever while simultaneously pulling the harness straps forward, away from the child. On most seats, like the Chicco KeyFit or Graco SnugRide, this button is centered on the front of the seat between the child’s legs. Pulling the straps without pressing the button does nothing and can damage the internal ratchet.
That simultaneous press-and-pull is the only motion that disengages the locking mechanism inside the adjuster. Getting it wrong means you’re just fighting the seat, and a panicked pull when you need to get a baby out fast can leave you stuck.
What follows is the exact location for every major brand, what to do when the button won’t budge, and the one cleaning trick from a manufacturer that fixes 90% of “broken” adjusters.
Key Takeaways
- The release button is almost always on the front of the seat between the child’s legs. Press it firmly and hold it down.
- You must pull both shoulder straps forward at the same time you’re pressing the button. A slow, even pull works; a yank does not.
- If the button sticks or the straps loosen on their own, debris is the likely culprit. Clean the adjuster mechanism before anything else.
- Never lubricate a sticking harness adjuster with oil or WD-40. It attracts more grime and voids the safety certification.
- Always re-tighten the straps after loosening. A loose harness is a safety failure.
The Universal Two-Step Method
Find the button. Press it. Pull the straps. The sequence is simple, but the timing and pressure matter.
For rear-facing infant seats, the harness straps must be at or just below the child’s shoulders. Loosening the straps is the mechanical reverse of tightening them: you disengage the lock, then feed the webbing back through.
Step 1: Locate and Press the Release Mechanism
On 95% of infant seats, the harness release is a large, colored button or lever on the front of the seat shell, right between where the child’s legs would go. It’s designed to be operated with one hand. – Chicco KeyFit, Evenflo Secure Kid: A large button. Press straight down. – Graco SnugRide SnugLock 35 LX, Maxi-Cosi seats: A lever. Push it down. – Cybex Cloud T: A button labelled “Harness Adjustment Button (A)” in the manual. The button doesn’t need a hammer strike. A firm, sustained press is enough. If it doesn’t move, stop. Forcing it can snap plastic internals.
Step 2: Pull the Harness Straps Forward
While holding the button down, grasp both shoulder straps near the chest clip. Pull them evenly forward, toward the front of the seat. You are feeding the strap webbing back through the adjuster. – Do not pull upward or outward. Pull along the path the straps naturally take. – Do not yank. A smooth, steady pull of 6-8 inches is usually all you need. – If only one side loosens, you’re likely pulling unevenly. Reset, press the button again, and pull both straps together.
The harness should now be loose enough to open the chest clip and unbuckle the crotch buckle without dragging your child against the straps.
| Brand & Model | Release Type | Where to Pull | If It Doesn’t Work |
|---|---|---|---|
| Chicco KeyFit | Center Button | Shoulder straps at chest clip | Check for twisted straps behind splitter plate. |
| Graco SnugRide | Front Lever | Harness straps at chest clip | Ensure lever is fully depressed; pull straps out, not up. |
| Cybex Cloud T | Button (A) | Shoulder Straps (B) | Verify straps are at/below shoulders; clean mechanism. |
| Joie Saffron-SI | Adjustment Button | Straps (b) | Clean button/strap per manual page 105. |
Where Things Go Wrong (And How to Fix Them)
The mechanism is simple until it isn’t. A sticky button or a strap that loosens on its own signals a maintenance issue, not a design flaw.
When the Release Button Sticks or Feels Loose
A button that refuses to press, or one that feels mushy and doesn’t click, almost always has something trapped in it. The number one cause is food debris, crackers, cereal, melted fruit snacks, followed by sand and dried drink spills.
Common mistake: Spraying a sticking adjuster with lubricant. The Maxi-Cosi consumer care guide is explicit: “If the buckle or harness release lever sticks… Do not lubricate.” Lubricant attracts more dirt and can degrade the plastic and webbing, voiding the seat’s safety certification.
The fix is cleaning, not forcing. 1. Remove the seat pad according to your manual to expose the adjuster mechanism. 2. Use a vacuum with a crevice tool to suck out loose debris. 3. For sticky residue, use a damp cloth with mild soap. A soft-bristled toothbrush can dislodge grit. 4. Let the area dry completely before testing the button.
For a Joie Saffron-SI, the manual has a dedicated cleaning procedure on page 105 for when “straps loosen without pressing the adjustment button.” It involves pushing down on a lever on the back of the button to expose small teeth for cleaning.
Straps That Won’t Loosen Even When the Button is Pressed
If you’re pressing the button correctly but the straps won’t budge, the problem is usually downstream. – Twisted Straps Behind the Seat: The straps can twist around each other where they connect to the splitter plate on the back of the shell. This creates a knot that won’t feed through. You’ll need to adjust the car seat to remove it from the base, turn it over, and untangle the straps. – Chest Clip Jammed: A chest clip that’s slid too far down or is misaligned can pinch the straps, creating friction. Unsnap it first. – Severe Webbing Twist in the Harness Slot: A strap that’s been threaded incorrectly or has spun 180 degrees inside the shell’s plastic slot can bind. This requires fully removing the harness to fix, a sign it’s time for a deep strap cleaning guide.
The One Motion Everyone Misses
You’ve pressed the button. You’ve pulled the straps. The chest clip is open. Now what?
You must pull the slack up through the buckle tongues before you unbuckle. This is the critical step that prevents the final, tightest part of the harness from getting stuck in the crotch buckle.
After loosening the straps, grab the two strands of webbing below the metal buckle tongues (the parts that insert into the buckle). Pull them up toward the baby’s chest. This draws the last few inches of tight harness out of the buckle mechanism. Now when you press the red buckle release button, the tongues will pop out freely. If you skip this, you’ll fight to pry them out, and over time you can damage the buckle’s release spring.
This is also the secret to a smooth proper strap adjustment when you re-secure your child. That slack has to go somewhere manageable.
How to Fully Loosen Straps for Harness Removal or Cleaning
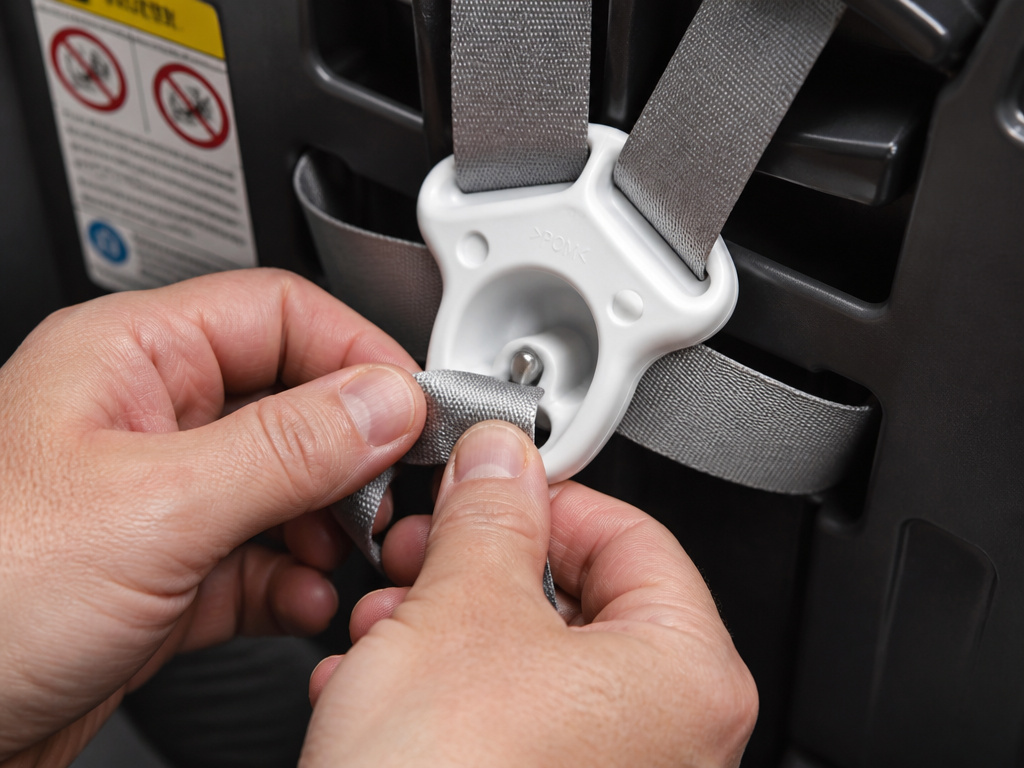
Sometimes you need to get the straps completely out, to wash the seat pad, to move straps up to a higher slot, or to troubleshoot a persistent problem.
This job requires accessing the splitter plate, a plastic Y or H-shaped piece on the back of the car seat shell where all the harness straps converge. The official steps from the Chicco KeyFit manual are the standard: 1. Turn the carrier over to expose the splitter. 2. Unhook one strap loop from the splitter plate. 3. Pull the loose strap end out of the seat pad and shell. 4. Re-attach the strap to the splitter after your adjustment.
Where this goes sideways: Not re-attaching both straps securely to the splitter plate. If one loop comes off, the harness loses all integrity. After any removal, tug hard on each strap from the front to ensure the splitter plate connection is solid before putting your child back in.
This process is why knowing when to adjust straps is about growth, but fully removing them is about maintenance. Don’t do the latter unless you have to.
Safety Check After Loosening and Re-Tightening
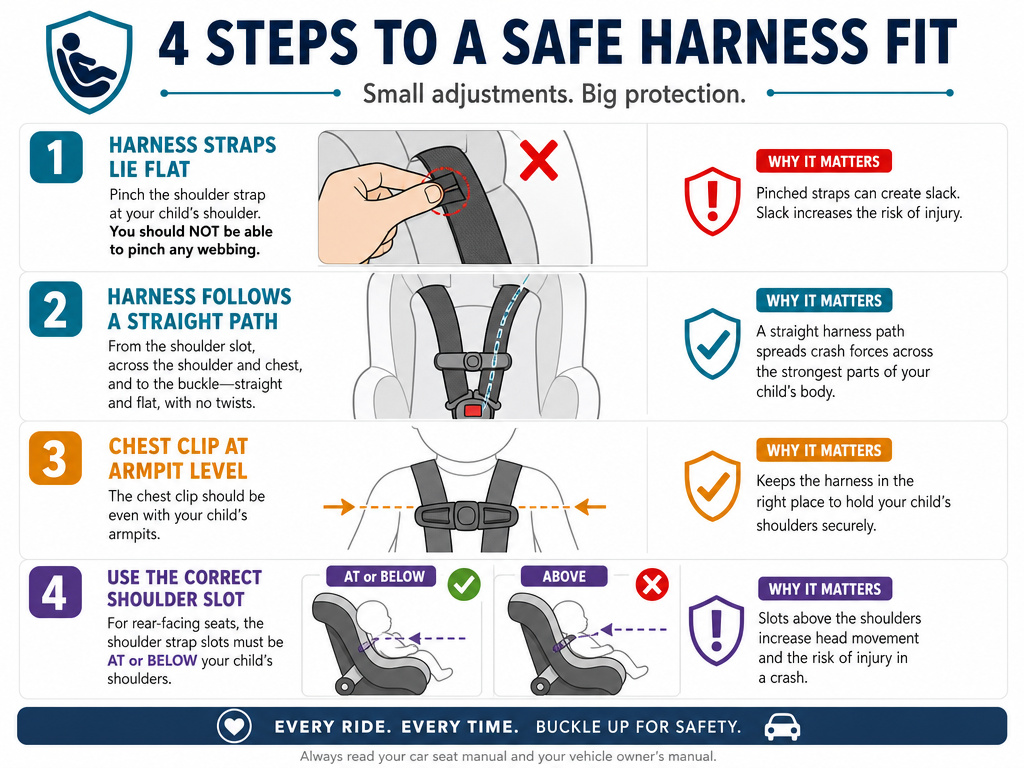
Loosening is only half the cycle. You must re-tighten correctly every single time.
- Pinch Test: After tightening the harness, try to pinch the webbing vertically at the child’s shoulder. If you can pinch a fold, it’s too loose. The strap should lie flat.
- Straight Line Check: The harness should run in a straight line from the back of the shell, over the shoulder, to the buckle. No slack, no sagging curves.
- Chest Clip Position: It must be at armpit level. Not on the belly, not on the neck.
- Shoulder Slot Position: For rear-facing, the straps must be at or just below the shoulders (Cybex Cloud T manual) or at or below (Chicco KeyFit). Never above.
If you consistently cannot get a snug fit, your child may be nearing the height or weight limit. That’s your cue to research the best next car seat, like a convertible model, as the next stage car seat.
Frequently Asked Questions
Why won’t my infant car seat straps loosen when I press the button?
First, ensure you are pulling the straps forward while the button is fully depressed. If that doesn’t work, check for twists behind the seat at the splitter plate or debris jammed in the adjuster mechanism. Forcing it can break the seat.
Is it safe to use lubricant on a sticky harness adjuster?
No. Manufacturer guides, like the one from Maxi-Cosi, explicitly warn against lubricants. They attract dirt and can degrade plastic and webbing. Clean the mechanism with a dry brush, vacuum, or damp cloth instead.
How loose should the straps be to get my baby out?
Loose enough that you can open the chest clip and unbuckle the crotch buckle without squeezing your child’s body or dragging them against the webbing. You should not have to forcibly compress your baby to get them out.
My straps keep getting loose on their own during drives. What’s wrong?
This is a critical failure. The internal locking mechanism in the adjuster is likely worn or fouled with debris. Stop using the seat immediately. Consult your manual for cleaning instructions (see Joie Saffron-SI manual, page 105) or contact the manufacturer. A harness that won’t stay tight cannot protect in a crash.
Before You Go
Find the button. Press it firmly. Pull the straps smoothly forward. That’s the motion. Remember the slack-pull through the buckle tongues. And if the button sticks, clean it, never oil it. A harness that loosens and tightens reliably is the baseline. Everything else, the chest clip, the shoulder height, the pinch test, builds on that one mechanical action working right. When it doesn’t, fix it before the next trip. Your car seat installation can be perfect, but if the harness doesn’t adjust, the seat hasn’t done its job.
